How to Level a Floor Before Tiling: 6 Beginner Tips 2026
To level a floor before tiling, you find the low spots, repair anything broken, grind down the high spots, prime the surface, and pour self-leveling compound or troweled thinset into the gaps. Most beginner jobs come down to a straight edge, a clean floor, and the discipline to follow the water-to-powder ratio on the bag.
The finished floor is the one that feels right underfoot and looks right at a doorway: no rocking tiles, no lippage where one edge sits proud of its neighbour, no hollow sound when you knock on it. That result comes almost entirely from what you do to the subfloor, not from the tile itself.
Contents
Fall is a good time for this. Concrete and basements are drier in the autumn, and you have room to let a floor cure without rushing the tile set. Before the holiday push starts, a weekend of measuring and a couple of days of cure buys a floor that lasts decades.
Time: one weekend of prep plus 1 to 3 days of curing, depending on the product
Cost: driven by area and fill depth; self-leveling underlayment is the priciest material per bag, and material prices shift by region
Difficulty: moderate DIY
Skill level: patient beginner with a drill and a straight edge
Tools and Materials
Gather everything before you start. Halfway through a pour with no primer on hand is a bad place to discover a gap.
Measuring and inspection tools
- 6 ft (1.8 m) straight edge or aluminum straightedge — the single most important tool. A 4 ft (1.2 m) edge is workable, but 6 ft shows you the long slow slope that a short edge hides.
- Box or torpedo level, 9 inch (23 cm) or 12 inch (30 cm), for checking the straight edge itself and for setting a constant reference height.
- Chalk line and chalk — snap a reference line across the floor so you can see the gap under the straight edge at a glance.
- Tape measure and a carpenter’s pencil for marking the deepest point of each dip.
- Standard 1/4 in (6 mm) and 3/16 in (5 mm) notched trowels if you plan to fill low spots with thinset instead of pouring.
- Angle grinder with a dust shroud and 4 to 7 inch (10 to 18 cm) diamond cup wheel for concrete humps, or a belt sander for a wood subfloor.
- Wet/dry vacuum with a fine filter for concrete dust. A household vacuum is not built for silica dust and will fill up fast.
- Spike roller or gauge rake, plus a flat trowel for edges and corners.
- Drill with a mixing paddle or a stand mixer. Mixing by hand gets tiring before the batch is even half done.
Prep and leveling materials
- Self-leveling underlayment — roughly 1 bag per 40 to 50 sq ft (3.7 to 4.6 sq m) at 1/8 in (3 mm) average depth. Add about 25 percent more for waste, laps, and mixing losses.
- Floor patching compound or thinset mortar for holes, divots, and anything deeper than the self-leveler can safely bridge in one pass — usually over 1/4 in (6 mm).
- Latex or acrylic primer if the bag calls for one. Concrete is thirsty; primer slows the water loss and gives the compound time to flow.
- Bonding agent or latex additive when the manufacturer requires it for a porous or non-absorbent substrate.
- Crack sealant or latex caulk for moving joints and small cracks.
- Plastic sheeting, painter’s tape, and cardboard to protect cabinets, baseboards, and door thresholds.
- Safety gear: safety glasses, hearing protection, N95 or better respirator for grinding, and chemical-resistant gloves for mixing.
If you are still choosing tools, a steady tripod-mounted laser can help you check heights across a larger room than a 6 ft edge reaches — this roundup of laser level tripods covers the setups that work in tight rooms. And once the substrate is flat, the cutting side of the job goes fast if you have picked the right cutter; our guide to tile cutters for small tiling projects covers the common sizes.
Before You Start
Knowing what you are standing on decides everything downstream. Concrete, plywood, OSB, and old tile each want a different primer and a different moisture test, and treating them the same is the number one reason a leveling job fails.
Identify the substrate. Concrete slab in a basement or ground floor, plywood or OSB over joists upstairs, or an existing tile floor you intend to cover. If you tap plywood and it sounds hollow, you have a loose section to deal with in Step 2.
Measure the high and low points. Set the straight edge on the highest point of the room you trust, and probe toward each wall in about 2 ft (0.6 m) increments. Mark the deepest gap with a pencil and a tape. That measurement, multiplied by the room area, is your material estimate.
Calculate fill depth realistically. A general rule is 1 lb (0.45 kg) of self-leveling compound per 1 sq ft (0.09 sq m) for each 1/16 in (1.5 mm) of average fill. Whole-room jobs on older slabs often run 1/4 in (6 mm) or more across the average, which means double the bags a first-time estimate suggests. The free calculators on manufacturer sites are far more reliable than mental math here.
Test for moisture on concrete. Tile adhesives and most self-levelers have a maximum relative humidity limit, commonly 75 to 80 percent, and some manufacturers specify an in-probe reading instead. An inexpensive calcium chloride test kit or a rented relative-humidity probe tells you whether you have a problem to fix or a floor to level. Ignore this step and the new floor will lift later, and lifting tile over a leveling layer is miserable work.
Protect the room. Tape and sheet cabinets, cover thresholds, and open windows. Mixing produces fine cement dust and the bags are heavy — plan your path so you are not hauling 50 lb (23 kg) bags through a doorway you just cleaned.
Wear protection and ventilate. Eye protection whenever you grind, a respirator for any concrete work, and gloves for the wet mixing stage. Keep the room aired out for the mixing window.
Know when a permit or a professional opinion applies. Leveling a surface is usually straightforward. Cutting into joists, removing a load-bearing wall, or moving plumbing is not, and a basement with a recurring damp problem deserves an assessment before you pour anything.
How to Level a Floor Before Tiling: Step-by-Step Instructions
Six steps, in this order. Skipping ahead to the pour is how beginners end up with a beautiful grey surface that still has a wave in it.
Step 1: Inspect the Floor and Find High and Low Points
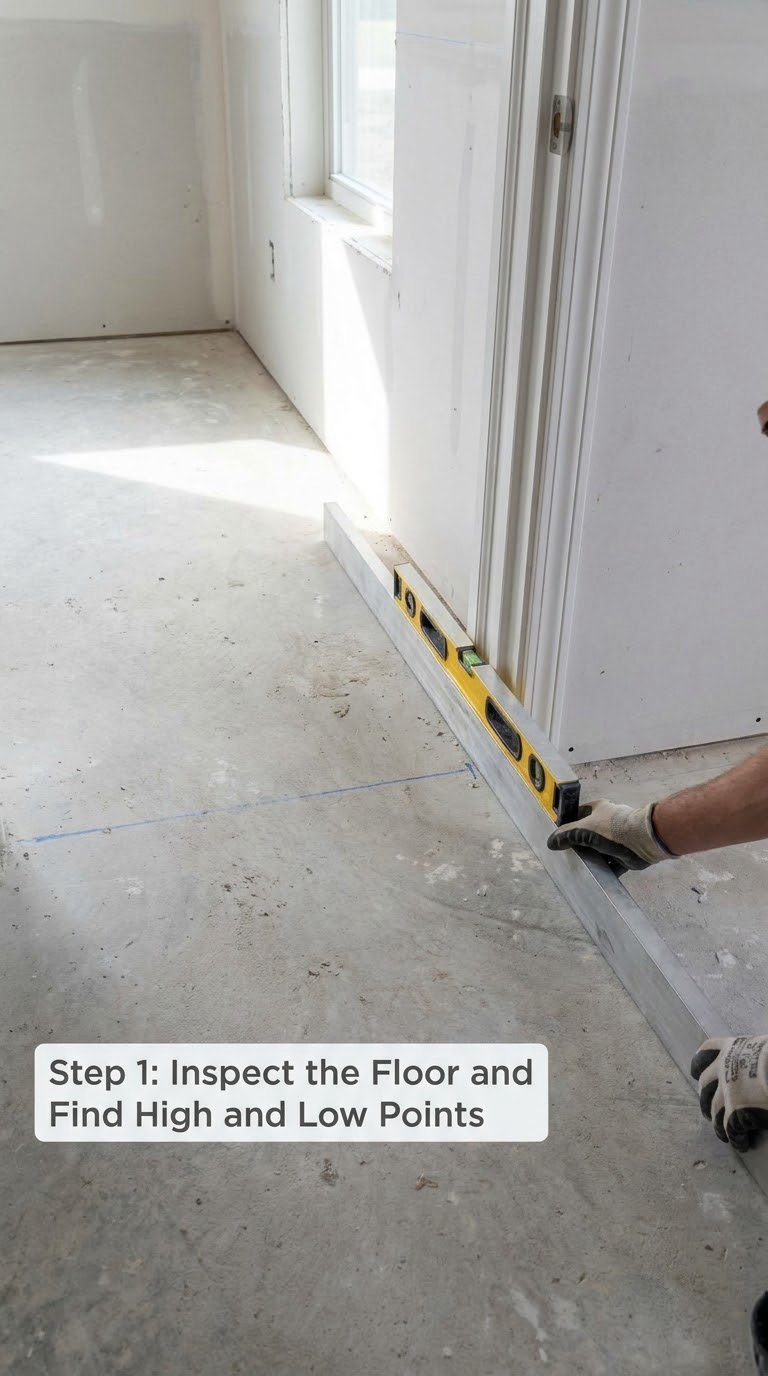
Lay the straight edge on your reference high point and probe outward. Where the edge rocks, you have a dip; where daylight or a gap shows under the edge, you have low ground. Mark each one and measure the deepest point with a tape measure, pencil side down.
Snap a chalk line along the reference height. It gives you a fixed visual target to come back to, which matters on a floor with a long slope where the eye lies to you.
How flat is flat enough? Most tile work calls for no more than 1/8 in (3 mm) of variation over a 10 ft (3 m) span, checked with a straight edge. Large format tile, plank tile, and thin porcelain are fussier: many manufacturers and the tile industry guidelines call for 1/16 in (1.5 mm) over 8 ft (2.4 m), and some 1/16 in over 10 ft. Check your tile’s installation instructions, because the warranty follows them.
Also decide whether you want the floor level or merely flat. Level means every point sits at the same height as gravity demands, which is what drains need and what most people picture. Flat means no humps or dips in it, which is all a tile floor actually requires. Old houses are rarely truly level, and chasing a true level in a house built in 1920 is how projects become three-week projects.
Step 2: Repair Cracks, Holes, and Loose Sections
Self-leveling compound is a liquid, and liquid finds every hole you left for it. Patch first, or you get a thin spot that dries faster than the rest and cracks.
- Chase out loose concrete and old mortar with a chipping chisel or wire brush until the edges are sound.
- Vacuum everything, including the dust that settles in the corners.
- Fill divots, drill holes, and settled areas deeper than 1/4 in (6 mm) with floor patching compound or thinset. Let it harden fully before moving on.
- Fill narrow cracks with latex caulk if they are stable, or with a flexible elastomeric sealant if they are structural or likely to move.
- On a wood subfloor, drive down protruding nails, replace soft or rotten board, and screw down any loose sheet that flexes under your weight.
How to tell it is right: walk the patched areas. Nothing flexes, nothing hollows, and the patch sits flush with the surrounding floor.
Step 3: Grind or Plane Uneven High Spots
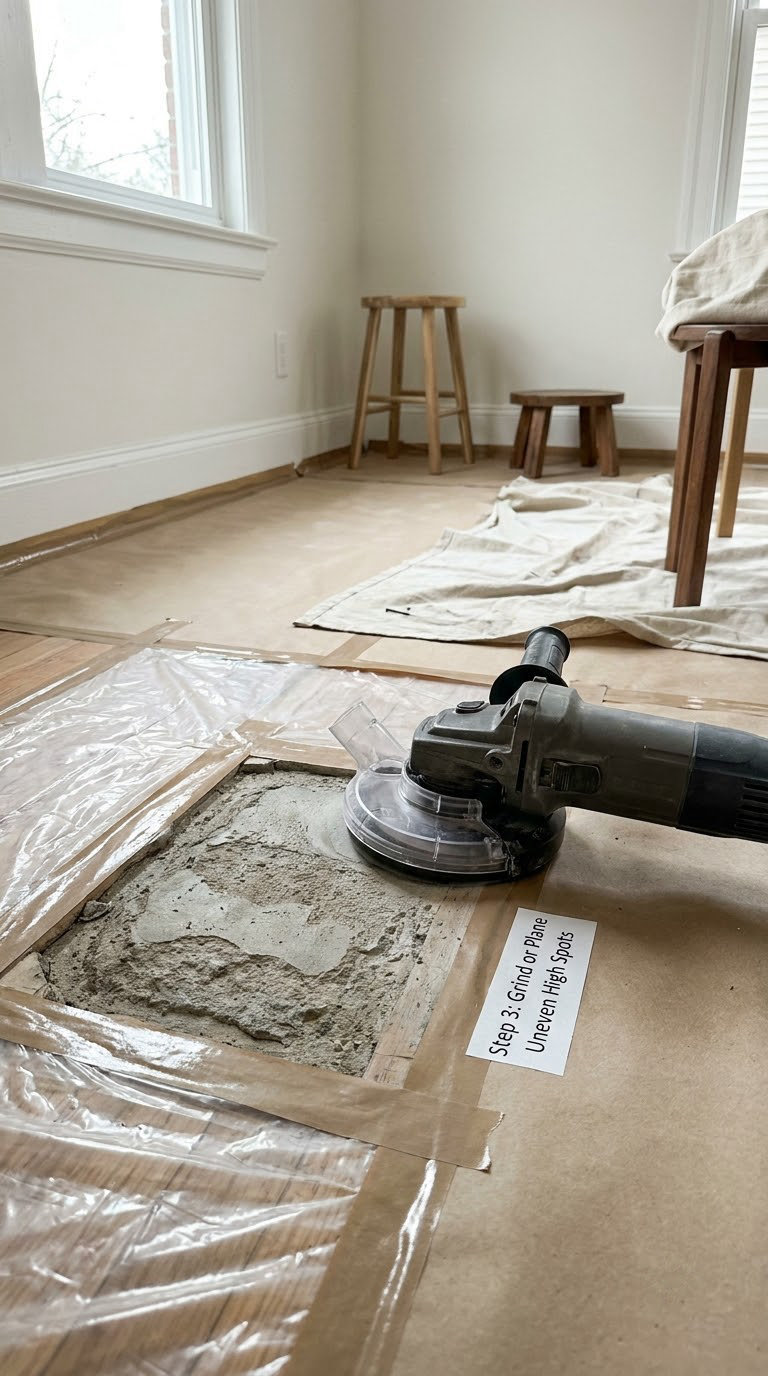
Removing high spots is faster and cheaper than adding compound over them, and it is the only way to take a hump down that sits well above your reference line. A 1/4 in (6 mm) dip is a thinset job; a 1/4 in hump needs the grinder.
On concrete, work from the middle of the hump outward in even passes rather than digging in at one edge. Check with the straight edge often, every few passes, because concrete grinds away faster than you expect. Use a wet/dry vacuum on the shroud, and keep a respirator on.
On wood, a belt sander handles a hump that sits proud of the joist line. Sand across the grain first, then with the grain, and stop as soon as the straight edge stops rocking. On an OSB or particle board subfloor, do not sand at all — you will cut through the face layer and the sheet is finished. Sheet those floors over with plywood instead.
Never cut into a floor joist or any framing. Grinding down a subfloor does nothing to a joist that is sitting too high, and removing framing to reach it is structural work for a licensed contractor. Joists on standard spacing also need to stay where they are.
Step 4: Clean, Prime, and Mix the Leveling Compound
Sweep, then vacuum, then mop with a damp cloth if the surface is dusty enough to need it. Let the floor dry completely. Any standing moisture, wax, paint, or oil will stop the compound from bonding and you will be chipping it out later.
Apply the primer if the product requires one — and read the bag, because the answer genuinely differs between products. Some self-levelers over porous concrete can be poured without primer, others need an acrylic or latex primer applied with a roller or push broom and allowed to dry or become tacky as directed. A bonding agent serves a similar purpose on dense or non-absorbent surfaces. Letting unprimed concrete drink the water out of the mix is what produces a gritty, half-set surface that never flows flat.
Mixing order, which is not negotiable: add water to the bucket first, then add the powder slowly while the drill runs. Never dump powder into standing water, and never add a splash of extra water later to loosen a stiff mix. Extra water weakens the cured strength, raises the drying time, and can cause the surface to separate or crumble at the edges.
Mix until the lumps are gone, roughly one to two minutes, then let the material sit for the rest period the bag specifies — commonly about 5 minutes. Do not mix more than you can spread inside the product’s working time. Leftover material that has gone stiff is a waste, and a cold joint where one batch meets the next is a visible ridge that shows through the tile.
Step 5: Spread the Compound and Work Toward the Edges
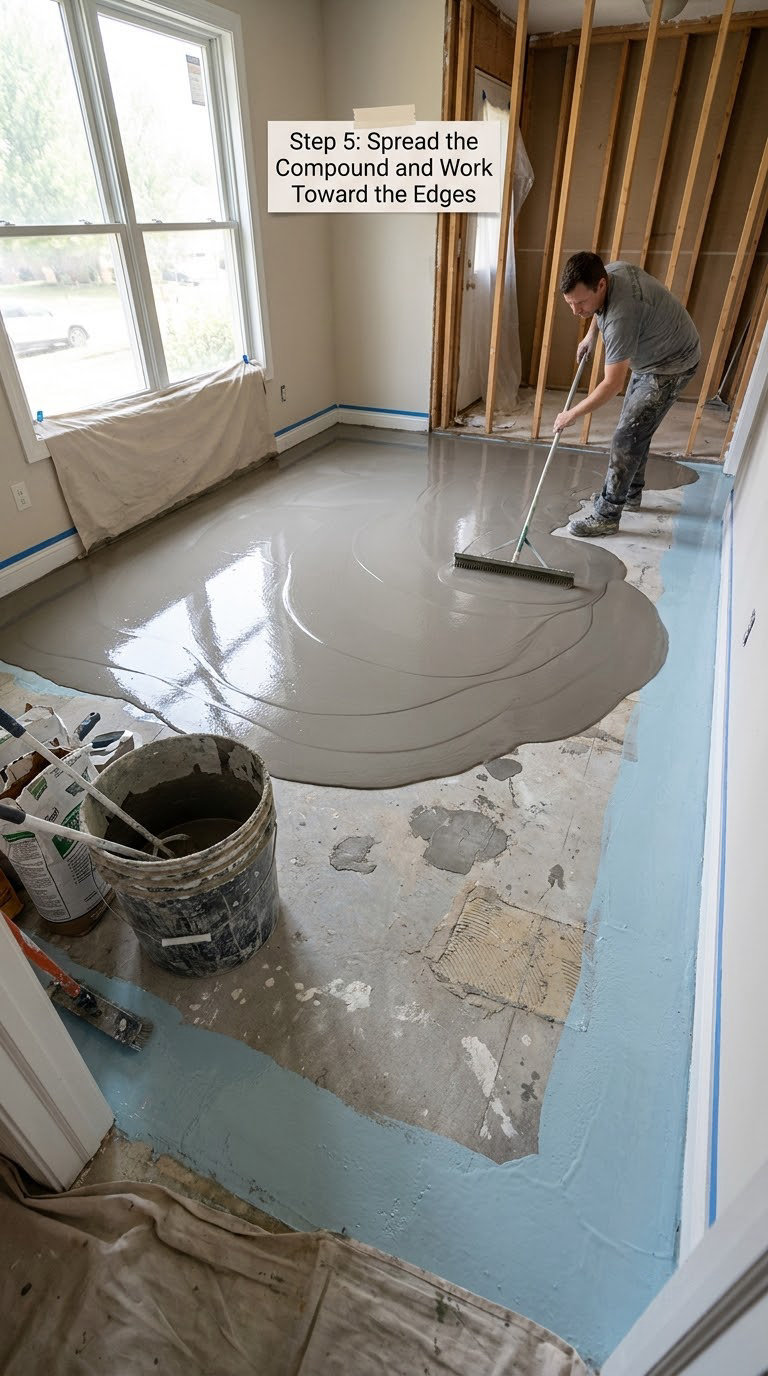
Start at the far corner, the door opposite your exit, and work back toward it. Pour a workable ribbon of material along your starting edge rather than trying to flood the whole room at once.
Pull the gauge rake or a long straight edge through the material to push it into the low areas and set the plane to the chalk line. Keep enough material against the walls to establish the intended floor height, then pull excess back into the field. Corners and the last 4 in (10 cm) along walls get a flat trowel.
Walk the surface with a spike roller while it is still fluid to release trapped air, especially over joints and where the primer pooled. Keep the roller moving and lighten the pressure as the material begins to set, because roller marks are permanent once the surface skins over.
Stay out of the room as much as you can while it works. Foot traffic at the wrong moment is the most common self-inflicted defect, and no amount of careful work afterwards removes the scuffs.
How to tell it is right: the surface should be a continuous grey plane with no standing puddles, no visible trowel or rake lines, and the rake should glide across it without leaving a trough.
Step 6: Check Flatness and Allow the Floor to Cure
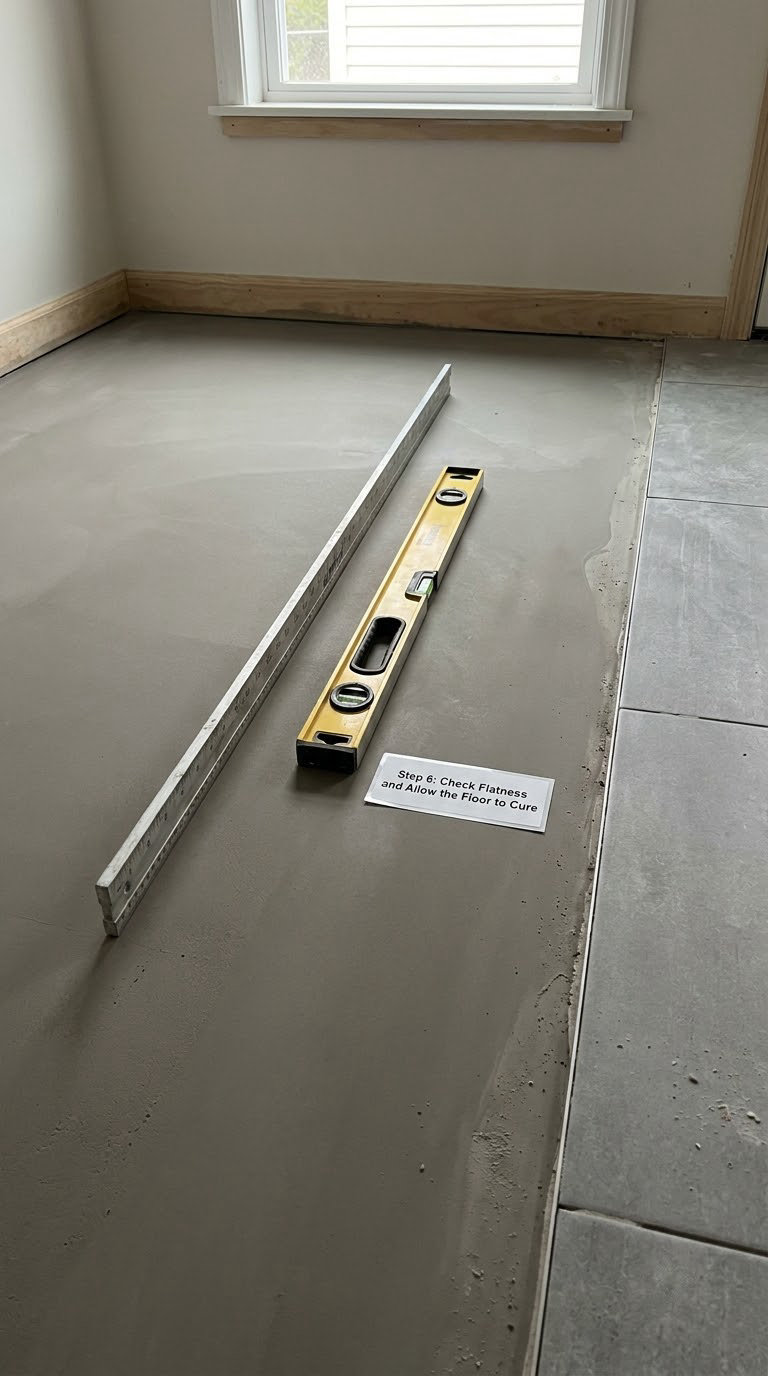
Wait for the set time listed on the bag, then put the straight edge back on the cured surface. Check at the spots you penciled in Step 1, since that is where problems show up first. A 6 ft straight edge with a bubble level on top gives you both the flatness reading and a reference for any residual slope.
Mark anything that still exceeds your tolerance so you can skim it with thinset later rather than discovering it after the tile is down. Photograph the floor before you cover it, with a tape measure in frame showing the straight edge position. If a claim or a dispute ever comes up, that photo settles it.
Timing before you set tile: typical products allow foot traffic in 4 to 8 hours and tile installation in 24 to 72 hours, while a full cure runs longer — sometimes several weeks. Rapid-setting and calcium-sulphate products move much faster, with tile times in the range of a few hours. These are ranges, not promises; the data sheet on your specific bag wins, and temperature and humidity stretch all of them.
Vacuum any sanding dust lightly, remove the sheeting, and let the room return to normal before you start setting tile.
Common Mistakes to Avoid
Almost every failed leveling job traces back to one of these. Each has a straightforward fix.
- Skipping the prep. Dust, wax, paint, and standing moisture block bonding. Fix: vacuum, mop, and dry fully before anything else.
- Mixing the whole job at once. Compound sets in the bucket while you are still pouring the first section, and cold joints show as ridges. Fix: batch size matched to your spread rate and the working time on the bag.
- Adding extra water to loosen the mix. More water means weaker cured material, longer drying, and a crumbly surface that fails under tile. Fix: measure water accurately, add powder to water, and discard stiff leftovers.
- Failing to prime when the product needs it. Unprimed concrete pulls water from the mix and the compound never flows. Fix: read the bag, prime porous concrete when specified, and use a bonding agent on non-absorbent surfaces.
- Testing flatness at the wrong time. A straight edge on wet material tells you nothing, and walking on it ruins the surface. Fix: test at the set time, off the surface, with no traffic in between.
- Ignoring moisture and structural issues. A damp slab or a deflecting subfloor will fail no matter how good the surface is. Fix: test relative humidity first, and address the structure before the surface.
- Pouring a wood subfloor without checking it. A level surface on a bouncy floor still cracks. Fix: verify the subfloor is firmly fastened, and check joist spacing against the tile and adhesive manufacturer’s requirements.
- Forgetting the thickness limit in one pass. Most products are meant to be applied in layers within a specified range, and overpouring creates shrinkage cracks. Fix: fill deep areas with thinset first, then level over it.
- Leaving the fill depth unplanned at doorways. A half-inch of new material has to come out of the door clearance. Fix: check the sill height against the finished floor thickness before you pour.
When to Call a Pro
Some floors are a surface problem wearing a disguise. Stop and bring in a licensed contractor or structural professional when you hit any of these.
- Deep or widespread unevenness in a large area, especially where the level changes more than an inch from one end of the room to the other.
- Moving, cracked, or failed joists, or a floor that bounces noticeably when someone walks across it.
- Rot or insect damage in the subfloor, or boards that need to be cut out and reframed.
- Recurring moisture, a sump that runs constantly, or a water table you cannot control.
- Load-bearing changes, including removing a wall, adding a heavy appliance like a cast-iron range, or relocating plumbing and HVAC.
- Suspected asbestos-containing material in an older home. Do not grind, sand, or disturb suspect materials before testing.
- Work your local authority requires a permit for, which is common where structural changes or new plumbing are involved.
Maintenance
Protecting the new substrate is the easy part, and it matters most during the days right after the pour.
Keep foot traffic off the floor for the first 24 hours, store materials on planks or boards rather than directly on the surface, and leave the sheeting in place if it is taped down at the edges. Do not install baseboards until the floor is fully cured, because the trim gets fastened into the edge and the fasteners can split a not-quite-solid perimeter. Keep the room dry and ventilated through the full cure.
Once the tile is in, care for it like any hard floor. Sweep or vacuum grit frequently, since sand is what wears grout and dulls a glaze. Use a pH-neutral cleaner rather than anything acidic, and seal grout on schedule if it is a cementitious grout in a wet area. Wipe spills at once, especially standing water near a toilet or a dishwasher, and check the flexible sealant around tubs and showers on a yearly basis.
Drop something heavy on purpose? Unglazed porcelain and natural stone chip in a way ceramic does not, so use felt pads under furniture legs and avoid point loads near tile edges.
Frequently Asked Questions
Do I really need to level a floor before tiling?
Usually yes, at least within tolerance. Tile is rigid, and it bridges nothing. A floor that varies more than 1/8 in (3 mm) over 10 ft leaves gaps under the mortar, which is exactly where lippage, cracking, and hollow-sounding tiles come from. Small isolated dips can be filled with thinset, but a floor with a continuous slope or several dips needs leveling. Large format and thin porcelain demand the tighter 1/16 in tolerance.
What is the maximum allowable floor unevenness for tile?
The common standard is 1/8 in (3 mm) of variation over a 10 ft (3 m) span, measured with a straight edge. Large format tile, plank formats, and thin porcelain are held to 1/16 in (1.5 mm) over 8 ft (2.4 m), and some manufacturers require 1/16 in over 10 ft. Your tile’s installation instructions control, since the warranty follows them. Check the floor in several directions, including diagonally, not just along one wall.
Should I use self-leveling compound or floor patch?
Use thinset or a patching compound for localized defects: divots, drill holes, small dips, and places where old mortar lifted. Use self-leveling underlayment when the whole plane needs correcting, when a large area is out of tolerance, or when the floor slopes. Deep areas are always patched first and leveled over, because most self-levelers are not designed to bridge a gap thicker than about 1/4 in in a single pour.
How long does self-leveling compound need to dry before tiling?
Typical products allow foot traffic in 4 to 8 hours and tile installation in 24 to 72 hours, with a full cure taking longer, sometimes several weeks. Rapid-setting and calcium-sulphate products can be tiled in a few hours. Cold, damp rooms stretch every one of those figures. Read the data sheet on your own bag, and follow it rather than a general timeline, because tiling too early is what causes the failure.
Can tile be installed directly over a self-leveling floor?
Yes, and that is the whole point of the product. Once the surface is cured, lightly sand or scuff glossy areas if the adhesive manufacturer calls for it, vacuum thoroughly, and set tile with thinset or mortar. Use a lighter-notch trowel on a level substrate than you would on an unleveled one, since the base is already flat. Some manufacturers recommend a bonding agent between the leveling layer and the adhesive, so check both data sheets.
What should I do if self-leveling compound cracks or separates?
Find out why before patching. Cracks usually mean the substrate was moving, the surface was dusty or unwetted, extra water went into the mix, or the pour exceeded the product’s thickness limit. Grind or remove the loose material, clean and prime the area, and re-pour within the product’s thickness limits. If cracks keep returning, or the floor flexes, stop and get the subfloor or structure assessed before spending more compound on it.
Measure the floor first. One hour with a 6 ft straight edge and a pencil tells you whether you are looking at a patching job or a full pour, and it stops you from buying twice what you need. Everything after that measurement is just the six steps above, in order.