How to Install a French Drain in a Yard: Easy DIY 2026
How to install a French drain in a yard means digging a sloped trench, wrapping it in filter fabric, filling it with washed gravel, and laying perforated pipe inside so rainwater moves downhill to a safe outlet instead of sitting in your lawn. It is a weekend project most homeowners can finish with a shovel and a rented trencher.
Time: one to two days for a 50 foot (15 m) run, plus drying time for the lawn. Cost: materials and a short tool rental. Difficulty: Moderate DIY. Skill level: comfortable with a shovel, a level, and a tape measure.
Contents
Spring and early fall are the best windows because the soil is workable and the lawn has time to recover. Read the whole guide first, even the parts you plan to skip, because most failed drains trace back to a decision made in the first hour.
Tools and Materials
Quantities below cover a typical 50 foot (15 m) run at 18 inches (46 cm) deep. Scale them up or down for your length, depth, and soil, and add about 10 percent extra gravel because every yard needs a rounding cushion.
Excavation and safety gear
- Shovel and spade for hand digging, or a walk-behind trencher for runs over 40 feet
- Pickaxe or mattock for compacted clay and roots
- 4 foot (1.2 m) level plus a torpedo level, or a line level and mason’s line
- Tape measure, marking paint, wooden stakes, and a hand tamper
- Work gloves, safety glasses, sturdy boots, and high-visibility clothing
- Wheelbarrow and tarps for hauling spoil, plus a bucket and board for moving wet soil out of the trench
- Topsoil, a hard garden rake, and a wheelbarrow-spread scoop for finishing
Drainage materials
- 4 inch (10 cm) perforated corrugated pipe or rigid PVC, roughly 55 linear feet including fittings and the 10 percent waste allowance
- Couplings and 4 inch (10 cm) caps or end caps, plus a 4 inch (10 cm) inlet grate or catch basin if surface water enters the trench
- Washed drainage gravel in the 3/4 to 1.5 inch (2 to 4 cm) range, about 1.5 to 2 cubic yards (1.1 to 1.5 cubic metres), free of fines
- Non-woven geotextile filter fabric, about 400 square feet (37 sq m) if you wrap the whole assembly, or a prefabricated pipe sock if you want to skip the gravel step
- 4 inch (10 cm) corrugated drain pipe elbow or a rigid sweep for the downspout connection
- Topsoil, seed or sod, and mulch or stone for the finished surface
Before You Start
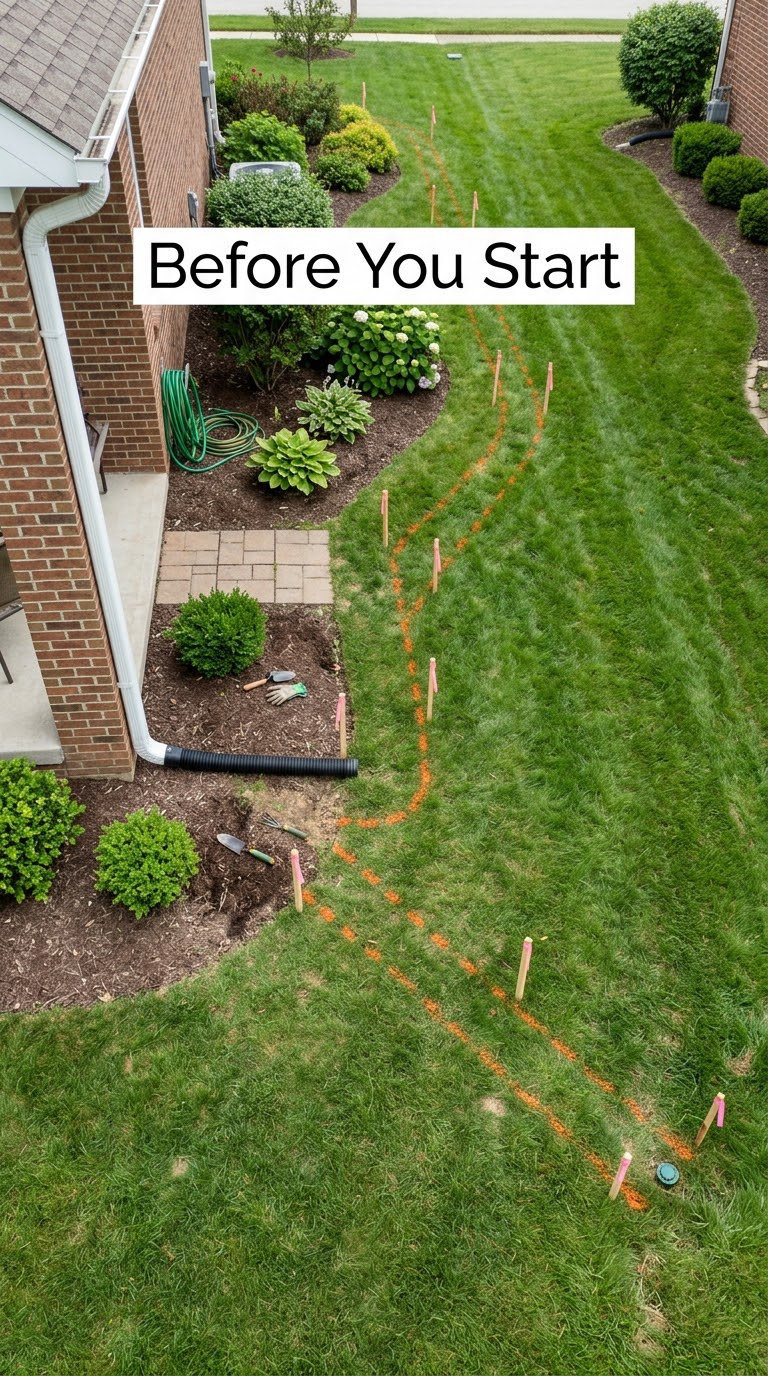
Three things decide whether this project works: where the water comes from, where it is allowed to go, and whether anything is buried under the route. Nail down all three before a single shovel goes in.
- Find the source. Watch where water puddles after a storm and trace it back to its origin, usually a downspout, a roof valley, or a low corner of the lot. Homeowners on r/HomeImprovement and r/landscaping repeatedly report that a drain aimed at the wrong low spot solves nothing, so spend the extra walk around the yard.
- Call 811 several days ahead. Utility locate services mark gas, electric, water, sewer, and communications lines free of charge, and most states require you to do it before any excavation. Stay at least 24 inches (61 cm) away from every marked line.
- Mark irrigation and drains too. 811 does not locate private sprinkler lines or low-voltage wire, so trace them yourself or find the valve box and flag every run.
- Rule out a leak. A saturated patch that stays wet in dry weather is often a cracked supply line or a leaking irrigation head. Fix that first or the new drain inherits the problem.
- Run a simple percolation check. Dig a hole 12 inches (30 cm) deep, fill it with water, and time how long it drains. A hole that barely drains in an hour points to clay, and clay causes pooling while also silting a new drain shut within a few seasons.
- Choose a legal outlet. Water has to exit somewhere downhill. A dry well, a storm drain, a retention area on your own property, or a permitted connection at the street are the usual options. Draining onto a neighbor’s lot is a legal problem in most jurisdictions.
- Check permits. A simple yard drain rarely needs one, but work that crosses a property line, touches a public right-of-way, or connects to a municipal storm system often does.
- Plan the spoil. A 50 foot (15 m) run moves roughly 1.5 cubic yards (1.1 cubic metres) of soil. Decide in advance where it goes, because piles in the lawn kill grass faster than the drain helps.
If the ground is steep, the route crosses a buried structure such as a septic tank or pool line, or the work is within a few feet of a foundation, stop and read the section on calling a pro below.
How to Install a French Drain in Your Yard
The finished drain is a gravity system. Water enters the gravel bed, seeps through the fabric into the perforated pipe, and travels downhill with no pump involved, which is exactly why the fall from inlet to outlet has to be continuous.
A straight trench or one that changes direction in gentle, wide sweeps works best. Tight elbows slow water and create places where sediment settles.
Step 1: Plan the Drain Route and Outlet
Walk the yard after a heavy rain and mark the wettest ground, then draw the shortest line from that point to the lowest legal discharge point. Keep the run clear of large trees, since new root growth crushes corrugated pipe faster than most people expect.
Check the total fall before you commit to a route. A line level is the cheapest accurate tool: stretch mason’s line between two stakes at the finished pipe height, level it, then mark where the string meets a ruler at each stake. Multiply the rise in inches by 100 and divide by the run in feet to get percent grade, and 1 percent means the pipe drops 1 inch for every 100 inches (2.5 cm per 2.5 m) of travel.
Decide what feeds the drain: a downspout extension, an inlet grate at the low point, or both. A downspout connection gives you the most water, and it is the fastest fix for a soggy strip along the house.
Step 2: Mark the Trench and Call Before You Dig
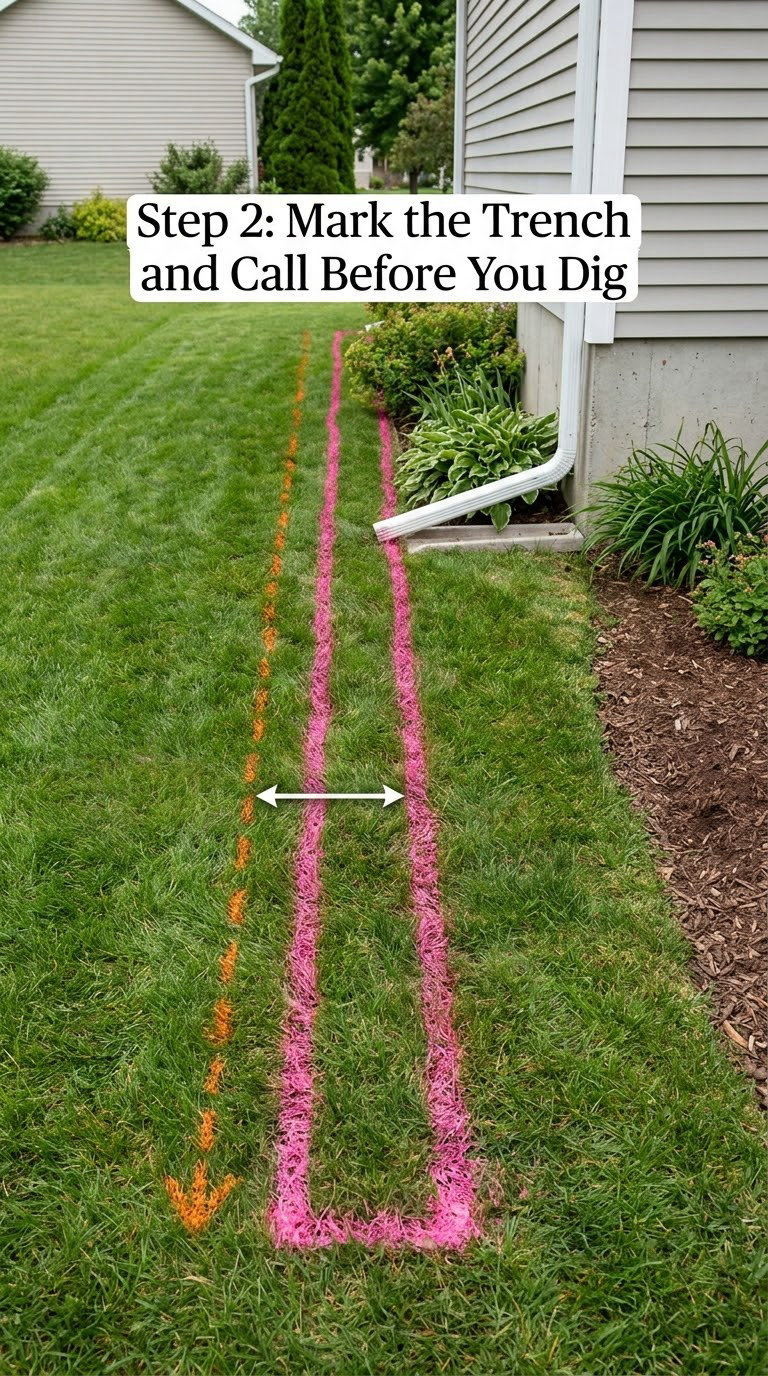
Lay out the trench in marking paint or flags before any digging, and stake the outlet point first since it sets the grade for everything else. A trench 12 inches (30 cm) wide at the top with a 6 inch (15 cm) flat base holds a 4 inch (10 cm) pipe plus enough gravel on each side to keep it filtered.
Walk the marked line and note every obstacle: irrigation heads, gas grills, low-voltage wire, patio pavers, and tree root zones. Shift the line rather than digging around these. Extra shifts and gentle sweeps cost minutes; a cut irrigation line costs a weekend.
Step 3: Dig the Trench to a Consistent Grade
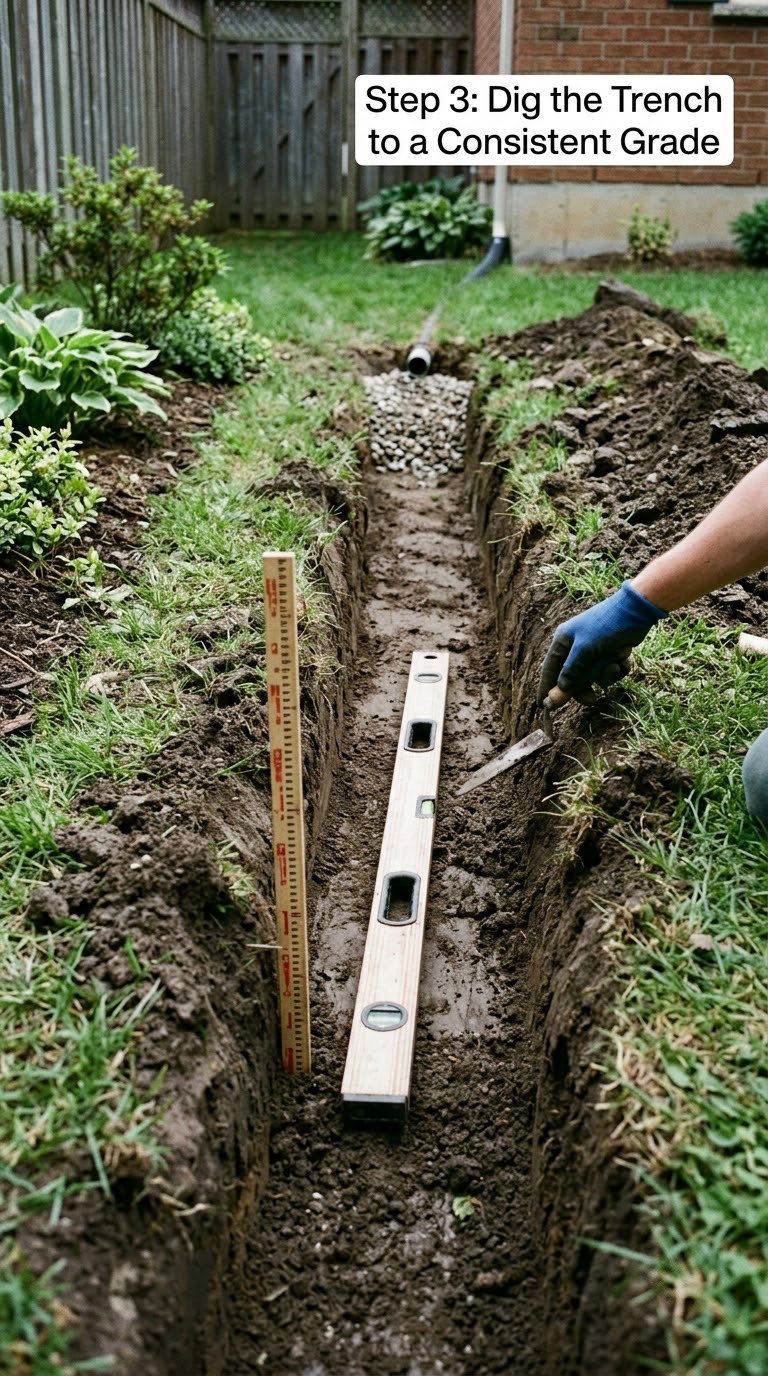
Start digging at the outlet end and work uphill, since it is much easier to hold a grade moving away from yourself than to correct a low spot from the far end. Typical residential trenches run 12 to 24 inches (30 to 60 cm) deep, with 18 inches (46 cm) a solid default for yard drainage.
Check fall every 4 to 8 feet (1.2 to 2.4 m) as you go, not just at the finish. Dig the bottom flat across the width so the pipe does not sit in a rut, and shave high spots instead of filling low ones. Check the string again once the trench is complete, and take a bucket of water to run along the bottom. If water pools and stops, that low spot becomes a trap and needs cutting out.
For runs longer than about 40 feet (12 m), a walk-behind trencher is usually worth the rental. It cuts a clean trench at a set depth in a fraction of the time, and hand digging the same run can stretch to a full weekend.
Step 4: Add the Filter Fabric and Drainage Aggregate
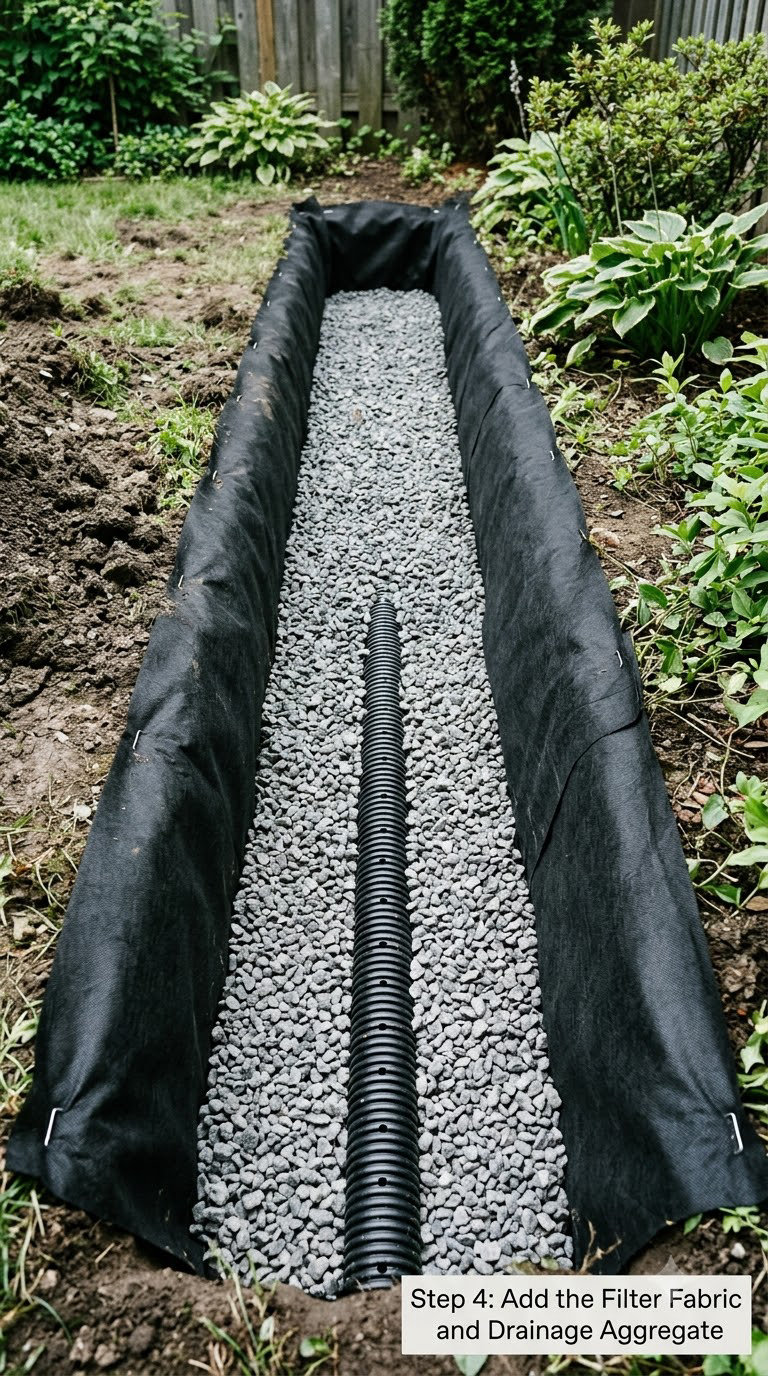
Line the finished trench with non-woven geotextile so soil fines stay out of the gravel while water still passes through. Let the fabric drape along the walls and floor with generous slack, overlap every seam by at least 12 inches (30 cm), and run it up the far end so it wraps the whole assembly when you finish.
Add roughly 3 inches (8 cm) of washed gravel across the base and tamp it level. The aggregate must be washed and free of fines, because crushed stone dust and ordinary pea gravel pack down into a cement-like plug that defeats the whole system.
Many homeowners in r/lawncare now favor a prefabricated pipe sock, a flexible pipe wrapped in fabric, which handles the filtering job in one step and skips the gravel bed. If you go that route, follow the sock manufacturer’s bedding depth and still keep the fabric envelope closed at the top.
Step 5: Install and Secure the Perforated Pipe
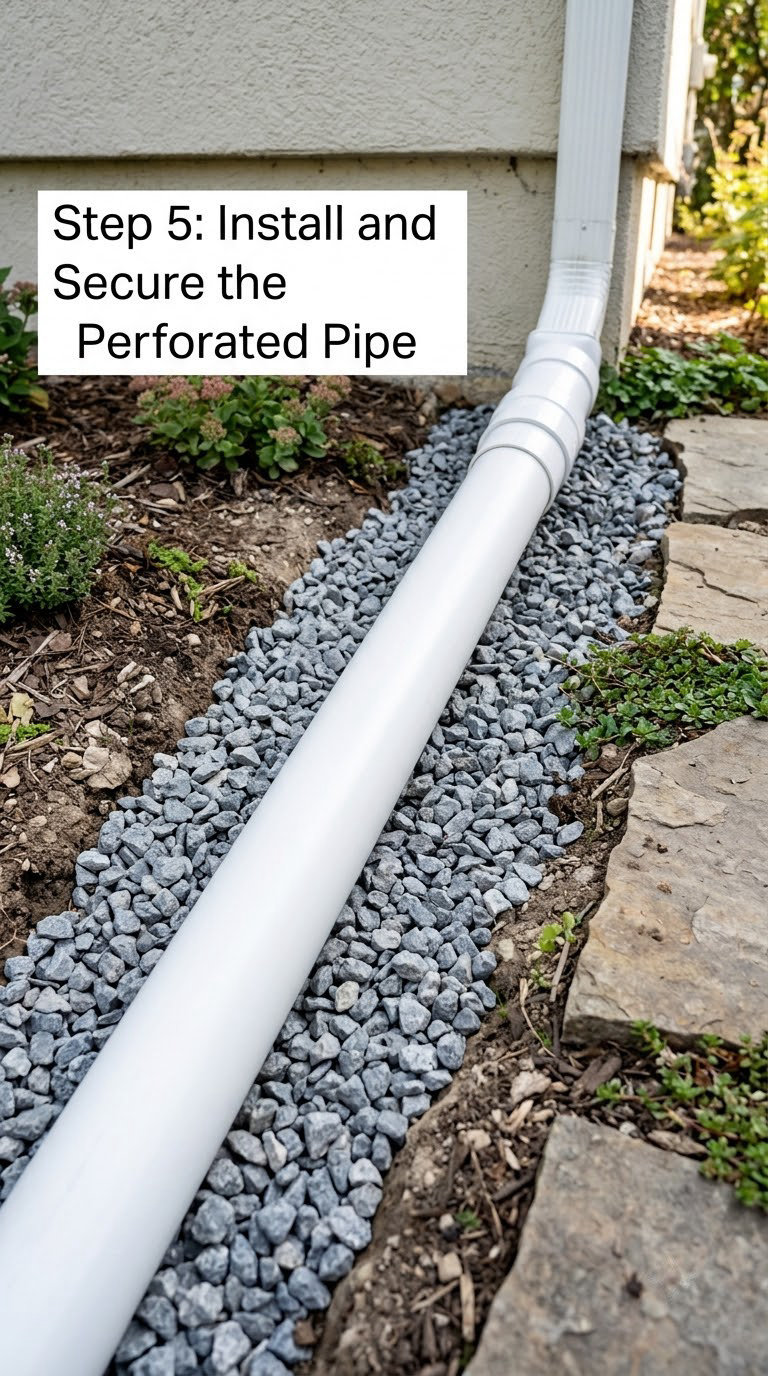
Lay the pipe on the gravel bed with every perforation facing straight down. Holes facing up collect grit and settle solids on the pipe’s crown, which is the fastest route to a clogged drain.
Secure couplings loosely so the fittings seal without deforming the pipe, and check fall again at every joint. Rigid PVC rodders and flushes cleanly years later, while black corrugated pipe is cheaper and more flexible but is harder to clear once roots find it. For a long run that will need servicing, rigid PVC is the better long-term trade.
At the uphill end, attach the downspout through a 4 inch (10 cm) sweep so roof runoff enters the pipe rather than washing soil in. At the outlet, leave the pipe end open and daylight it, or terminate it in a dry well or catch basin, and never seal the end.
Step 6: Wrap, Cap, and Finish the French Drain
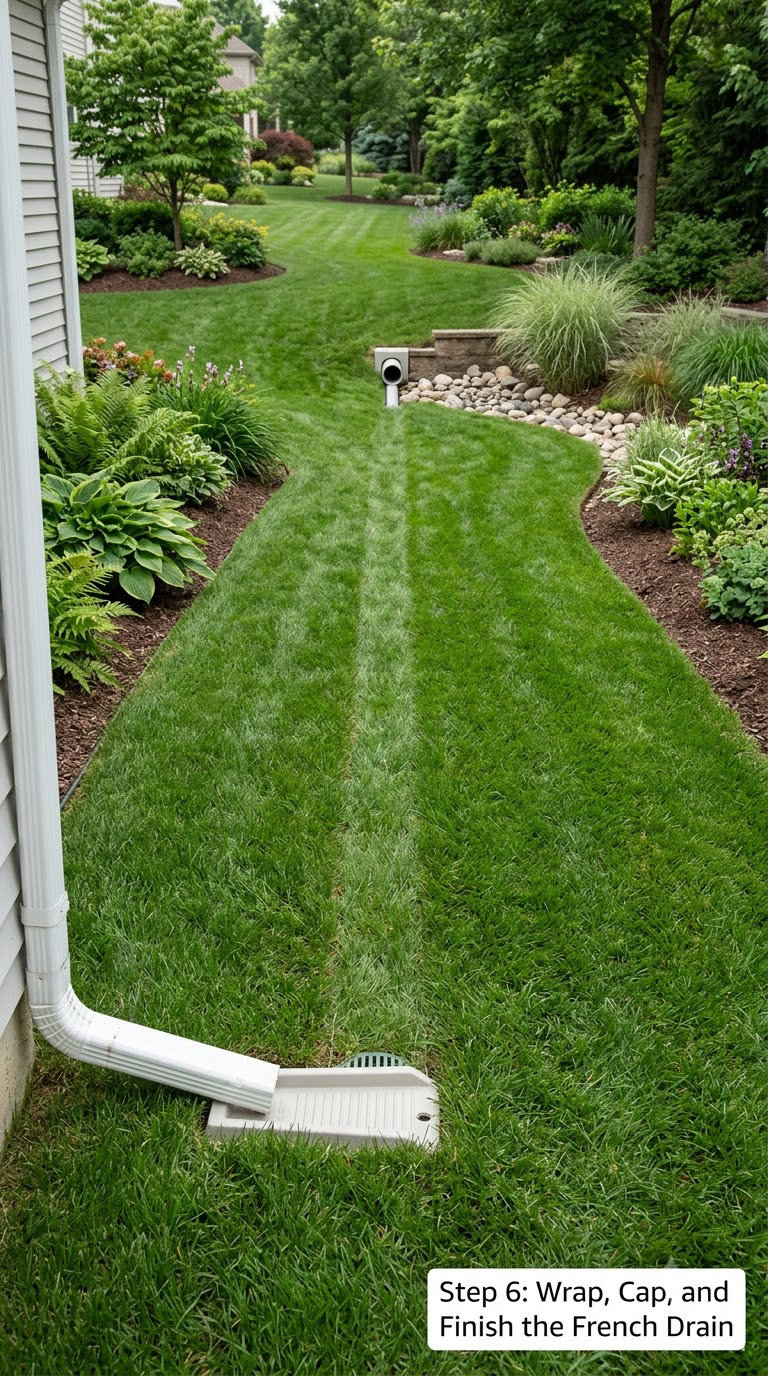
Surround the pipe with more washed gravel until it is buried, leaving about 6 to 12 inches (15 to 30 cm) of cover above the crown. Then fold the fabric over the top, lapping every seam, and tape or staple it closed so soil cannot wash down into the aggregate in the first hard storm.
Cap the end if you are feeding an enclosed outlet system, and leave a visible, open discharge point if you are daylighting, because you want to be able to see whether it is running. Connect the outlet below the finished grade of the receiving area, or water will simply pool at the end of your new pipe.
Backfill with the soil you removed, breaking up clods, and bring the finished grade slightly proud of the surrounding lawn so it sheds water instead of collecting it. Test the run by pouring a full bucket into the inlet end and timing how long it takes to appear at the outlet. A two minute trip confirms a clear path.
You can put grass back over the drain. Finish with about 3 inches (8 cm) of topsoil, rake it smooth, and seed or lay sod on top, since a healthy root mat filters surface runoff without harming the pipe underneath. Decorative stone or a paver strip is the smarter choice if the line passes through a bed you will ever dig in again, because it makes future access fast.
Common Mistakes to Avoid
Almost every failed French drain I have seen traced back to one of a handful of problems, and all of them are fixable on paper before the first shovel.
- No continuous slope. A single low spot stops the flow and turns the trench into a pond. Check grade every few feet and cut out dips as you dig.
- No legal outlet. A drain that dead-ends in the lawn simply moves the puddle. Pick the discharge point before you dig, not after.
- Gravel with fines in it. Pea gravel and crushed stone dust compact into a plug. Buy washed drainage rock in the 3/4 to 1.5 inch (2 to 4 cm) range.
- Skipping or tearing the fabric. Without a filter envelope, soil migrates into the gravel within a few seasons and silts the pipe.
- Holes facing up. Perforations aimed upward collect sand and debris. Roll the pipe so the holes point down before the gravel goes in.
- Crushed or misaligned pipe. Over-compacting gravel over the pipe, or forcing fittings on too tightly, flattens it and stops flow. Pack gently by hand first.
- Too little cover. A contractor drain with pipe sitting too close to the surface is a common complaint on home forums, because vehicle traffic and frost heave both break it. Keep 6 to 12 inches (15 to 30 cm) of cover.
- Damaged utility lines. Hitting a sprinkler line or a buried cable is the most expensive avoidable mistake in the whole project. Mark private lines yourself and give 811 enough lead time.
- Discharging onto a neighbor’s property or a neighbor’s lawn. This creates a new problem on the lot next door and can violate local rules.
When to Call a Pro
Some jobs are worth handing to a licensed contractor or drainage engineer, and the tell is usually complexity rather than size.
- Near the foundation. A drain within a few feet of the house, or one that has to tie into a crawlspace or foundation wall, is a different job from a yard drain and often needs proper engineering.
- Steep, unstable, or collapsing ground. Trenches in hillside soil need shoring or benching to stay safe.
- Buried structures. Septic tanks, pool lines, and utility vaults change the plan and are expensive to disturb.
- Utility relocation. Moving a gas, electric, or sewer line requires the utility company, not a weekend.
- Code and permit work. Anything crossing a property line or connecting to a municipal storm system may need approval and inspection.
- Contaminated or uncertain soil. Old fill, unknown debris, or anything industrial gets tested before excavation.
- A failed existing system. When an installed drain has already silted up and you cannot find the run, excavation and diagnosis take real equipment.
- Long runs with a sump pump. Very long trenches or pump tie-ins need a pump and a discharge plan a DIY run cannot supply.
Maintenance
A well-built French drain runs for years with very little attention, but a five minute check after every heavy storm catches small problems early. Look at the outlet during rain and confirm water is actually leaving the pipe, since that single observation tells you more than anything else.
Check the downspout connection twice a year for leaves and for gaps where the connection has pulled apart, and clear the inlet grate of grass and silt. Keep an eye on the ground over the trench for a damp strip, a sunken line, or new soggy patches, all of which hint at a leak or a separation in the pipe.
When a drain stops working, escalate in this order:
- Flush from the inlet. Push a garden hose into the upstream end and run full pressure for several minutes. Most silt blockages clear here.
- Rodd or snake it. Send a plumbing snake or drain rod from the inlet end to break a compacted plug, working toward the outlet.
- Excavate the trouble spot. If the hose backs up and you smell standing water, the blockage is deep. Open the fabric at that point, remove the gravel, clear or replace the crushed section, and re-wrap it.
If clearing fails twice, the failure is usually structural: a crushed section, roots, no slope, or fines that migrated in before the fabric was installed. At that point, professional cleaning with a jetter or a new section is faster than a third attempt. Our bathroom drain pipe size guide covers the pipe and fitting basics worth matching, and our drain cleaning walkthrough walks through the rodding and jetting techniques that work on a yard line too.
Frequently Asked Questions
How deep does a French drain need to be dug?
For most residential yard drains, dig 12 to 24 inches (30 to 60 cm) deep, with 18 inches (46 cm) a reliable default. Deeper is unnecessary for surface water but helps with subsurface flow and frost protection. What matters more than any single number is a consistent fall from inlet to outlet and at least 6 to 12 inches (15 to 30 cm) of cover over the pipe.
Do French drains eventually clog?
Well-built French drains can last decades, but they do clog under specific conditions. Fine soil that bypasses torn or missing filter fabric, tree roots, crushed pipe, and pipes installed without slope are the usual causes. Installing washed gravel inside a properly lapped fabric envelope and keeping the pipe clear of root zones removes most of the risk before it starts.
Why didn’t my French drain work?
Most failed drains come down to five causes: no continuous slope, no legal outlet, gravel loaded with fines, perforations facing up, or a pipe that got crushed during backfill. Another common cause is aiming the drain at the wrong water source, so trace where the water actually enters before you rebuild. Pouring a bucket in and watching whether it appears at the outlet is the fastest diagnosis.
Can you put grass back over a French drain?
Yes. Finish the drain with about 3 inches (8 cm) of topsoil and seed or lay sod over the buried line. Grass roots filter surface runoff and cause no harm to the pipe, and a healthy lawn actually helps slow water entering the trench. Use decorative stone or a paver strip along the route instead if you may ever need to dig in that spot for repair.
How do I clear a clogged French drain full of dirt?
Escalate in order: run a garden hose at full pressure into the upstream end for several minutes, then send a plumbing snake or drain rod from the inlet to break a compacted plug. If water backs up and you smell standing water, the blockage is deep, so open the fabric at that point, scoop out the gravel, clear or replace the crushed section, and re-wrap the envelope.
How do I measure slope for a French drain?
Stretch mason’s line between two stakes at the finished pipe height, level it with a line level, and mark where the string crosses a ruler at each stake. Multiply the rise in inches by 100 and divide by the run in feet for percent grade. One percent, a drop of 1 inch (2.5 cm) for every 100 inches (2.5 m) of run, is a good target, and checking every 4 to 8 feet keeps it honest.
Conclusion
Start by mapping where the water actually comes from and where the yard is lowest, get your utility locate in early, and confirm your discharge point is legal and downhill from the inlet. Verify the fall with a line level before a single bag of gravel goes in, because grade is the one thing you cannot fix later without digging the whole trench back up.
When in doubt, lay a short test run of 10 feet (3 m), pour a bucket through it, and see how fast it reaches the outlet. That one afternoon answers most of your questions.