20 Painted Stair Ideas for a Hallway (October 2026)
These 20 painted stair ideas for a hallway all share one thing: they change the look of a room without touching a single stud. A staircase is the first thing guests see when they step inside, and it is also the surface your family scuffs most, so it is worth painting properly rather than leaving tired carpet or builder-grade oak in place.
Most of the looks below cost less than a weekend of painting supplies and a can of floor-rated enamel. All costs here are realistic US ranges and they vary by region, stair size and whether you already own a ladder and drop cloth. October is a good month to start, because a hallway needs a few dry days and cool nights before holiday traffic kicks in.
Contents
If you want the room to hold together as a whole rather than just the stairs, start with hallway decor ideas that suit your floor plan, then pick a stair look below that matches them.
20 Painted Stair Ideas for a Hallway at a Glance
Every scheme below lists what it costs, how hard it is and how long it takes. The table is the fastest way to narrow things down before you buy a single sample pot.
| Idea | Cost (USD) | Difficulty | Time |
|---|---|---|---|
| 1. Two-tone treads and risers | 60-160 | Easy DIY | 1 weekend |
| 2. White stairs with a painted runner | 45-120 | Easy DIY | 4-6 hours |
| 3. Vertical color blocking | 40-110 | Easy DIY | 4-5 hours |
| 4. Checkerboard stair run | 70-180 | Moderate DIY | 6-8 hours |
| 5. Ombre from light to dark | 90-220 | Moderate DIY | 2 days |
| 6. Riser gallery in one color | 50-130 | Easy DIY | 4 hours |
| 7. Faux shiplap risers | 65-170 | Moderate DIY | 6 hours |
| 8. Plaid stair accent | 70-190 | Moderate DIY | 7 hours |
| 9. Abstract color-block risers | 65-175 | Moderate DIY | 6 hours |
| 10. Tinted treads, white risers | 80-200 | Easy DIY | 1 weekend |
| 11. Wall and riser color story | 120-300 | Moderate DIY | 2 days |
| 12. Color-blocked painted runners | 60-150 | Easy DIY | 5 hours |
| 13. Botanical stenciled risers | 55-150 | Moderate DIY | 5 hours |
| 14. Scalloped risers | 55-145 | Moderate DIY | 5 hours |
| 15. Metallic accent risers | 70-160 | Easy DIY | 5 hours |
| 16. Playful rainbow steps | 60-150 | Easy DIY | 5 hours |
| 17. Tonal monochrome staircase | 70-170 | Easy DIY | 5 hours |
| 18. Geometric mosaic risers | 85-210 | Moderate DIY | 8 hours |
| 19. Painted stair numbers | 45-115 | Easy DIY | 3-4 hours |
| 20. Glow-in-the-dark stair edges | 55-140 | Easy DIY | 3 hours |
1. Two-Tone Stair Treads and Risers
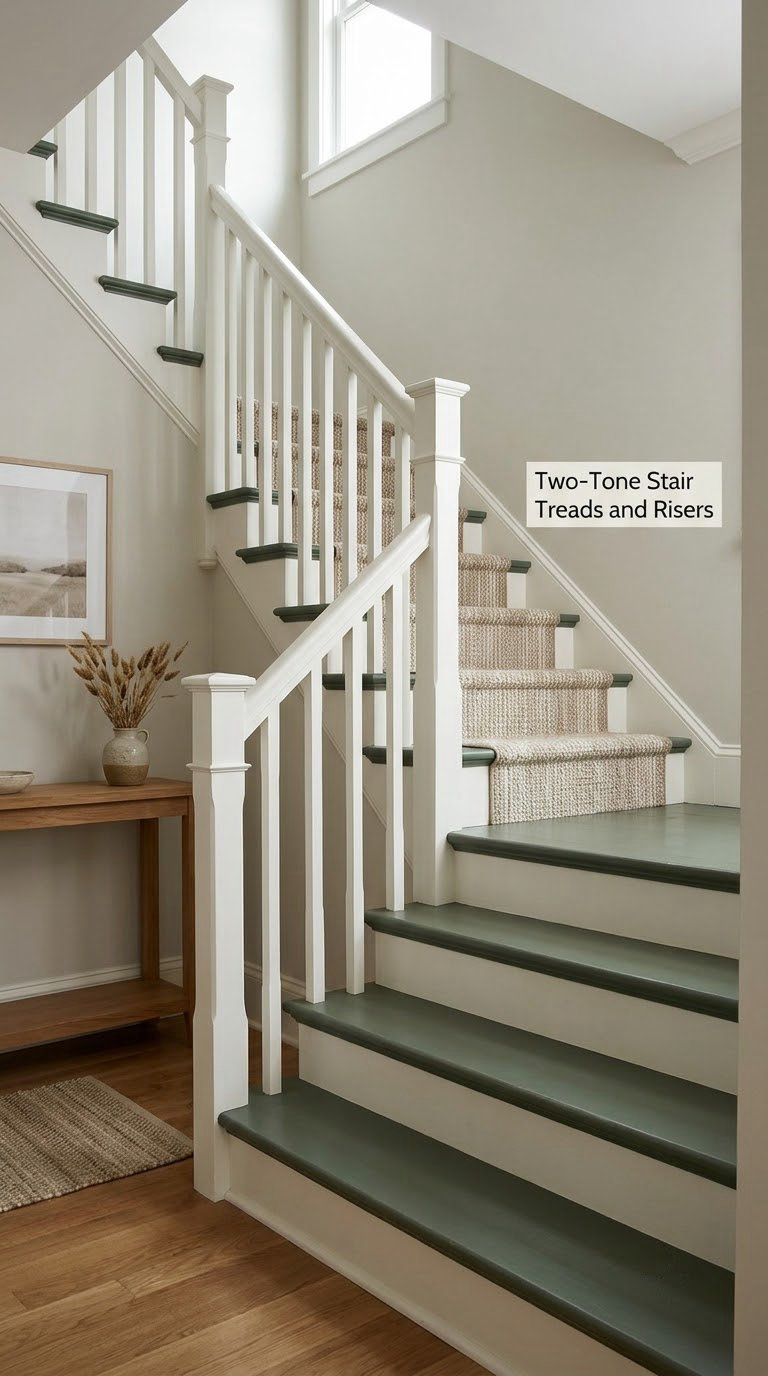
Two-tone paint is the easiest place to start, because contrast gives a plain run some rhythm. You keep the vertical faces light so the space stays open, then drop a deeper colour on the horizontal treads where feet land and dirt shows.
How to do it: Sand any old finish with 120-grit and scuff previously painted risers with 220-grit. Cut in with a brush along the nosing, then roll the treads with a 3-inch nap roller for even coverage. Two coats, allowing 4 hours between them, is normal. Finish treads with a floor-rated enamel in an eggshell or satin sheen.
Cost: roughly 60-160 USD for paint, tape and a new roller. Difficulty: Easy DIY. Time: one weekend.
Good to know: Satin holds up better than flat on treads, and if you rent, ask first. Homeowners on r/HomeDecorating usually pick one neutral and reuse it rather than juggling several strong colours in a tight hall. For a smaller win, a woven runner on the top steps softens the same scheme without paint.
How to Paint a Two-Tone Stair Run
Start at the top of the flight and work downward so you always have a clear route to the door. Tape the nosing line once, carefully, because a wavering edge is the one thing that gives away a rushed job.
Paint every other riser first, then let them dry before you can walk past. Experienced painters on r/paint advise against primer on stair treads, since primer is a soft coat that gets walked on; on bare wood, though, an oil-based primer is worth it to stop the grain drinking the first coat. Seal bare wood with two coats of floor enamel and expect to wait 24 hours before normal foot traffic, longer before you set furniture down.
2. Crisp White Stairs With a Painted Runner
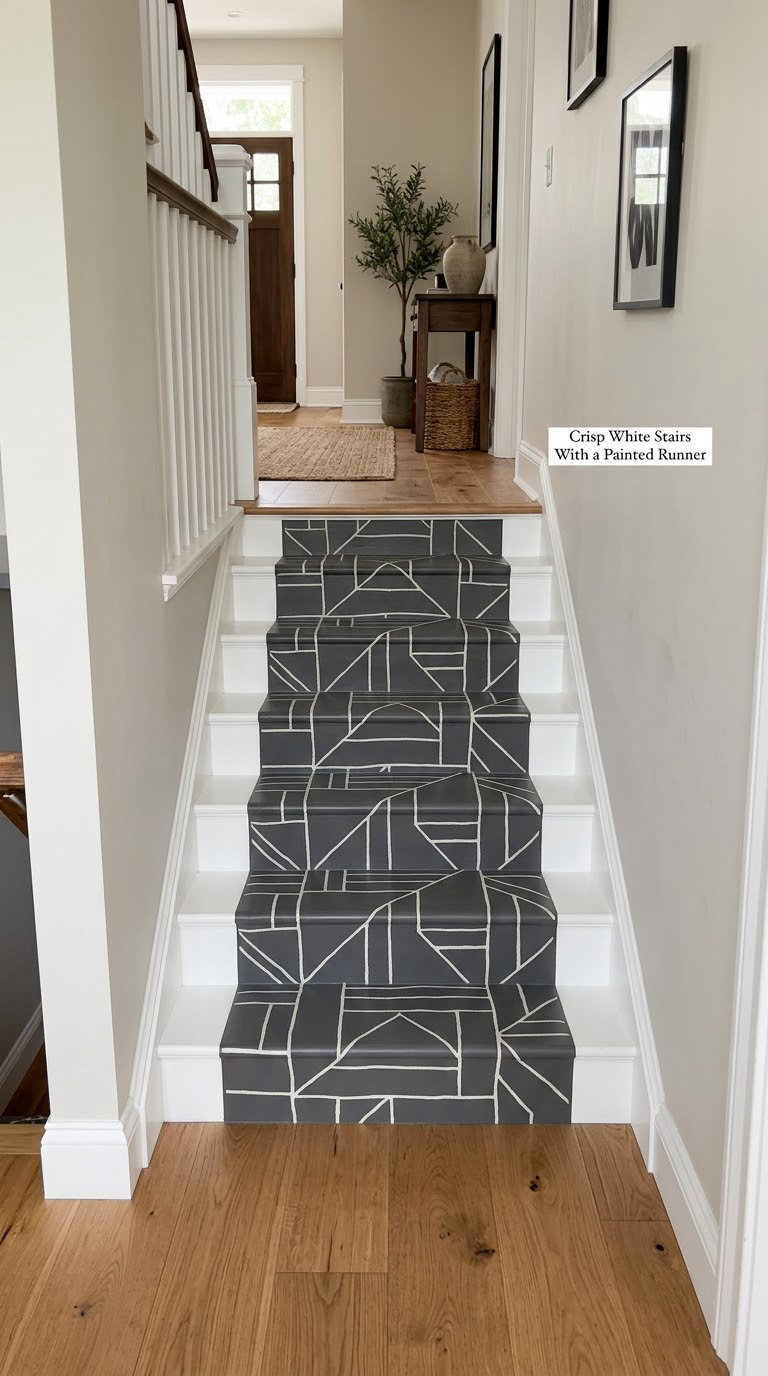
This one fakes a runner with paint, which saves you wrestling with stair-specific rug pads that never quite fit a turn. White on both treads and risers makes the flight read as one clean plane, and the painted band adds the pattern a rug would.
How to do it: Mask a band 10 to 12 inches wide down the centre of each tread, centred on the stair’s midline. Tapers and landings get the same treatment at the same width so the runner reads continuous. Use a 2-inch angled brush for the edges and a small roller inside the band, then peel tape while the paint is still slightly damp.
Cost: roughly 45-120 USD. Difficulty: Easy DIY. Time: 4 to 6 hours plus drying.
Good to know: The pitfall is tape residue, so press edges down with a putty knife and keep the temperature above about 50 F (10 C). If you would rather not paint a pattern at all, low-pile vinyl runner strips cut to tread depth do the same job and lift back out when you move.
3. Soft Two-Tone Vertical Color Blocking
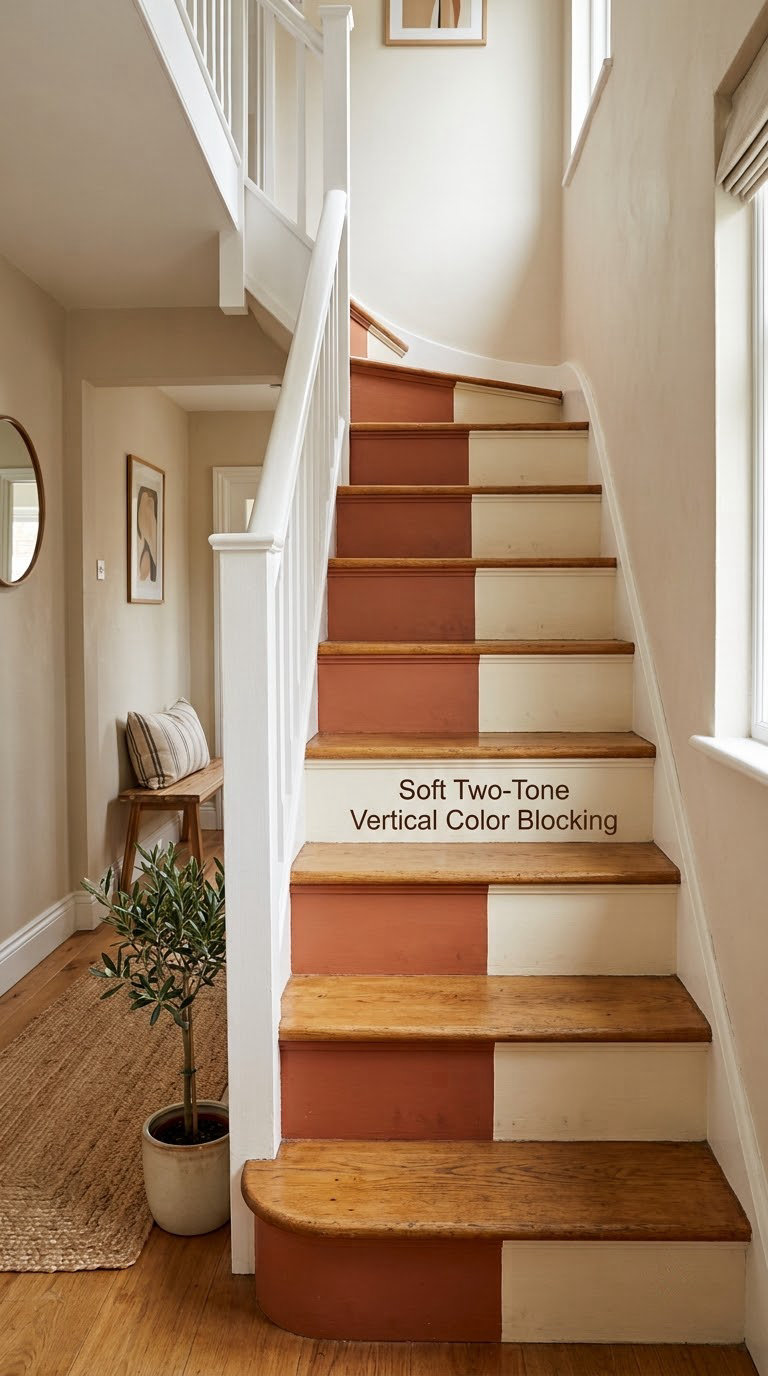
Splitting each riser down the middle, at an angle or straight, gives you colour without a commitment to a whole saturated staircase. It is the easiest of these 20 to do in a narrow hall, because half the surface stays light.
How to do it: Decide on one angle for the entire flight, then mark it with a pencil and a straightedge so the divisions line up step to step. Tape along the line, roll the accent onto one half, and cut in with a small brush at the tape edge. Repeat the same split direction going up so it reads as a pattern rather than a mistake.
Cost: roughly 40-110 USD. Difficulty: Easy DIY. Time: 4 to 5 hours.
Good to know: Do risers only and leave treads in their existing finish or in white, otherwise the walking surface needs a tougher paint than the decorative one. In a rental, a peel-and-stick wall covering on the risers gives the same split look and comes off cleanly.
4. Checkerboard Stair Run
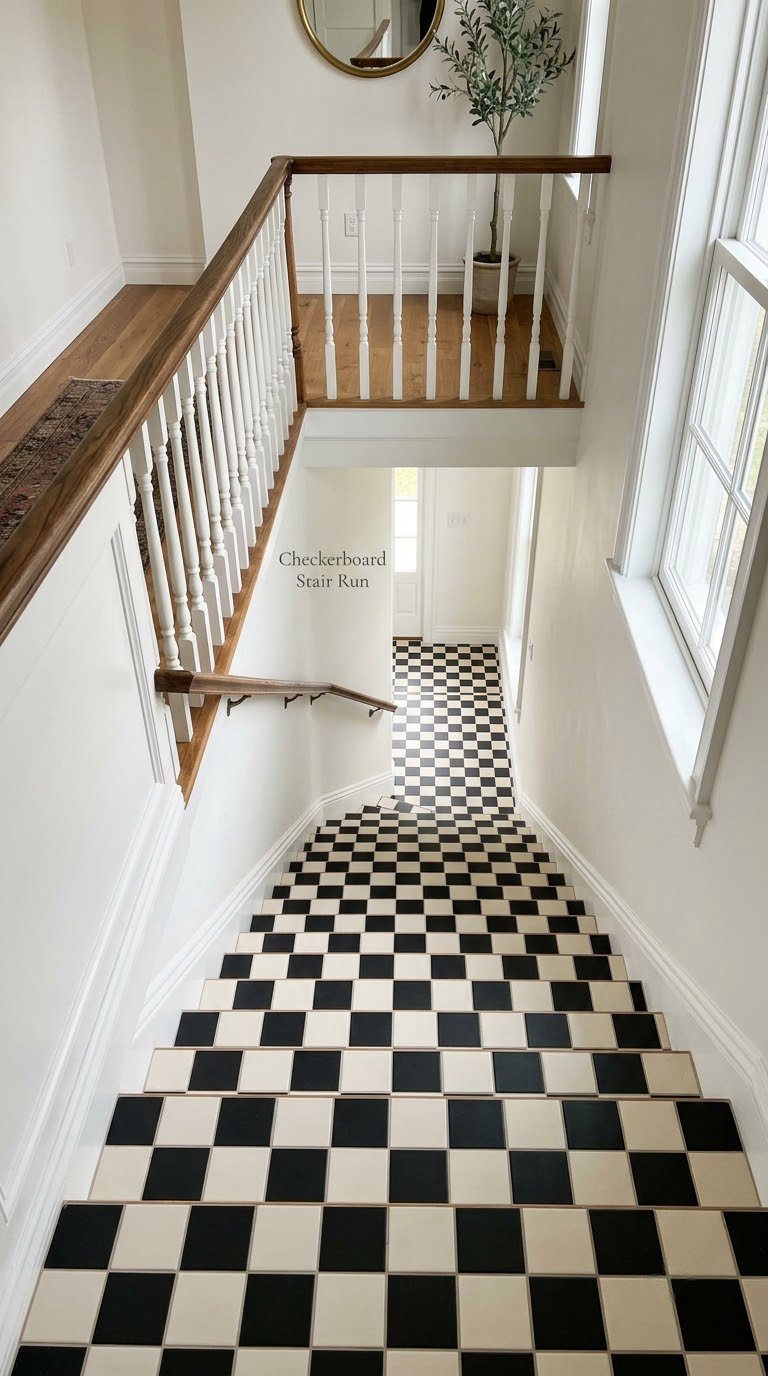
Checkerboarding is bold, graphic and a bit retro, which is why it sticks in memory long after the paint dries. Done well it looks like a chessboard unrolling down the flight, and it hides scuffs better than a solid dark stair because the pale squares interrupt the wear.
How to do it: Pick squares that divide evenly into your riser width, usually 8 to 10 inches on a typical flight. Measure once, mark a grid on masking tape, and fill alternate squares in one colour. Let that dry fully, then remove only the tape over the squares you still need and fill them in the second colour. Two thin coats beat one thick coat every time.
Cost: roughly 70-180 USD. Difficulty: Moderate DIY. Time: 6 to 8 hours across two sessions.
Good to know: Taping over cured paint is fine, but taping over a fresh coat lifts it. If your hall is only three steps wide, try the pattern on the landing wall instead, where the grid has room to read. High-contrast checkers in a dim stairwell can feel busy, so keep the walls pale.
5. Ombre Staircase From Light to Dark
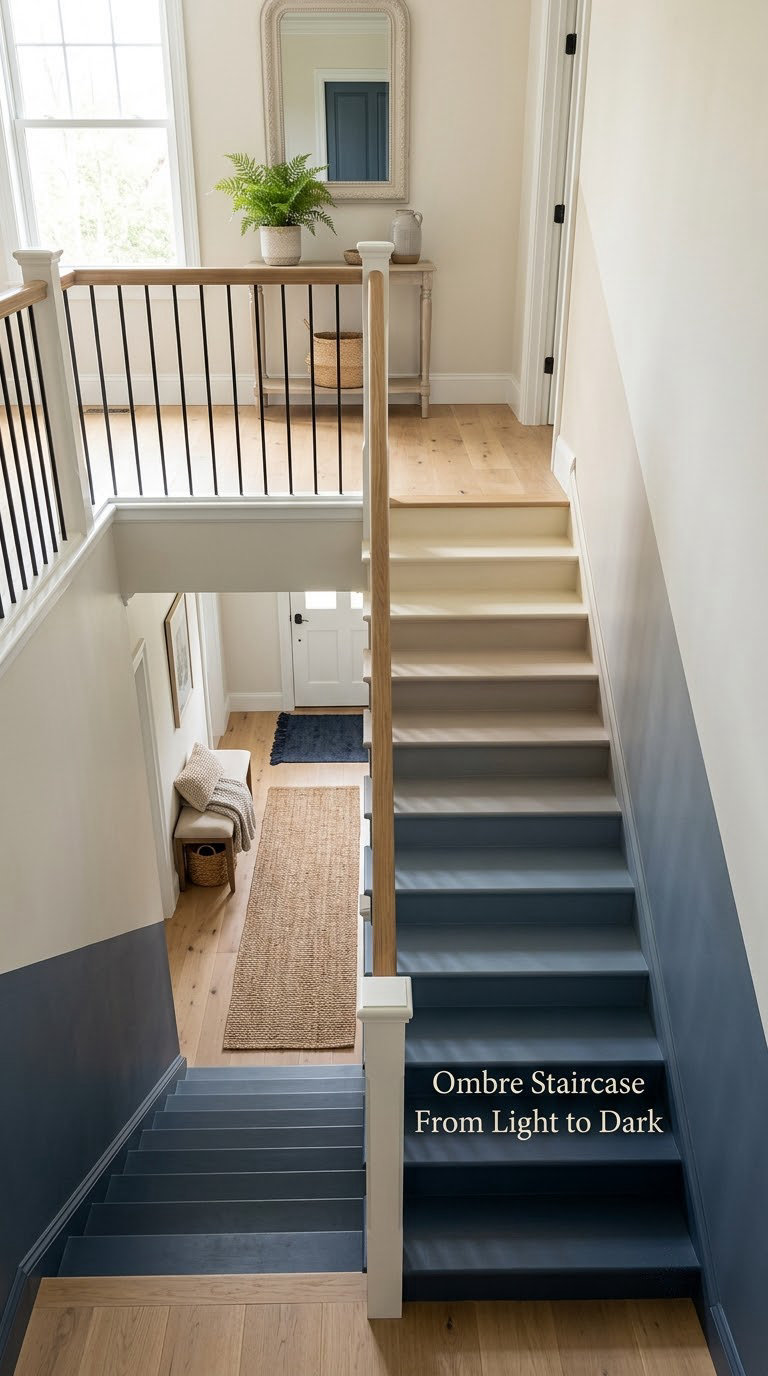
An ombre stair fades step by step from a pale landing colour to a deep one at the bottom, so the staircase itself becomes a gradient. It suits a tall stairwell where a single dark colour would make the flight feel like a tunnel.
How to do it: Mix one base colour into four or five tints in five separate containers, keeping a written record of the mix ratio for each. Paint the top three steps with the palest tint, move down a step at a time, and blend the wet edge into the next step with a damp brush. Work every other step per session so the house stays walkable.
Cost: roughly 90-220 USD. Difficulty: Moderate DIY. Time: two days with drying between.
Good to know: Rough transitions are the whole point, so do not fuss over the blend. Label your cans with masking tape and a pencil, because you will need to touch up scuffs later. If five tints feel like too many, a two-step tonal jump from cream to muted navy reads almost as well at half the effort.
6. Color-Dressed Stair Riser Gallery
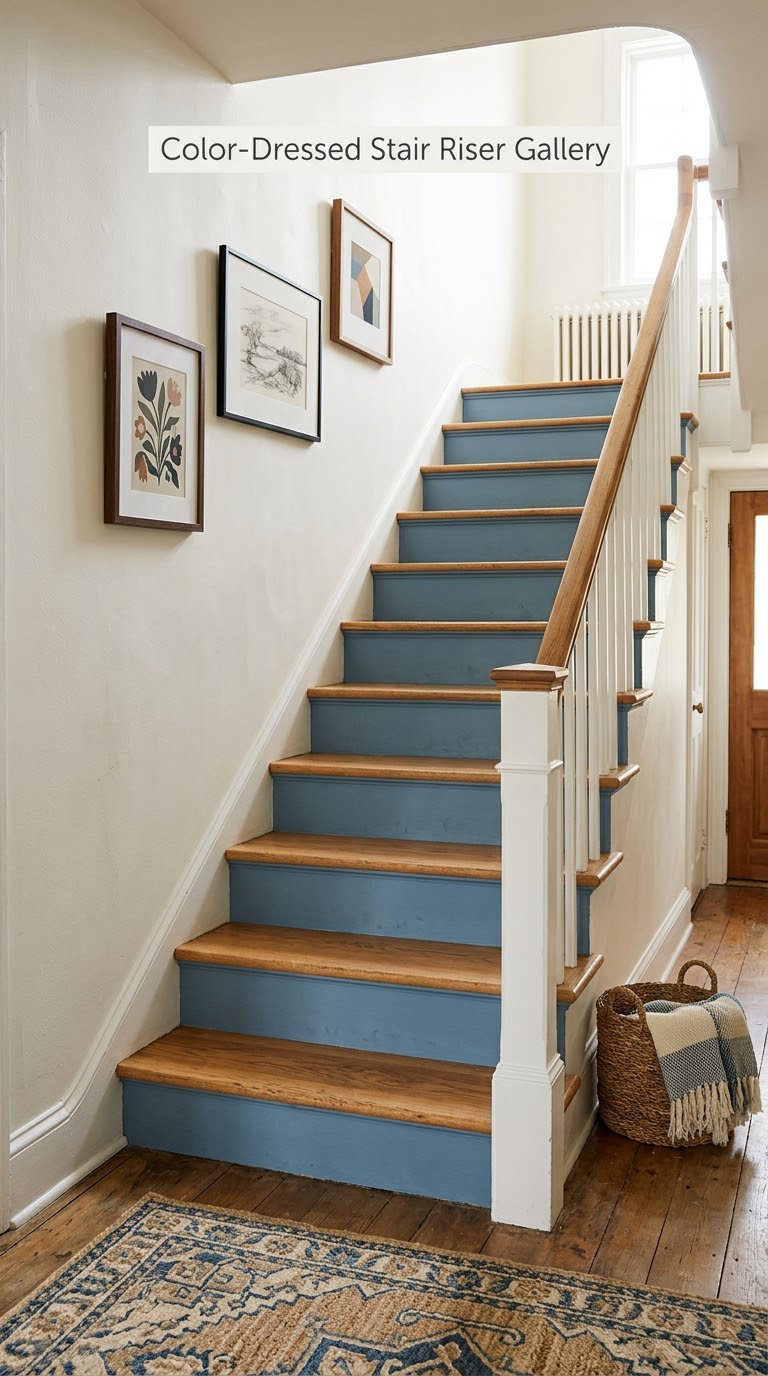
Painting every riser in one confident colour turns the flight into a backdrop for art. This is the scheme to pick if you like hanging pictures along the stairs, because a single flat colour stops the wall behind them from fighting the frames.
How to do it: Choose the riser colour first, then hang art against it. Keep frame edges on one vertical line and space them 8 to 10 inches apart measured along the stair’s slope, not the wall. Use picture hooks rated above the frame weight and add a dab of removable picture-safe pad behind each frame so vibrations from foot traffic do not walk them along the wall.
Cost: roughly 50-130 USD for the paint. Difficulty: Easy DIY. Time: 4 hours of painting.
Good to know: Satin finish keeps fingerprints off risers better than flat. In a low-light stairwell, a lighter version of the colour reads better than the deep shade on the sample card, so sample the top step first.
7. Faux Shiplap Stair Risers
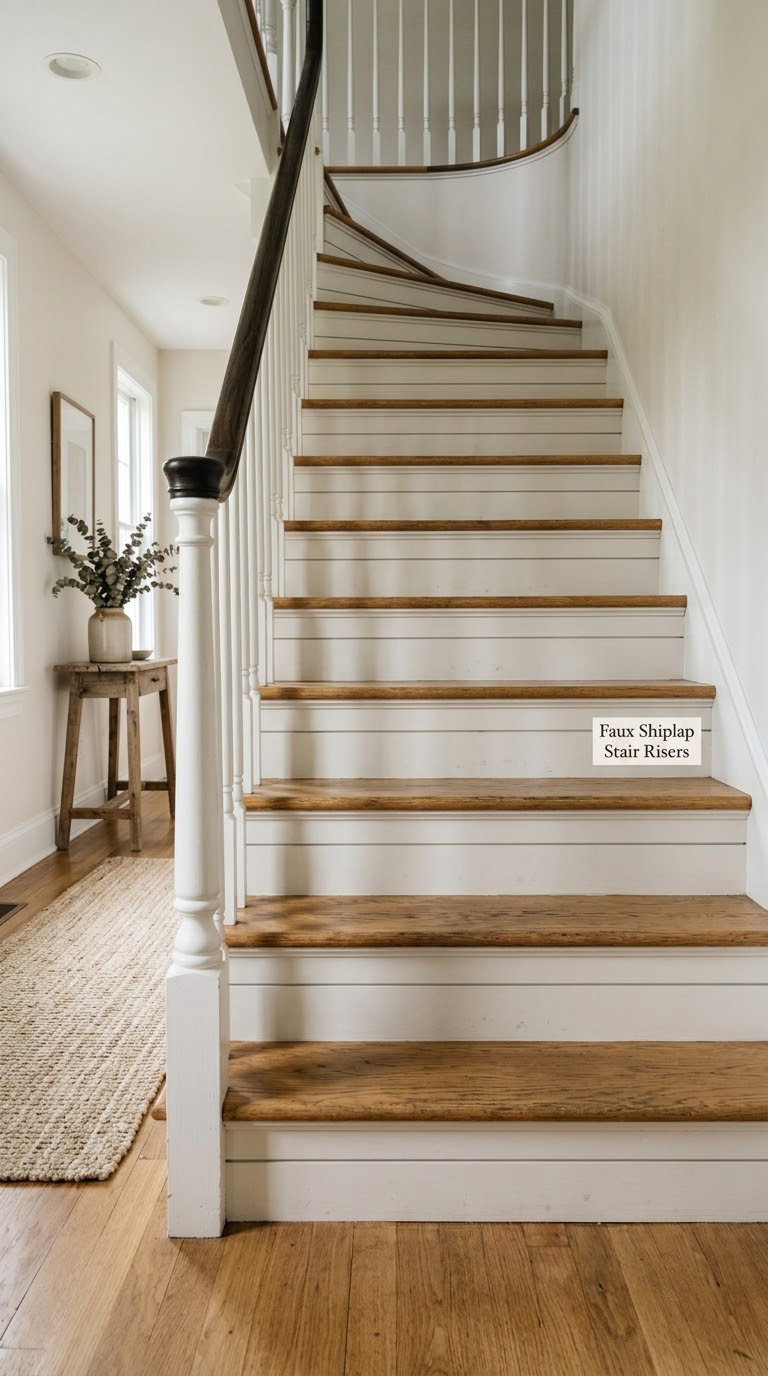
Faux shiplap is horizontal shadow lines painted onto flat risers, and it gives a plain staircase a farmhouse texture without the cost or the joints of real boards. On vertical risers the lines are horizontal, which makes the shadow lines catch the light from the landing window.
How to do it: Mark a level line every 4 to 5 inches with a pencil and a long straightedge. Run a strip of painter’s tape along each line and burnish it down with a finger. Roll a slightly darker shade of the wall colour into the gap, then peel the tape while the paint is still damp so the edge stays crisp. Two coats of the base colour go on first.
Cost: roughly 65-170 USD. Difficulty: Moderate DIY. Time: about 6 hours.
Good to know: A level is non-negotiable here; a hand-measured line drifts visibly across a wide riser. Washable striped wallpaper gives a similar rhythm in half the time and peels off at move-out, which makes it the sensible rental option.
8. Plaid Stair Accent
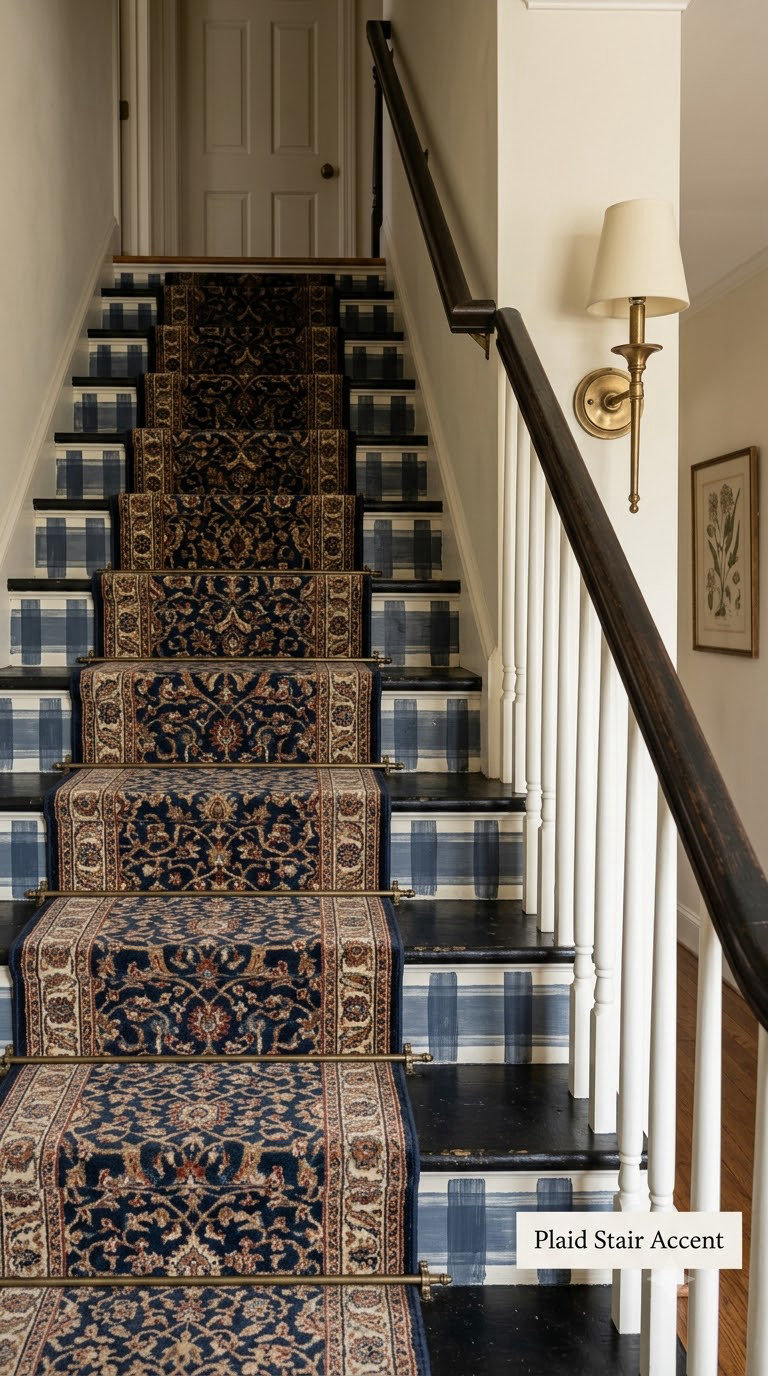
A restrained buffalo check or tartan on risers reads tailored rather than loud, provided the palette stays to two or three colours. It suits a hallway with traditional trim, where a plain white stair looks unfinished next to everything else.
How to do it: Pick two colours and lay out the grid on paper first. Measure the riser height, divide by your chosen repeat, usually 2 to 3 inches, and mark every line across the full width. Tape the vertical lines before the horizontal ones so crossings stay square, and alternate which colour sits on top at each intersection.
Cost: roughly 70-190 USD. Difficulty: Moderate DIY. Time: about 7 hours.
Good to know: A plaid with fine detail needs a steady hand and a small brush; nobody enjoys a plaid with a wobble in it. If the pattern feels fussy once it is up, a wide vertical stripe in the same two colours keeps the tailored mood with half the taping.
9. Abstract Color-Block Risers
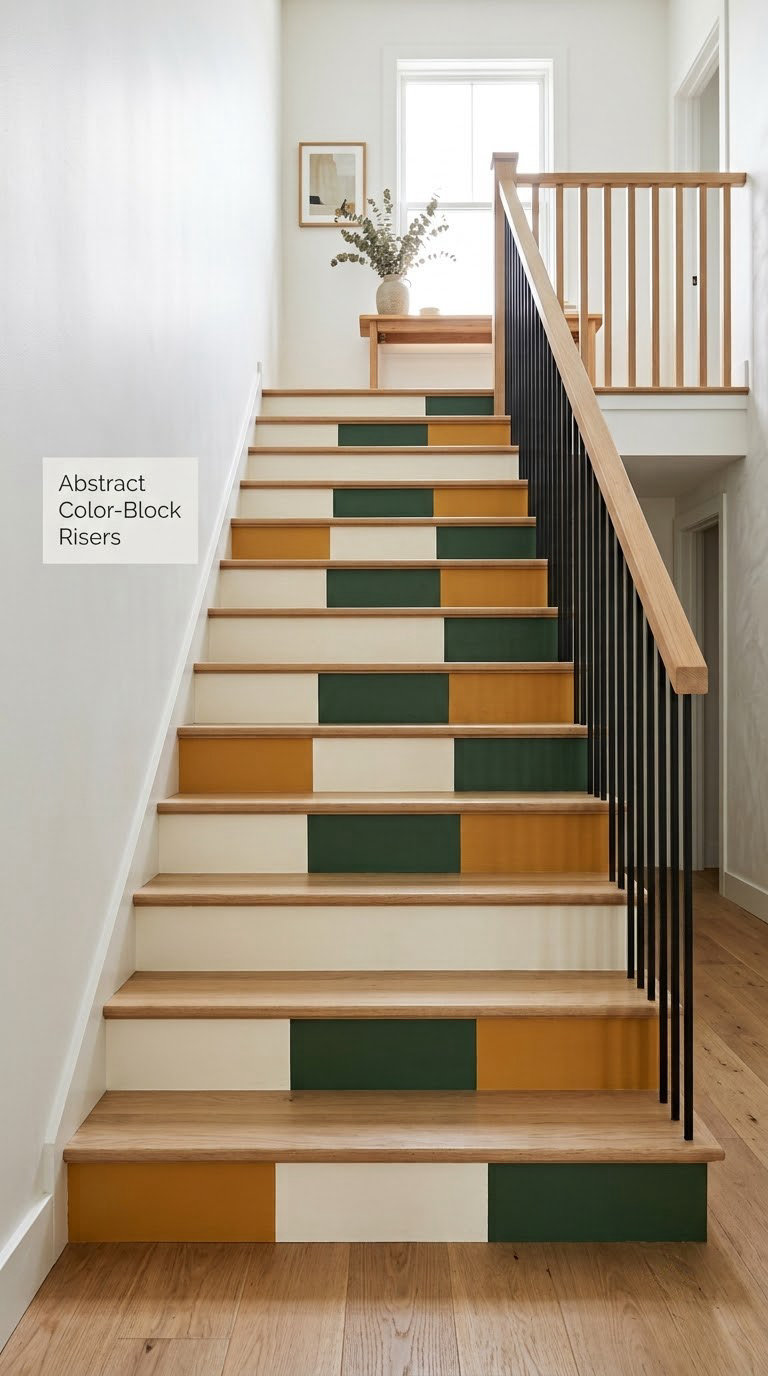
Instead of a repeating motif, each riser gets two or three large colour fields with no symmetry, and the stack reads like abstract art when you view it from the bottom of the flight. It suits a modern hallway where a traditional pattern would feel borrowed.
How to do it: Sketch your colour fields on paper at riser proportions first, then transfer with a pencil grid. Paint the largest field on every riser first, then the second, then the smallest, so you are always touching up a boundary rather than chasing loose edges. Use a 2.5-inch brush and let each colour dry 2 to 3 hours before the next meets it.
Cost: roughly 65-175 USD. Difficulty: Moderate DIY. Time: about 6 hours.
Good to know: Limit yourself to three colours from one family or one strong neutral plus two accents. In a rental, tape the layout on paper, tape the paper to the risers and trace through it, so you get a real preview before committing.
10. Tinted Stair Treads With White Risers
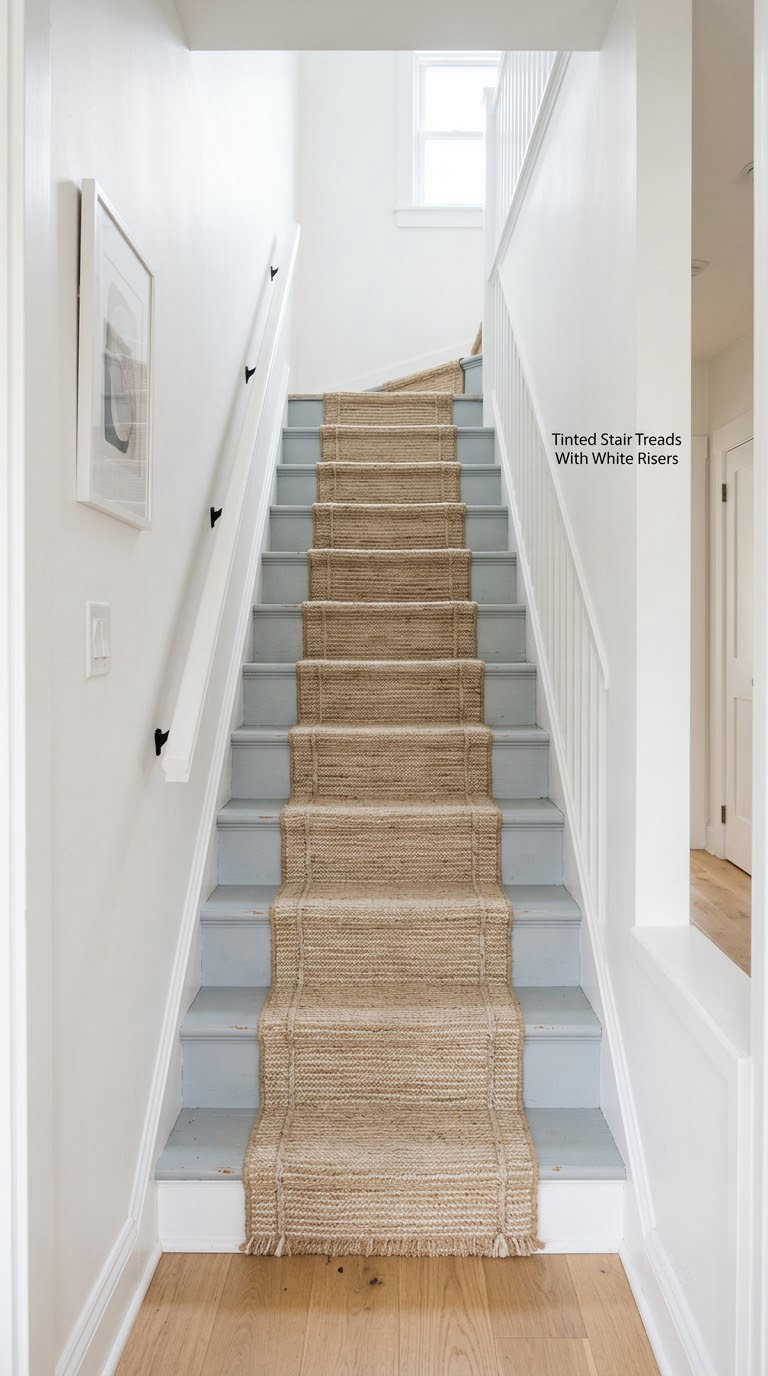
Softly tinted treads with white risers is the look to pick when you want definition without drama. White risers bounce light into narrow halls while a tinted tread adds warmth underfoot, which is why this version keeps coming up at the top of the search results for painted stair ideas.
How to do it: Work the grain with 100-grit on bare wood, then 150-grit, and wipe with a damp cloth before painting. Use an oil-based primer on bare wood and a scuff coat plus your finish coat on previously painted treads. Cut in the nosing with an angled brush, then roll with a short-nap roller for texture and let each coat dry 4 to 6 hours.
Cost: roughly 80-200 USD. Difficulty: Easy DIY. Time: one weekend.
Good to know: Treads take the most abuse in the house, so buy a floor-rated enamel or porch-and-floor paint rather than wall satin. A washable flat-weave runner in a similar tone protects the finish and leaves the colour visible at the sides.
11. Stair-Themed Wall and Riser Color Story
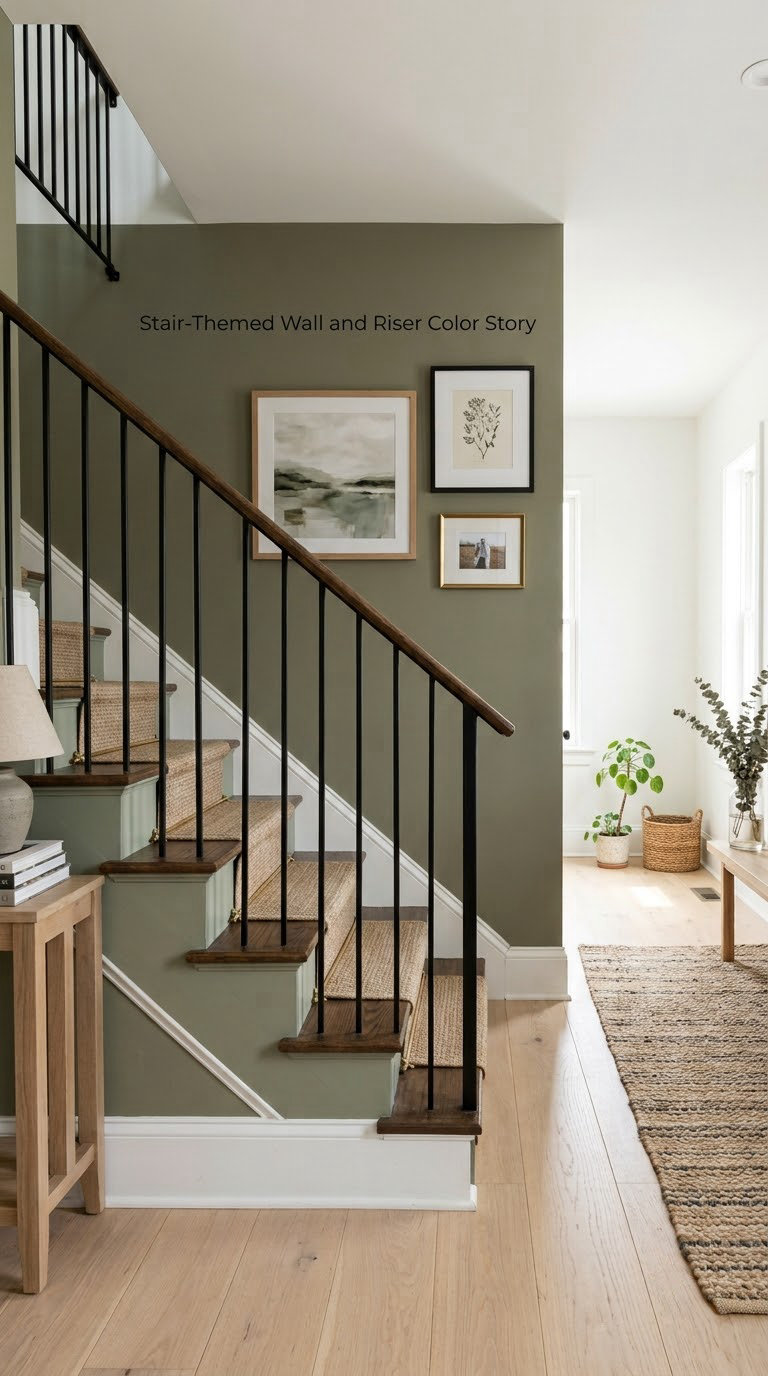
Painting the risers and the adjacent hallway wall as one connected colour story makes the stair feel built into the room instead of parked in it. This is the option to choose when the hallway wall is visible from the entry door and people will see both surfaces at once.
How to do it: Sample the accent colour on a 12-inch square of wall near the landing, where light is strongest, and let it dry overnight. Paint the wall first with a roller, cutting in at corners and trim. Then roll the same colour onto the risers with a short-nap roller for a matched sheen, keeping treads in wood or a floor enamel.
Cost: roughly 120-300 USD. Difficulty: Moderate DIY. Time: two days with drying.
Good to know: Extra colour on a big surface means extra paint, so buy sample sizes first and check the label’s spread rate against your wall square footage. If the stairwell is dim, pick the two shades lighter than you think. One surface only is fine: many people paint only the wall and keep the stairs in oak.
12. Soft Color-Blocked Stair Runners
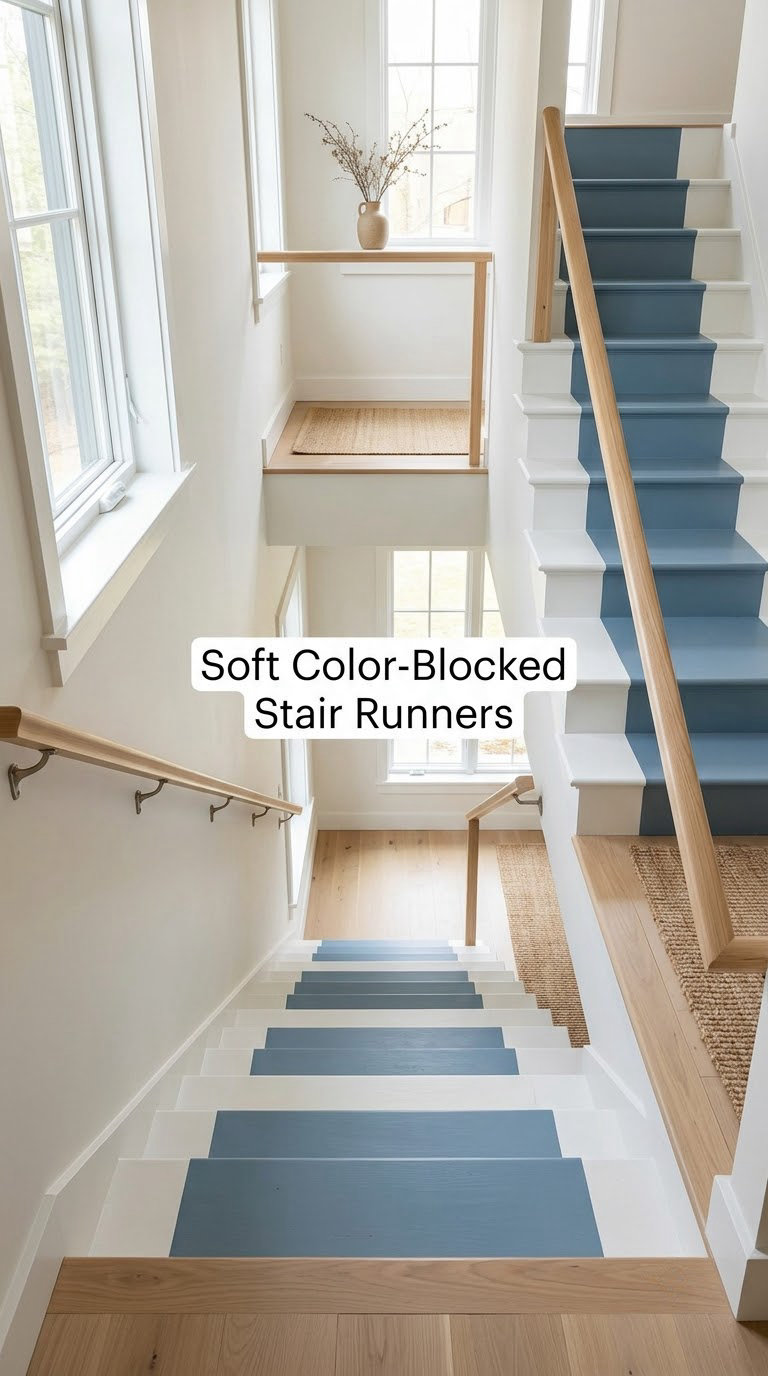
Wide painted bands across otherwise neutral steps imitate a continuous runner, which is a neat trick in a hallway that turns or lands awkwardly. It keeps the full width of the stair usable, unlike a rug that bunches at a turn.
How to do it: Mark band edges 4 to 6 inches in from each side of the tread and roll the accent colour inside. Treat every tread the same way, so the band reads as one runner running down the flight. Use a floor-rated enamel in satin for grip and wipe coats thin to avoid pooling at the nosing.
Cost: roughly 60-150 USD. Difficulty: Easy DIY. Time: about 5 hours.
Good to know: Never leave a wet coat thicker than a coat brush would lay down; thick paint on a nosing takes days to cure and stays slick. A removable runner strip is the alternative if you plan to move within a year or two.
13. Botanical Stenciled Stair Risers
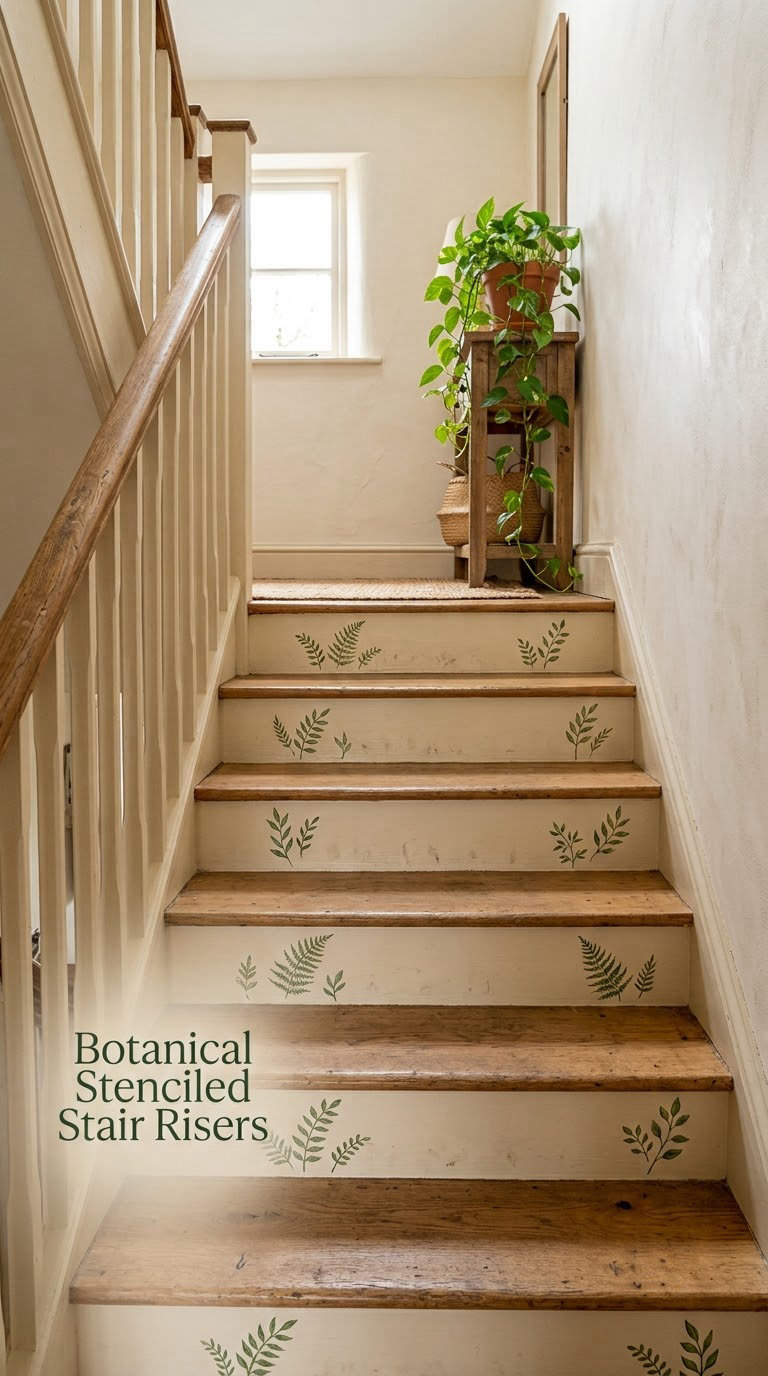
A repeated leaf, twig or vine motif across the risers adds personality without covering the surface, and homeowners really do hand-paint these directly onto stairs rather than using a decal. Sparse sprigs placed low on each riser look grown rather than applied.
How to do it: Mark a light centre line on each riser and place one motif 4 to 6 inches up, repeated at the same height going up the flight. Hold a reusable adhesive stencil flat with one hand and pounce a thin coat of paint with a stencil brush so the edges do not bleed. Always finish with a stencil brush rather than a roller, which forces paint under the edge.
Cost: roughly 55-150 USD. Difficulty: Moderate DIY. Time: about 5 hours.
Good to know: Two to three sprigs per riser is plenty; a crowded riser turns into a wall of leaves from below. If stenciling feels fiddly, one larger motif on the landing riser only gives the same effect with far less work.
14. Scalloped Painted Stair Risers
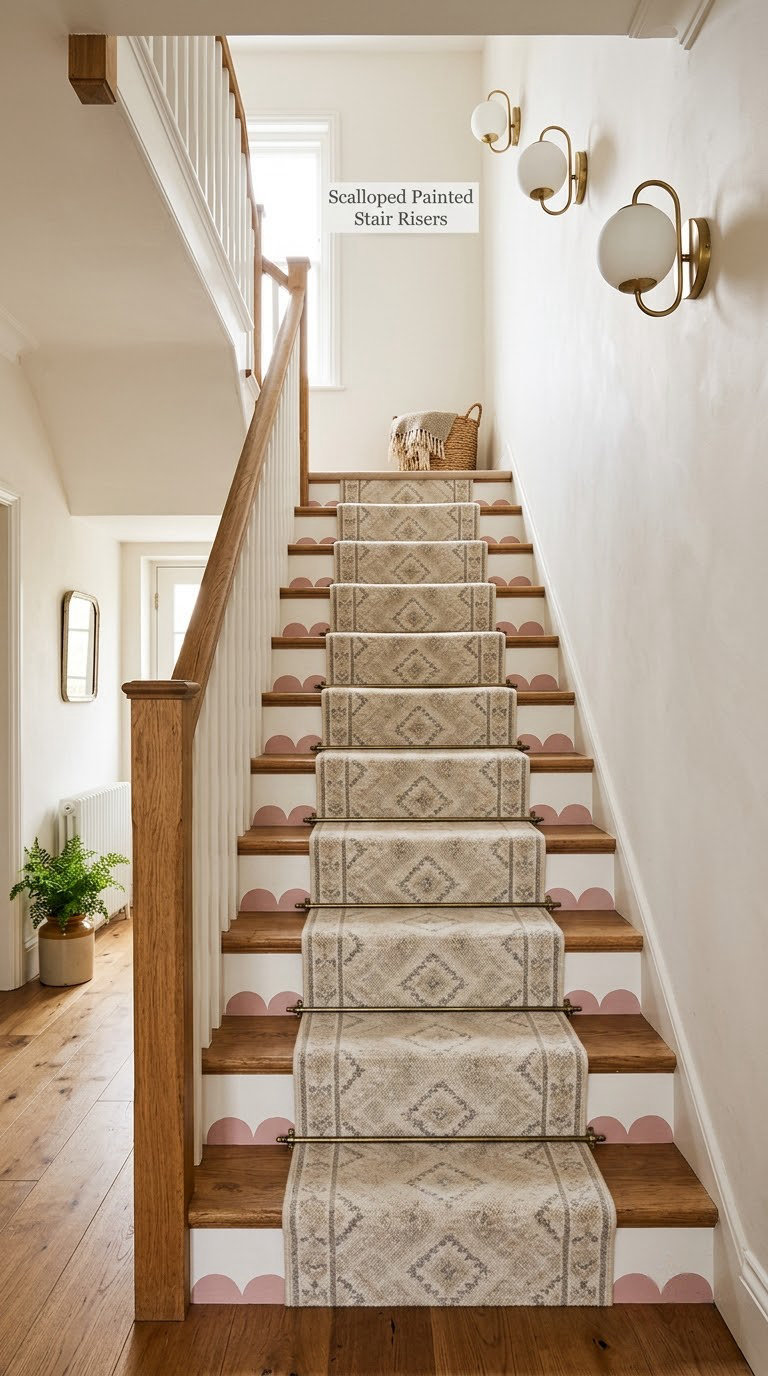
Repeating half-circles soften the hard straight lines of a staircase, which makes scallops a natural fit for a cottage, coastal or bohemian hallway. Viewed from the bottom of the flight, the arcs read as a gentle wave.
How to do it: Draw one half-circle on card stock, cut it out and use it as a template, tracing each scallop along the top edge of every riser with the same radius, usually 4 to 6 inches. Paint the band below the curve in your accent colour, then add a second, smaller arc in a lighter tint for depth. Keep the curve 2 inches below the nosing so the top edge stays crisp.
Cost: roughly 55-145 USD. Difficulty: Moderate DIY. Time: about 5 hours.
Good to know: Freehand curves wobble, so trace the same template every time rather than eyeballing each one. A single arched shape repeated large on each riser is the simpler version and reads more modern.
15. Metallic-Accent Stair Risers
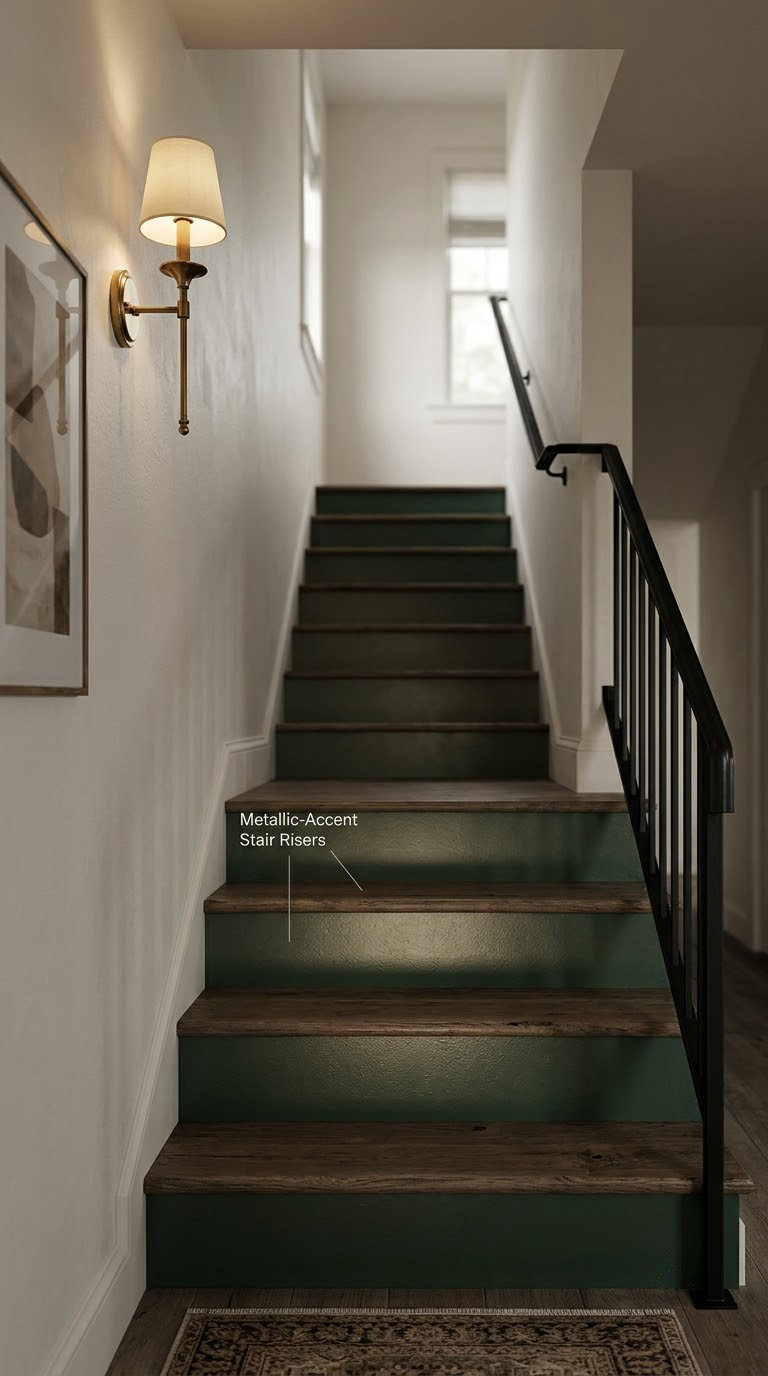
A restrained metallic or pearlescent finish reflects what little light a dim hallway has, so a dark stairwell stops feeling like a cave. Used on risers only, the shimmer reads as a light effect rather than as glitter.
How to do it: Buy a metallic paint labelled for your base colour and for interior use, then test a 6-inch patch and let it cure for 24 hours. Apply with the short foam roller the label specifies and keep coats thin; thick metallic coats dry patchy. Follow with the compatible clear topcoat the manufacturer names, since mixing an unrelated sealer can dull the effect.
Cost: roughly 70-160 USD. Difficulty: Easy DIY. Time: about 5 hours plus cure.
Good to know: Metallic paint shows every scuff and roller lap more than flat colour does, so it is better on risers than on treads. If you want the brightness without the upkeep, a satin finish in a light warm white does a similar job in a dim hall.
16. Playful Rainbow Stair Steps
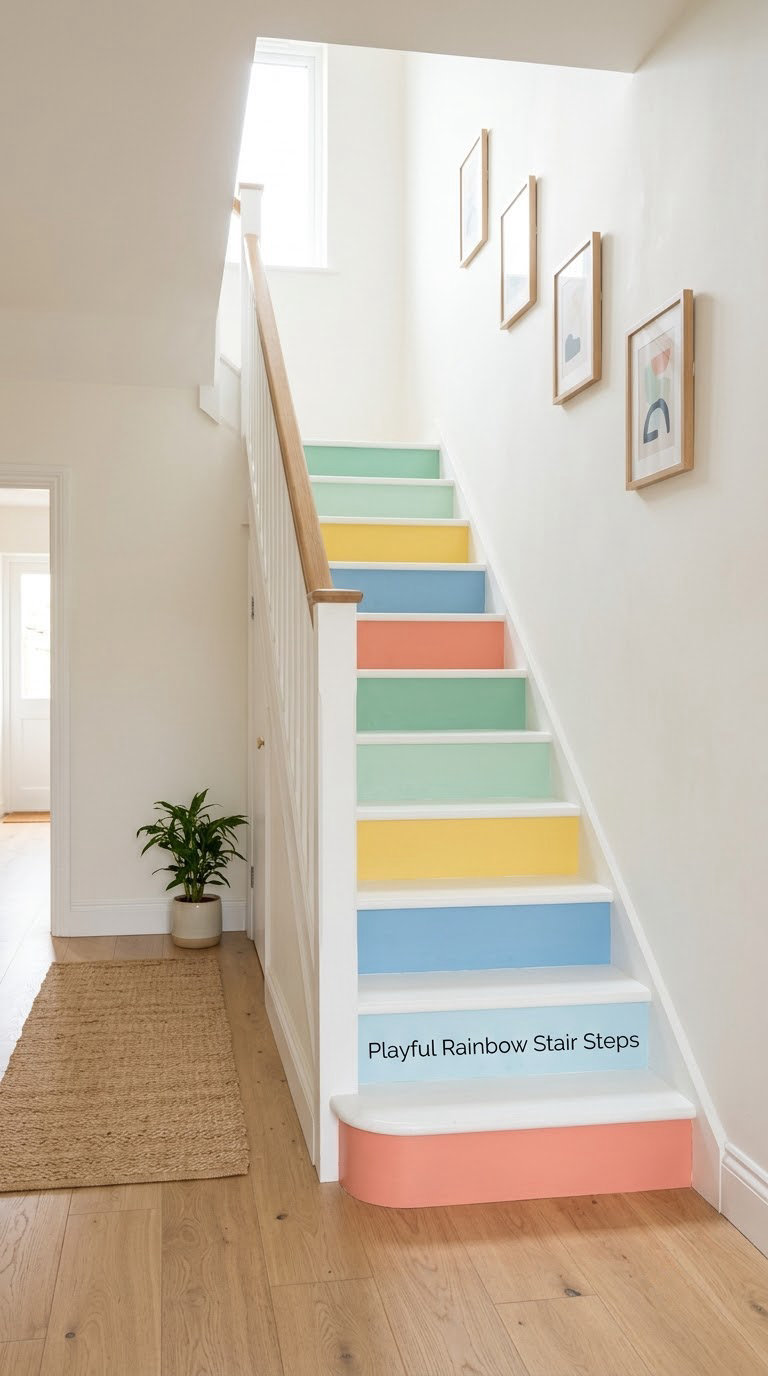
Coordinated pastel risers or a controlled colour sequence turn a family hallway into something a kid actually likes to walk up. This is the one to pick when the stairs lead to a playroom or a second bedroom.
How to do it: Paint all risers a solid base colour first, then add each pastel on top in two thin coats. Test each pastel over the base on a hidden riser, since pale colours can go chalky over a dark coat and need a third pass. Keep treads white so the sequence reads cleanly and the walking surface stays easy to touch up.
Cost: roughly 60-150 USD. Difficulty: Easy DIY. Time: about 5 hours across two sessions.
Good to know: Order matters less than repeatability: buy one sample pot of each colour first so the pastels stay in the same family. Two pastels that differ clearly, such as soft coral and sky blue, are enough if four start to feel busy.
17. Tonal Monochrome Staircase
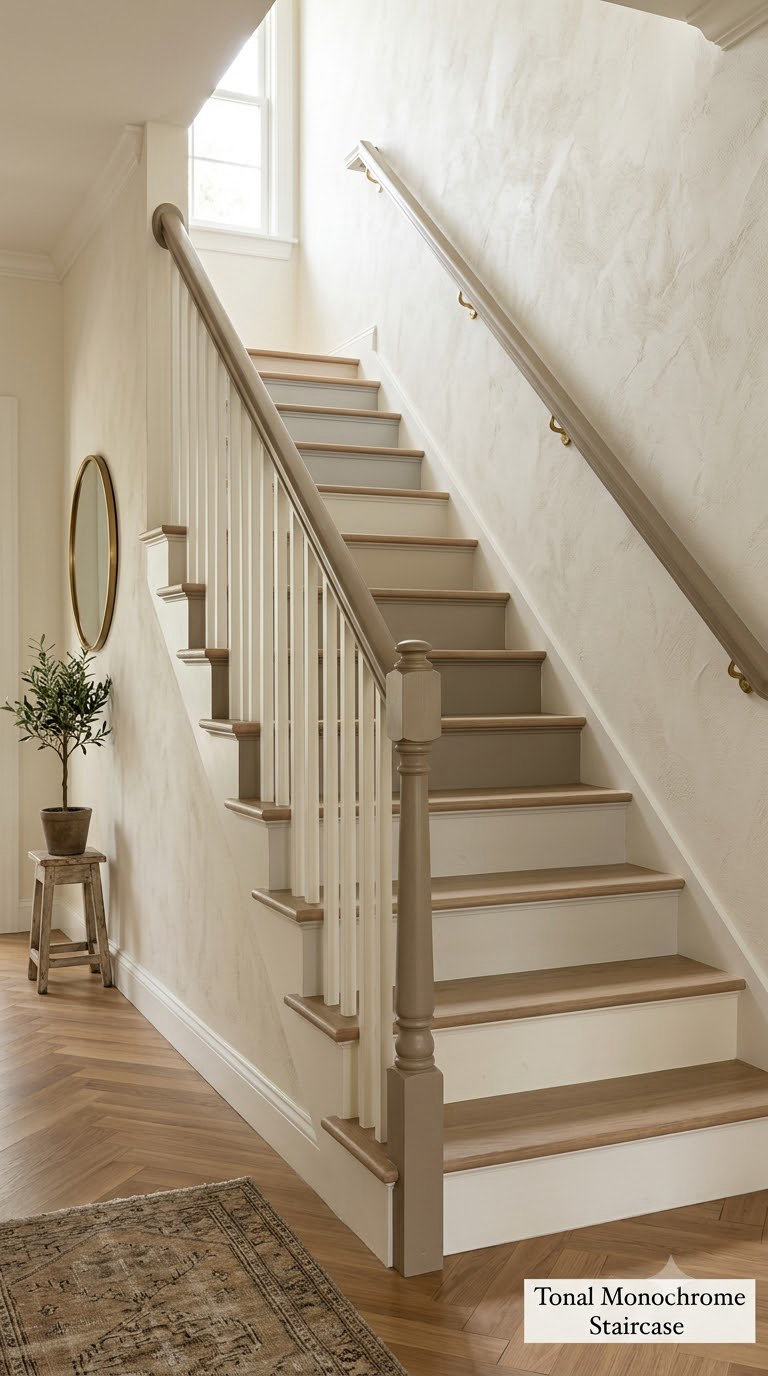
Layering closely related neutral tones gives a staircase depth without high contrast, and it is the safest choice for a narrow or windowless hallway. Tonal greige and warm neutral stair paint ideas are showing up in renovation photos everywhere right now, largely because the look is forgiving in bad light.
How to do it: Pick four neutrals that all come from the same undertone family, warm or cool, and test them side by side on one riser before committing. Apply the lightest to treads, the mid-tones to risers in rotation, and the deepest to the handrail or balusters. Keep every sheen the same, because mixing flat and satin in one palette makes the tonal steps read as mistakes.
Cost: roughly 70-170 USD. Difficulty: Easy DIY. Time: about 5 hours.
Good to know: Undertones fight each other, so warm putty next to cool grey looks dirty rather than subtle. Two shades instead of four still reads as tonal, and it halves the number of cuts in.
18. Geometric Mosaic-Inspired Risers
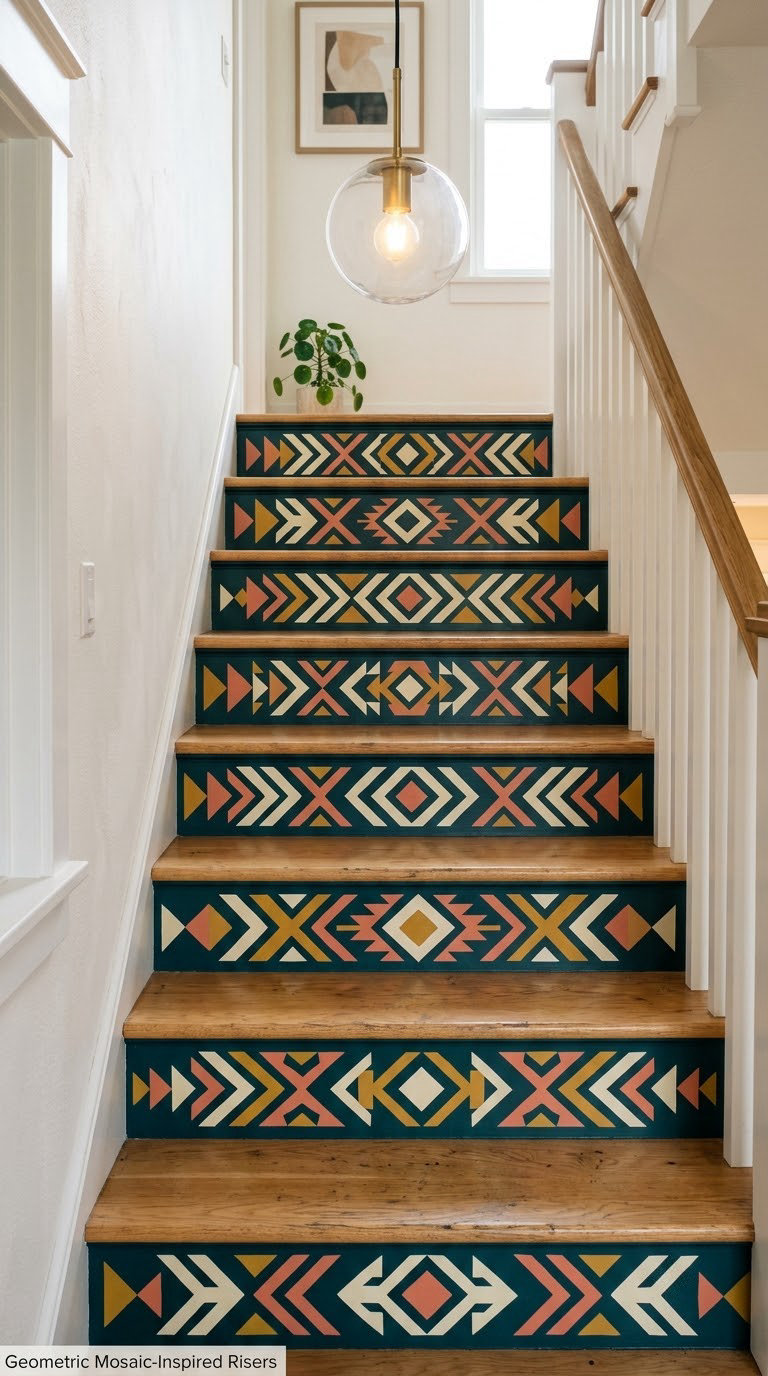
Small triangles, diamonds or irregular shapes make a riser look tiled without any tile work, which is the most ambitious idea on this list and the most reward for patience. The grid does the visual work; the colours just fill it in.
How to do it: Draw your full pattern on paper at riser size, then transfer it by holding the paper against the riser and rubbing the back with a pencil. Tape the main diagonals first, fill in the largest shapes, then move to smaller ones so your hand never has to work in a tight gap. Plan your colour order before you start and work from the darkest to the lightest so overlaps land cleanly.
Cost: roughly 85-210 USD. Difficulty: Moderate DIY. Time: about 8 hours, best split over two days.
Good to know: Use a pencil grid and a straightedge, not a ruler alone, since risers are rarely square. A simplified diamond grid in two colours delivers the same mosaic feel in about half the time.
19. Painted Stair Numbers
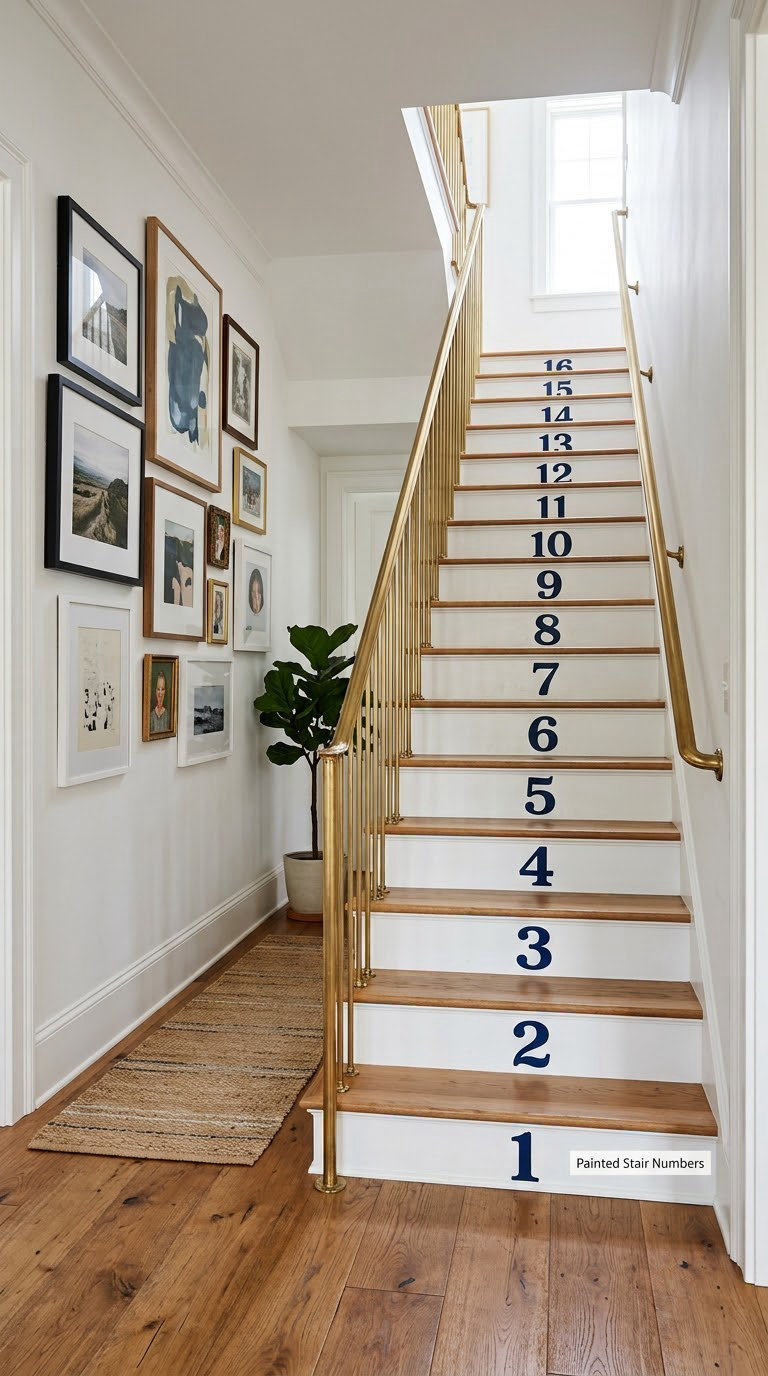
Oversized numerals centred on each riser are a playful graphic feature that doubles as a wayfinding cue on a stairway to a basement or a guest floor. Painted rather than stickered, they do not peel off in a draft.
How to do it: Mark the centre of each riser with a pencil cross, then mark the baseline 8 to 12 inches up from the bottom edge so the numerals do not clash with the nosing. Centre a stencil on each cross, tape it flat, and pounce with a stencil brush in two thin coats. Keep the same height on every riser even as the tread depth changes.
Cost: roughly 45-115 USD. Difficulty: Easy DIY. Time: 3 to 4 hours.
Good to know: Buy stencil numbers in the size you want rather than shrinking large ones; small numerals on a wide riser look lost. For a family hallway, alternate sizes or use one numeral per riser in different colours. Repainting over the numbers later is easy if you stay in the same colour family.
20. Stairway Glow With Reflective Paint
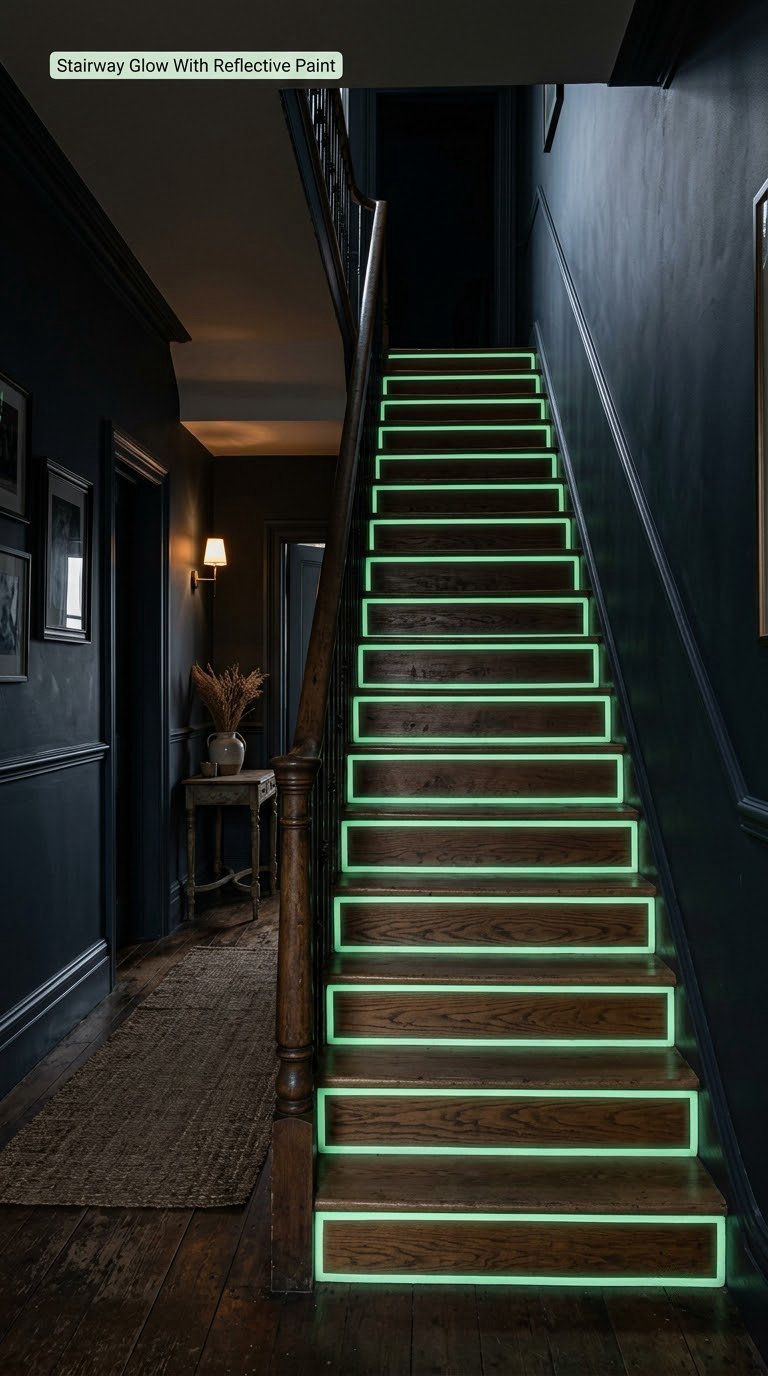
Glow-in-the-dark or low-sheen reflective paint along step edges makes a dim hall safer at night without adding a hardwired light or another switch. It is the most practical idea on the list and the least decorative, which is exactly why it works in a basement stair.
How to do it: Buy a product labelled for stair and floor use rather than a craft glow medium, and check that your topcoat is compatible with it. Paint a 1 to 2 inch band along the nosing of each tread and up the leading edge of each riser. Charge it with a bright light for the time the label states, then let it cure 48 to 72 hours before testing how long the glow lasts.
Cost: roughly 55-140 USD. Difficulty: Easy DIY. Time: about 3 hours plus cure.
Good to know: Glow strength drops with each charge and depends on how much light the hallway gets, so test one step before painting all of them. Reflective tape strips on the nosing give a similar night-time cue in minutes and peel off at move-out, which makes them the sensible rental choice.
Planning Tips for Painting Staircases
Before you buy a single pot, walk through this list. Most disappointing stair paint jobs come down to prep and sequencing rather than colour choice, and the extra day you spend protecting the floor below saves the whole project.
- Measure before you paint. Multiply riser width by riser height for the side area and tread depth by tread width for the top surface, then add 20 percent for cutting in and the two coats you will need.
- Prep the whole surface, not just the dirty parts. Sand bare wood to 150-grit, scuff existing paint to 220-grit, and fill nail holes and gaps before the first coat goes on.
- Test samples in the hallway itself. Paint a 12-inch square on the bottom step and one near the landing, then look at both in morning and evening light before buying a gallon.
- Pick the primer by surface and condition. Oil-based primer on bare wood helps the grain; on previously painted stairs many experienced painters skip it and rely on a scuff coat plus a durable floor enamel. Treads take foot traffic, risers do not, so they can take a different sheen.
- Protect the room and sequence the coats. Drop-cloth the floor below, tape the skirting and baseboard, and work top to bottom painting every other riser per session so the staircase stays usable.
- Budget a 10 to 15 percent buffer. Add it for extra coats, touch-ups and the second sample colour. Of all 20 painted stair ideas for a hallway, the ones people regret are the ones where the colour was chosen from a 1-inch chip in a bright store instead of the stair itself.
Some of these schemes suit older homes better than others, and the same is true of the surrounding room. If your hallway leans cottage or country, our cozy primitive room ideas pair naturally with scallops, plaids and botanical risers. For a lighter, plant-filled look, greenhouse interior ideas translate well to a tonal staircase with white risers.
Frequently Asked Questions
What is the best paint color for a hallway staircase?
For most hallways, a light warm neutral on risers with a slightly deeper tone on treads works best. It brightens a narrow or windowless space while still showing contrast at the nosing. In a dim stairwell, step lighter than the sample card looks and keep every finish in the same sheen family so the tones read as one palette.
Do I need to prime unfinished stair treads before painting?
Yes, bare wood is the one case where primer earns its place. Oil-based primer seals the grain so your first coat of floor enamel spreads instead of soaking in and drying patchy. If the stairs are already painted, many experienced painters skip primer and scuff the old finish, then use a durable floor enamel for both coats.
Should I paint the stair treads and risers the same color?
They do not have to match. Treads take shoe traffic and dirt, so many people keep them in wood or a hard-wearing floor enamel while risers carry the color. Same colour suits small halls best; a two-tone split gives a longer stairway more visual length and makes the risers look larger.
What should I use on stair treads that need to be easy to clean?
Use a floor-rated enamel or porch-and-floor paint in eggshell or satin, applied in two thin coats. Wall satin scuffs and peels within months on a tread because it was not formulated for foot traffic. Add the compatible clear topcoat the label names, and wait 24 hours for light foot traffic or longer before setting anything down.
Can I paint stairs in a rental or apartment?
Check your lease first, since paint changes usually need written permission. If you get it, go with a washable satin interior enamel and stay in colours you could sand back off. If permission is refused, peel-and-stick wallpaper on the risers or low-pile runner strips give much of the same effect and come off at move-out.
Start with the table at the top and pick the one idea that suits your hallway’s light and width. Then sample it on two steps before you buy anything. Whichever of these 20 painted stair ideas for a hallway you choose, the prep and the topcoat matter more than the colour, and both are worth doing slowly.