How to Repair Chipped Paint on a Wall: Easy DIY Method 2026
How to repair chipped paint on a wall takes about an hour of work and one overnight dry. Scrape the loose paint off, fill the bare drywall with spackle or lightweight joint compound, sand it flush, prime the patch, then brush on matching paint and feather the edge. Done properly, the repair disappears.
Most chips come from a hook, a tape strip, or a door that caught the wall, and none of them need a pro. The part that trips people up is the last one: a patch reads as a flaw when the new paint sits a shade off or the edge is too crisp. Prep decides whether the repair blends or announces itself.
Contents
Time: 45-90 minutes of active work, plus 2-6 hours of drying between stages · Cost: a few dollars for spackle and a sample-size paint can, more if the wall is textured or several areas need work · Difficulty: Easy DIY · Skill level: Beginner, as long as you sand and feather
Tools and Materials
Gather everything before you start, because the drying windows force breaks anyway. Most of this list costs a few dollars total, and prices vary by region.
- Putty knife, 1.5-2 inch wide, plastic or stainless
- Utility knife with a fresh blade, for lifting loose edges
- Paintable spackle, small tub
- Lightweight all-purpose joint compound, if the chip is bigger than a dime
- Self-adhesive mesh wall patch, for holes over half an inch across
- Sanding sponge or sanding block
- Sandpaper, 180 grit and 220 grit
- Stain-blocking drywall primer and a small foam roller
- Angled sash brush, 1.5-2 inch, plus a 2 inch roller for bigger patches
- Painter’s tape, a dust mask, safety glasses, nitrile gloves
- Drop cloth, damp cloth, and a small vacuum or brush for dust
- Paper towel, for testing a dried paint dab
Pick the filler by the size of the hole, and you will rarely need more than one product:
- Under 1/4 inch (nail holes, small divots, screw pops): paintable spackle. It dries in 20-30 minutes and barely shrinks.
- 1/4 to 1 inch (bumps from furniture, tape pulls, chipped outside corners): lightweight joint compound, applied in two thin coats. It shrinks more, so a second coat saves you sanding twice.
- Over 1 inch or a hole you can see daylight through: a mesh patch, then joint compound over the mesh. Pick one up from our wall repair patch kit roundup if you would rather buy the patch and compound together.
- Trim, baseboards, doors: wood filler or paintable spackle, not joint compound. Mud is too soft for a door edge that gets knocked again.
Before You Start
Find out what you are dealing with. Most interior walls are drywall with latex paint over a primer, but older homes and rentals are full of surprises.
Test the paint type. Find an inconspicuous spot, usually behind a light switch plate or in a closet, and press a cloth to it. Latex wipes off and feels slightly rubbery when damp. Oil-based paint stays put, feels hard and glossy, and needs a primer made for oil-based surfaces before latex will stick to it.
Know why the paint chipped. Chips have causes, and patching without fixing the cause means you will do this job twice:
- Adhesive pulls from command strips, tape, or a picture hook lifting off with a layer of paint attached.
- Impact from furniture, a door handle, or a moving box corner.
- Moisture behind the wall, which shows up as bubbles, soft paint, or a brown stain.
- Latex over oil-based paint without a bonding primer, which lets whole sheets peel.
- Unprimed drywall sucking the binder out of the first coat.
- Age and daily wear in a hallway corner or behind a door.
Protect yourself and the room. Wear glasses and gloves, run a fan or open a window to move dust, and put the drop cloth under the work area. If you are sanding a larger area, a dust mask is worth the two dollars.
Check the age of the house. In a home built before 1978, assume the existing paint may contain lead until a professional test says otherwise. Sanding and scraping lead paint creates dust that no one should breathe, and disturbing it usually falls under the federal lead-safe work practice rules. Renters should ask the landlord in writing before touching it.
Protect the trim. If the chip sits near baseboards, a door frame, or a switch plate, run painter’s tape along the edge so your brush has a clean stop line.
How to Repair Chipped Paint on a Wall Step by Step
Work in this order and stop at each drying window. Rushing between stages is the reason most touch-ups look obvious.
Step 1: Inspect and Clean the Chipped Area
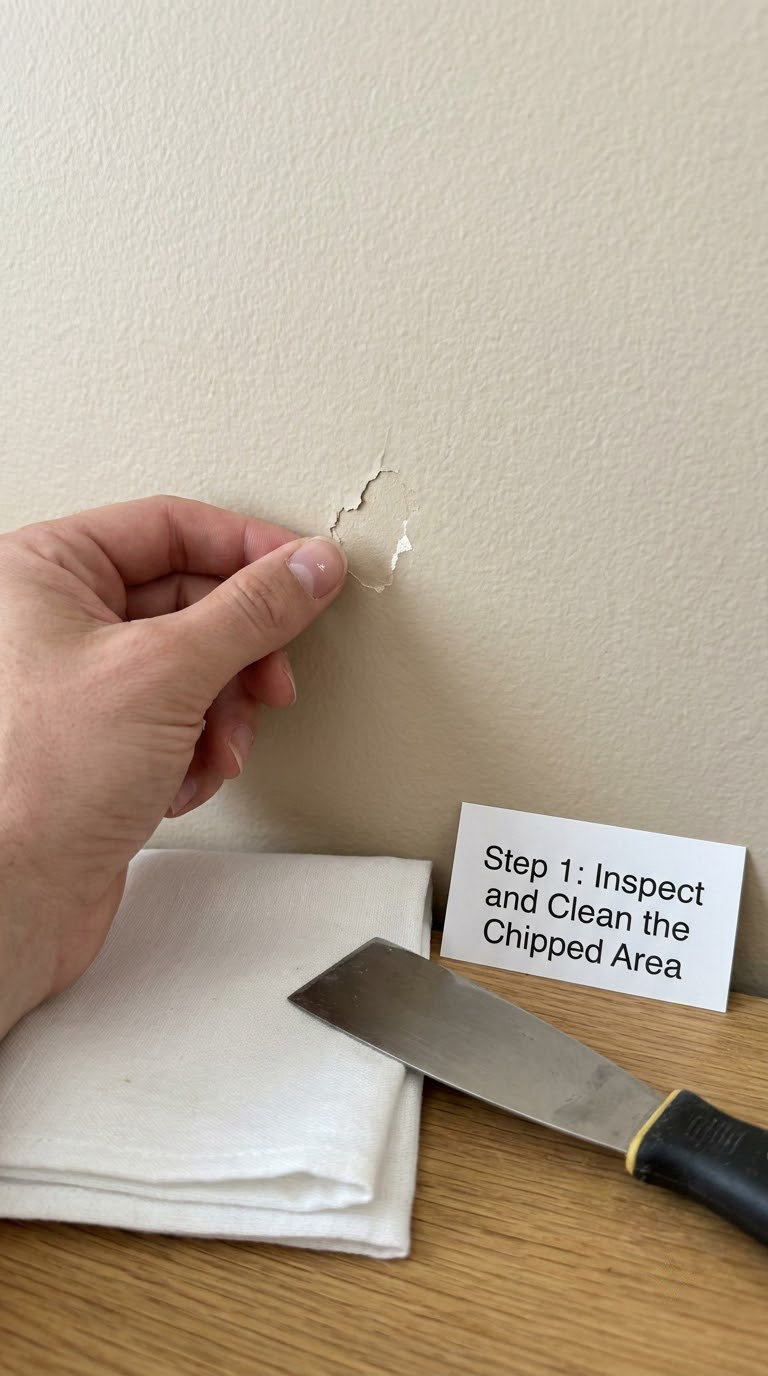
Press the edges of the chip with a fingertip. Anything that lifts, flexes, or sounds hollow has to go, because filler applied over loose paint peels off with it within weeks.
Slide the utility knife under the raised edge and lift the failed fragment away in one piece where you can. Work at the boundary of the sound paint, not past it, so you do not turn a chip into a scar. Follow with 180 grit sandpaper over the area to scuff the surrounding glossy paint and give the new compound something to grip.
Wipe or vacuum the dust, then check what is underneath. If the paper facing is torn or the drywall is crumbling, back it with a mesh patch before filling. Wipe again with a damp cloth and let it dry about 15 minutes.
Step 2: Fill Small Holes and Sand the Surface
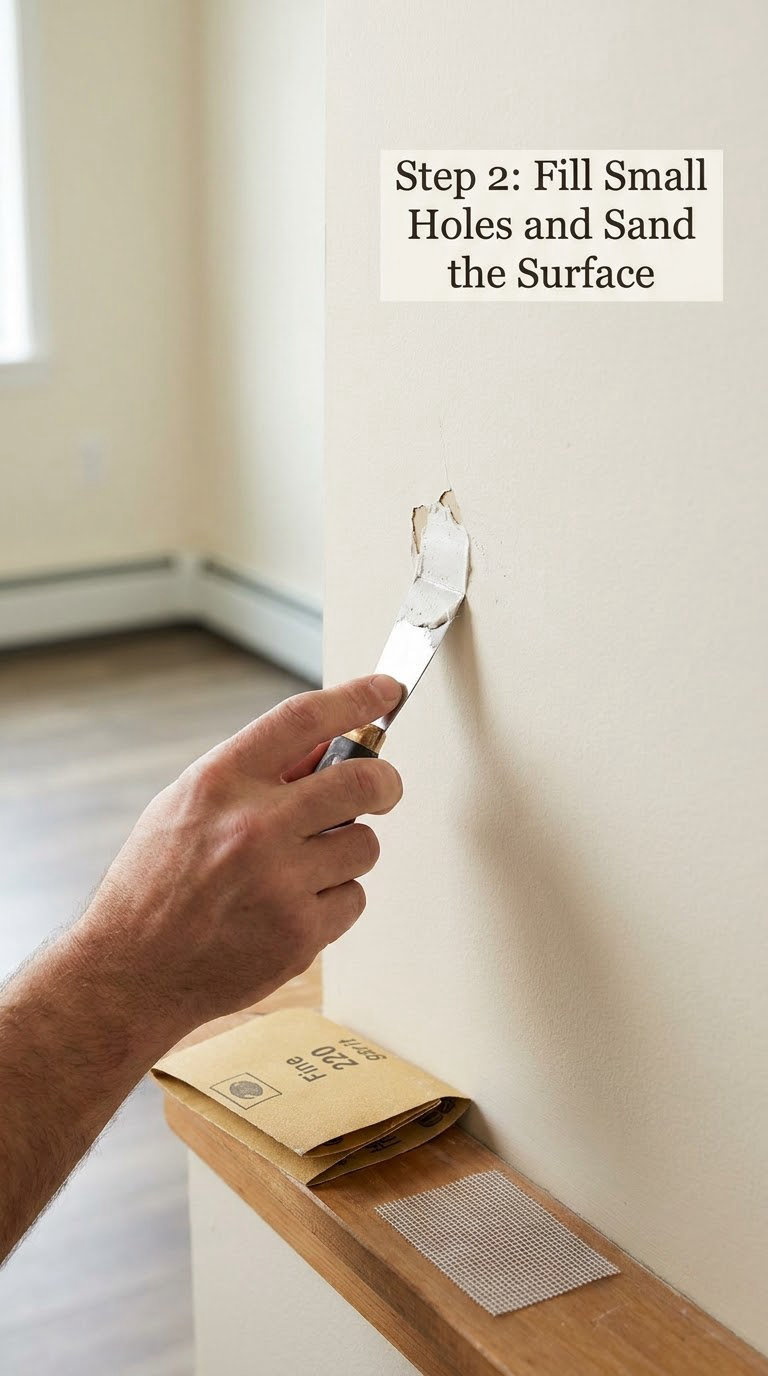
Load spackle on the putty knife, less than you think you need. Pull it across the hole at a shallow angle so it fills the depression and thins out at the edges, leaving the surface slightly proud rather than ridged.
Let spackle dry to a pale, chalky finish, usually 20-30 minutes. Joint compound wants 2-4 hours per coat and a second thin coat if the first one sinks.
Sand with 180 grit until the edges disappear, then finish with 220 grit for a smooth, even surface. Run a finger across the repair: it should feel level with no grit. A crayon rubbed over the patch will catch on any high spots, which is the fastest flatness check I know.
Wipe the dust off with a damp cloth and let the wall dry fully before priming.
Step 3: Remove Dust and Prime the Bare Drywall
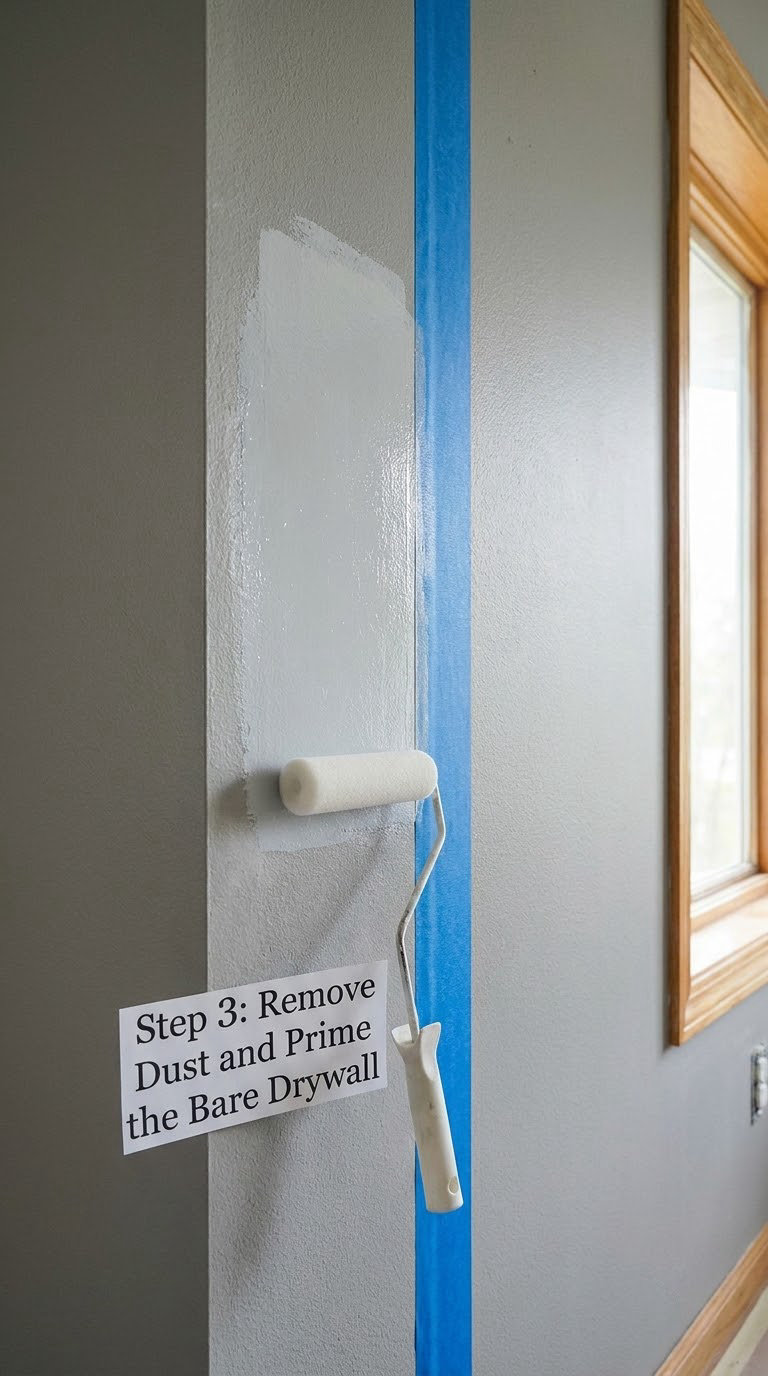
Prime every bare drywall repair, including filled areas. Unprimed drywall drinks the binder out of your paint and leaves a dull, flat spot surrounded by glossy original paint.
Mask the trim if it is within an inch of the patch. Cut the roller into the edges, then roll the center, keeping a wet edge so the primer dries evenly. Follow the can’s timing, usually 1-4 hours before recoating, and remember that humid weather stretches that out.
Textured walls take primer differently. Work a stippling brush or the corner of a stiff sponge over the patch first so the primer grabs the texture, then roll the flat surrounding area to match.
Step 4: Paint the Patch and Feather the Chipped Paint Edges
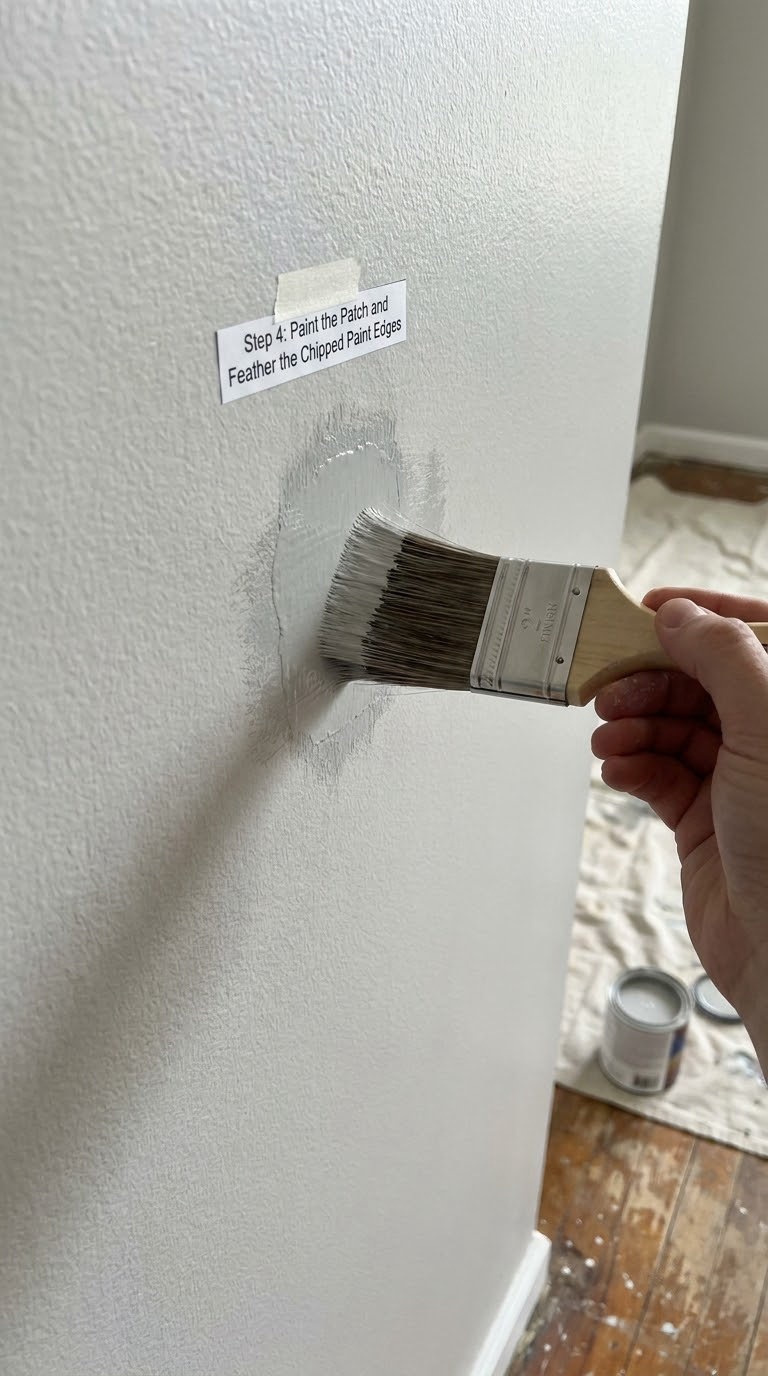
Match two things, not one: the color and the sheen. Satin over eggshell shows up as a shiny patch from across the room, which is exactly the mistake that makes a good repair look bad.
Take a 2 x 2 inch chip of the existing paint to a paint store and let the scanner match it. Then paint a dab on a paper towel and let it dry overnight, because latex shifts lighter as it cures. If the store cannot match it, test two candidates on an inconspicuous corner.
Load the brush lightly. Feather the chipped paint edges by starting a few inches out on the original finish, sweeping lightly toward the patch, and easing off so the stroke thins to nothing at the perimeter. Two thin coats beat one heavy one, and let the first dry 4 hours before the second. Pull the tape while the final coat is still slightly workable.
Step 5: Let the Paint Dry and Check the Finish
Latex is touch-dry in about an hour and firm in 2-4. Leave it clear of hands, furniture, and bedding overnight, and avoid scrubbing it for a week.
Check the repair under the same light you see it in daily, from a couple of feet back and from an angle. A faint outline is normal at first and often settles as the paint cures fully over a day or two.
If a brush mark is still visible, add one more light coat rather than scrubbing. If the spot reads too dark, a second coat of slightly lighter paint often evens out a patch that started from a dried sample mismatch. And if the shape of the repair is what you can see, that is a feathering problem, not a color problem.
Common Mistakes to Avoid
Filling over loose or glossy paint. Loose paint holds the filler off the wall, and glossy paint gives it nothing to grip. Scrape the failed paint out, then scuff the surrounding finish before filling.
Skipping primer. Bare drywall and dried compound drink binder. The result is a dull spot that shows forever. One coat of stain-blocking primer fixes it.
Priming over paint with the wrong primer. Latex over oil-based paint needs a bonding primer, or the new coat peels in sheets later.
Not feathering. A hard-edged patch draws the eye no matter how close the color is. Start the stroke away from the patch and taper it out.
Ignoring sheen. Matching color but not finish is the most common reason a repair still reads. Match flat to flat, eggshell to eggshell, satin to satin.
Sanding before the filler dries. Wet spackle gums up the paper and pulls out as you sand. Wait for the pale, chalky look, usually 20-30 minutes.
Rushing the final coat. Thick paint shows brush marks; humidity and cold stretch dry time. Two thin coats with a full dry between them look better and last longer.
When to Call a Pro
Some damage is a symptom, not a surface flaw, and patching it delays a bigger bill. Bring in a pro when you see any of these:
- Cracks that run diagonally from a corner or across drywall seams, which suggests movement or a truss uplift issue.
- Bubbling, soft, or sagging paint with a stain behind it. Find and fix the leak before anything else.
- Mold or a musty smell in the wall cavity, which needs remediation rather than filler.
- A missing section of wall larger than a dinner plate, especially around windows or in load-bearing areas.
- Heavy texture such as knockdown, popcorn, or hand-troweled stucco that you cannot reproduce with a sponge.
- Suspected lead paint in a pre-1978 home, where testing and lead-safe practices are the law, not a preference.
- Damage near wiring or a junction box, or anywhere the wall must be opened for electrical work. Licenses and permits apply there.
Maintenance
Clean the repair gently. A soft cloth with warm water and a drop of dish soap is enough; abrasive pads and all-purpose cleaners can burnish the sheen and leave the patch glossier than the wall around it.
Keep moisture away from the spot. Wipe down kitchen and bathroom walls where splashes land, and check that bath and kitchen exhaust fans vent outside rather than into the attic.
Look at repaired areas twice a year, in spring and autumn. A chip that returns in the same spot is telling you the cause is still there, whether that is a door that swings too wide or a leak behind the drywall.
If the room needs more than a spot repair, replacing the wall colour entirely is often less work than chasing five near-matches. Our office wallpaper ideas are worth a look when the wall itself is sound and only the finish has had a hard life.
Frequently Asked Questions
Can I paint over chipped paint without sanding?
Only if the chip is purely cosmetic and the surrounding paint is sound. Paint will not stick to loose, flaking, or glossy paint, and it will lift again within weeks. Scrape off anything that flexes under a fingernail, scuff the surrounding finish with 180 grit, then patch and prime. Skipping the scuff on a glossy wall is the most common reason a touch-up peels off later.
What is the best filler for chipped paint on a wall?
Paintable spackle for holes under a quarter inch, since it dries in 20-30 minutes and barely shrinks. Lightweight joint compound for chips from a quarter inch to an inch, applied in two thin coats because it shrinks as it cures. Anything larger needs a self-adhesive mesh patch with compound over it. Wood filler or spackle is better than mud for trim, doors, and outside corners.
How do I match existing wall paint color and sheen?
Take a 2 x 2 inch chip of the existing paint to a hardware store and let the scanner match it, then paint a dab on a paper towel and let it dry overnight since latex shifts lighter as it cures. Match the sheen too: flat, eggshell, satin, and semi-gloss each read differently in the same room. A satin touch-up on an eggshell wall is visible from across the room.
Should I prime a chipped paint repair before painting?
Yes, whenever drywall or fresh compound is exposed. Both are porous and pull the binder out of the paint, leaving a dull flat spot that stays visible even with the right color. One coat of stain-blocking drywall primer solves it. If the wall is painted with oil-based paint and you are going over it with latex, use a bonding primer made for that combination.
How long does a chipped paint repair take to dry?
Allow about 45-90 minutes of work spread over a full day. Spackle needs 20-30 minutes, joint compound 2-4 hours per coat, primer 1-4 hours, and latex paint 2-4 hours between coats. Humidity and cold stretch all of these, so plan on painting in the morning and leaving the wall alone overnight before anything touches it.
Why does my touch-up paint look different from the wall?
Three causes account for most of it: the color is off, the sheen is off, or the edge is too hard. Test a dried dab on a paper towel to rule out color, and match the original sheen level. A visible outline usually means the stroke ended too abruptly, so feather the edges by starting on the old finish and tapering toward the patch. One more light coat often settles it.
Conclusion
Start by cleaning out the chip. Pull off every loose fragment, scuff the surrounding paint, and fill the bare drywall with spackle for a small hole or joint compound for a bigger one. Sand it flush with 180 grit, then 220, and wipe the dust away.
Prime the patch, let it dry, and paint with two thin coats of matched color and sheen, feathering the edges instead of ending the stroke at the repair. That last part is what separates a repair nobody notices from a patch you keep catching in the mirror.