18 Kitchen Backsplash Ideas for White Cabinets: Stunning 2026
White cabinets are a blank canvas, so the backsplash decides whether the room stays quiet and uniform or gets a real focal point. These 18 kitchen backsplash ideas for white cabinets cover both routes, with the cost, timing and pitfall for each one.
Most people land on white cabinets for a reason: they look clean, they suit any counter, and they never date. The problem is the wall behind them. Flat, pale, low-texture tile in the same shade as the doors just disappears, and the kitchen ends up looking like a showroom. Texture, grout contrast or a single colour accent fixes that without touching the cabinetry.
Contents
Costs below are realistic US ranges for materials per square foot before labour, and they shift with your region, wall size, material choice and whether you hire a tiler. Get two or three quotes before committing to anything expensive.
18 Kitchen Backsplash Ideas for White Cabinets at a Glance
| Idea | Material | Estimated cost | Difficulty | Project time |
|---|---|---|---|---|
| 1. Full-height white subway | Ceramic or porcelain | Budget to mid | Moderate DIY | 1 to 2 days |
| 2. Staggered subway, dark grout | Ceramic subway | Budget | Easy DIY | Half a day |
| 3. White-and-gray marble-look slab | Porcelain or stone | Mid to premium | Hire a pro | 2 to 4 days |
| 4. Pale gray herringbone mosaic | Porcelain mosaic | Mid | Moderate DIY | 1 to 2 days |
| 5. Warm beige zellige | Handmade-look ceramic | Mid to premium | Hire a pro | 2 to 3 days |
| 6. Soft green square tile | Ceramic | Budget | Easy DIY | Half a day |
| 7. Powder blue bead tile | Glazed ceramic | Mid | Moderate DIY | 1 day |
| 8. Stacked sage ceramic | Ceramic | Budget | Easy DIY | Half a day |
| 9. Navy blue ceramic | Ceramic or porcelain | Mid | Moderate DIY | 1 day |
| 10. Natural stone ledger | Limestone or quartzite | Premium | Hire a pro | 2 to 3 days |
| 11. Beige travertine mosaic | Travertine | Premium | Hire a pro | 2 days |
| 12. Wood-look porcelain planks | Porcelain plank | Mid | Moderate DIY | 1 to 2 days |
| 13. Black-and-white geometric | Cement-look or ceramic | Mid to premium | Moderate DIY | 1 to 2 days |
| 14. Hand-painted floral tile | Glazed ceramic | Mid to premium | Hire a pro | 2 to 3 days |
| 15. Encaustic-inspired tile | Cement-look porcelain | Mid | Moderate DIY | 1 to 2 days |
| 16. Brushed brass grid tile | Metal-look porcelain | Mid to premium | Moderate DIY | 1 day |
| 17. Textured white microcement | Microcement | Premium | Hire a pro | 3 to 5 days |
| 18. Two-tone vertical color block | Ceramic or painted tile | Budget to mid | Moderate DIY | 1 to 2 days |
Cost tiers here mean roughly budget at the lower end of porcelain and ceramic pricing, mid for mosaics and large format, and premium for natural stone, zellige and microcement. Labour typically runs from a few hundred dollars for a small band to several thousand for full-height stone work.
1. Full-Height White Subway Tile
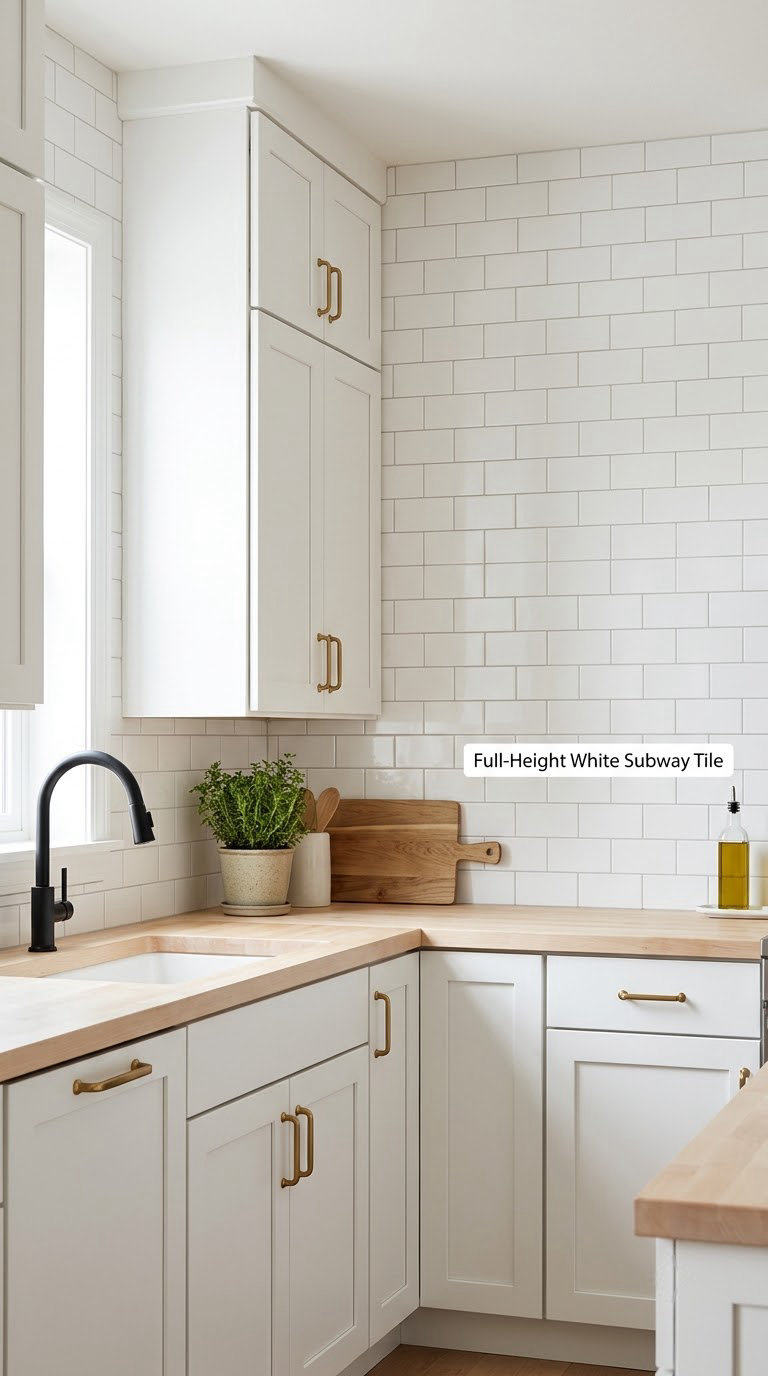
Running white subway tile from counter to ceiling turns a flat wall into a strong vertical surface, and it is the single safest backsplash choice for white cabinets. Because the wall reads taller, even a low 8-foot ceiling looks better. The style travels too: it works in modern, farmhouse and transitional rooms without changing anything else.
How to do it:
- Measure the wall in inches and mark a level line across the whole run before anything is cut.
- Use 3-by-6-inch tile for a modern scale or 2-by-4-inch for a more traditional one.
- Keep joints at 1/16 inch with a plastic spacer and use light grey grout so the lines stay visible.
- Tile the centre of the wall first, then work outward so cuts land in the corners.
- Carry the tile to the ceiling if you want the full vertical effect.
Cost: budget to mid range per square foot. Difficulty: Moderate DIY. Time: one to two days for a normal run.
Good to know: outlets and light switches throw the grid off, so mark their edges and adjust the layout so cuts land on a grout line rather than splitting a tile across the opening. On an uneven wall, full height exposes every dip that a 12-inch band would hide.
How to Plan 18 Kitchen Backsplash Ideas for White Cabinets
Before picking a style, measure the wall, note where outlets, windows and the range sit, and look at your existing grout colour if you are tiling over anything. Then match the idea to your cabinet finish, countertop material, lighting and how much scrubbing you tolerate. Tall glossy cabinets and honed natural stone handle very different backdrops than flat-panel doors and quartz.
2. Staggered White Subway Tile With Dark Grout
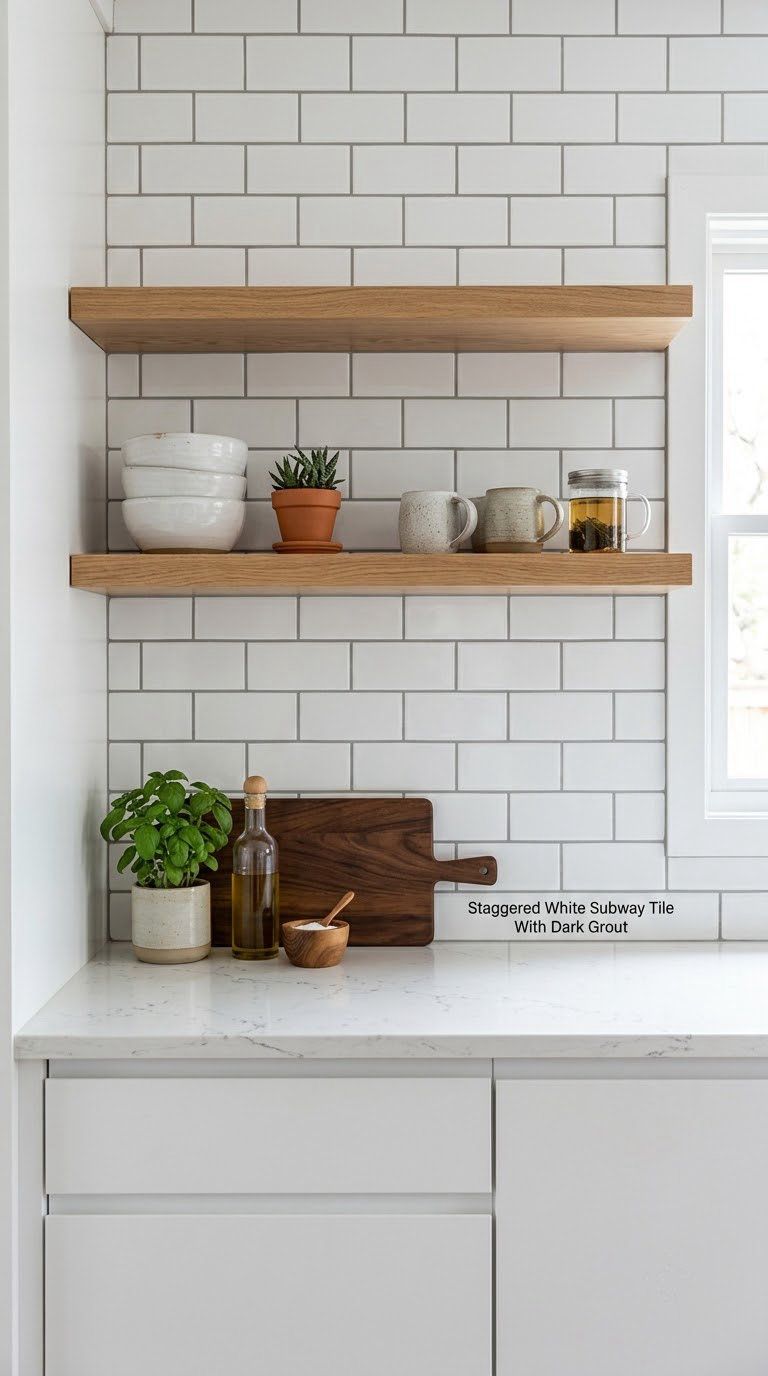
The same white tile behaves completely differently once you offset every other row by half a tile and pick a darker grout. The joints draw a fine grid across the wall, which defines the edges of your white cabinets instead of letting them melt into each other. Warm grey grout softens the effect; charcoal gives you a graphic grid that looks deliberate rather than dated.
How to do it:
- Lay in a 50 percent offset brick bond, cutting the edge tiles to half width.
- Hold a 1/16-inch spacer between every tile and keep the rows dead straight with a chalk line.
- Choose a grout colour one or two shades away from pure white so the joints read without shouting.
- Work in sections of about 3 feet so the grout does not skin over before you get there.
Cost: budget range. Difficulty: easy DIY. Time: half a day for a standard band.
Good to know: if you want the same tile with a quieter result, grout everything the same soft white and lay it in a straight stack bond. That version reads as a single pale surface, so pair it with a wood cutting board or a warm floor to stop the room feeling cold.
3. White-and-Gray Marble-Look Slab
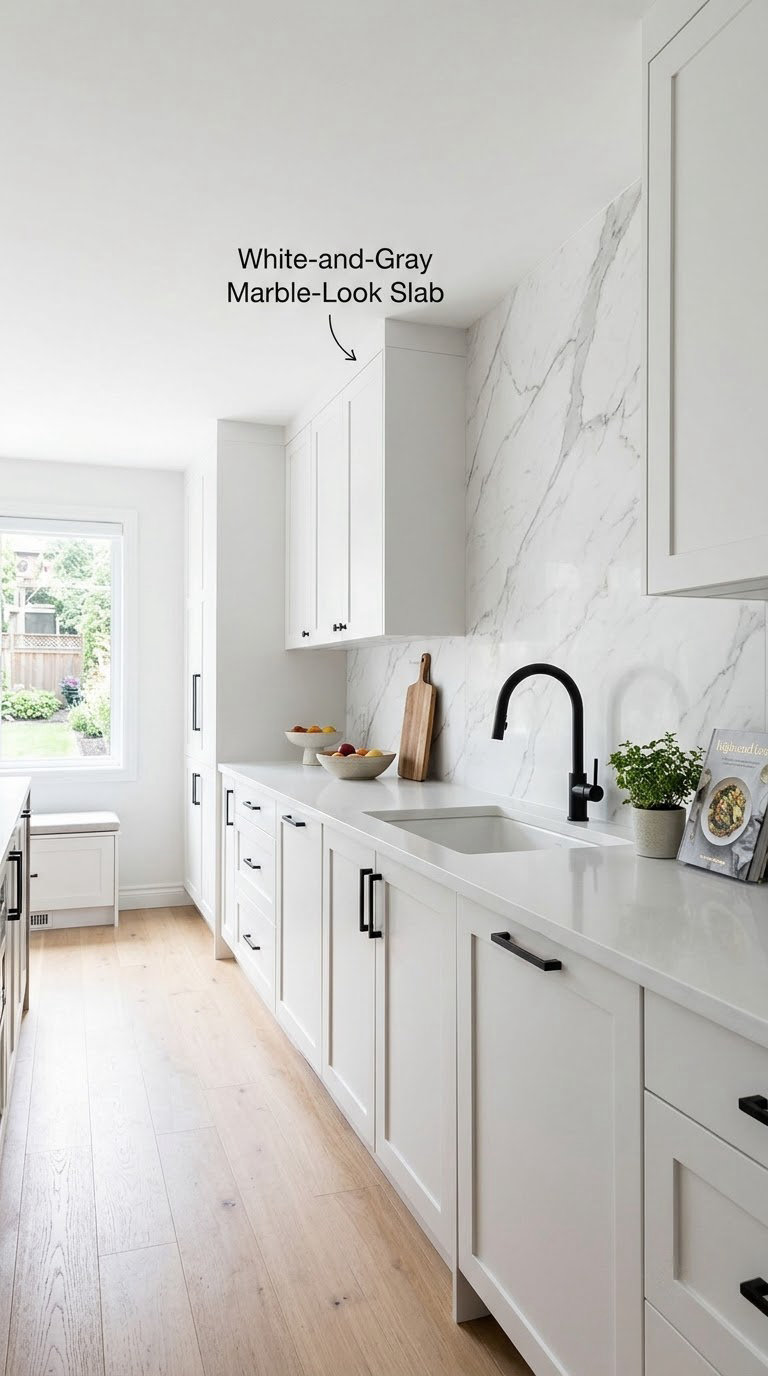
One continuous slab of white-and-gray marble look takes the grout lines away entirely, and that alone makes white cabinets look more expensive. Veining gives the wall movement without adding colour, which is why this works in kitchens that are otherwise all pale surfaces. Porcelain in a large format gets you the look for far less than a cut stone slab.
How to do it:
- Order panels sized to your wall, typically 24 by 48 or 24 by 60 inches, and check the delivered weight before handling.
- Level the substrate to within a tight tolerance, since large panels follow every dip in the wall.
- Use a levelling clip system and a thin-set mortar rated for the panel size.
- Book a stone or large-format specialist for the cut around electrical boxes, or the edge will chip.
Cost: mid to premium. Difficulty: hire a pro. Time: two to four days including the fabrication lead time.
Good to know: natural marble needs waterproofing before grouting and can etch from acidic spills, so porcelain is the easier choice in a working kitchen. Corners and outlets are where the labour cost concentrates.
4. Pale Gray Herringbone Mosaic
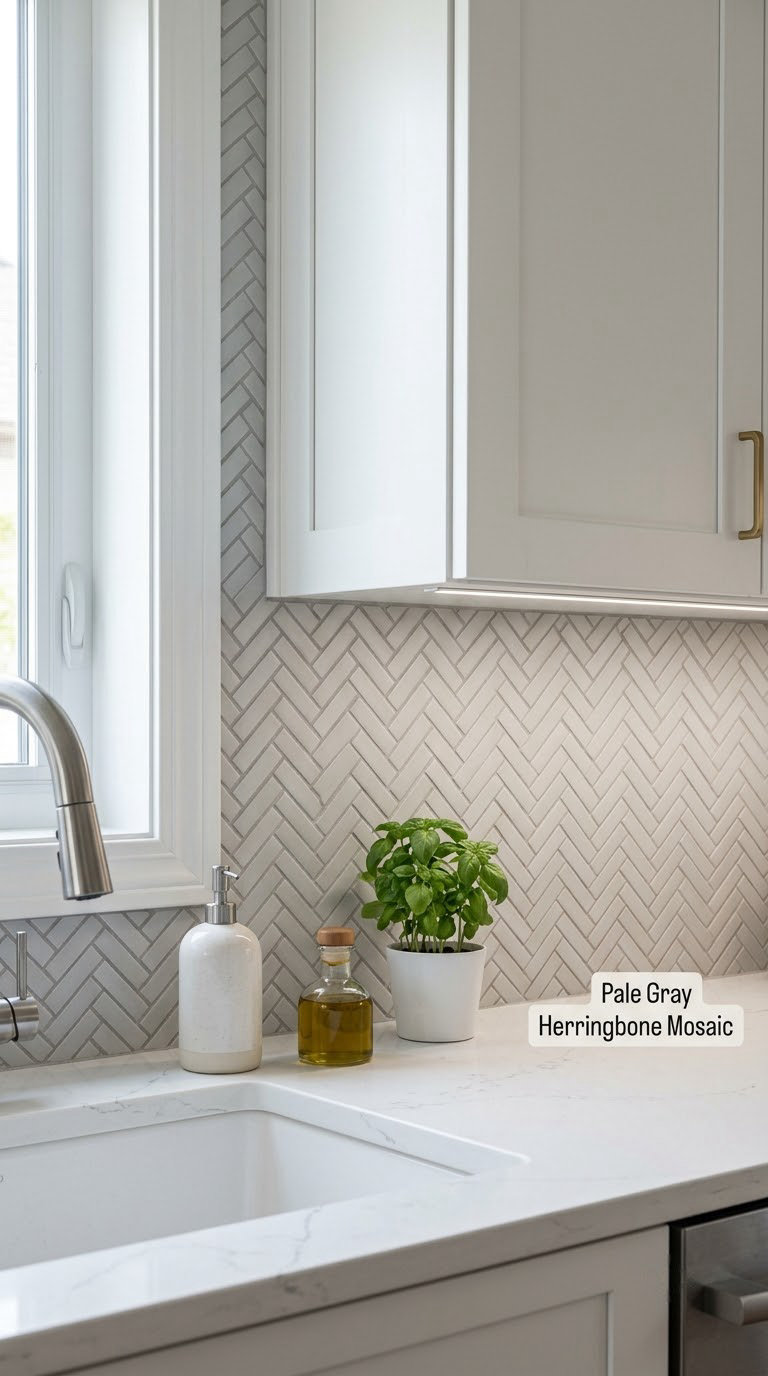
Herringbone gives a white kitchen direction and movement without asking for a second colour. Small pale-grey rectangles in a herringbone layout catch light at two angles, so the wall has texture and shadow even in flat daylight. It reads softer than a marble pattern and less formal than a chevron.
How to do it:
- Choose a mosaic mounted on sheets so the herringbone pattern is already set and stays consistent.
- Keep joints at 1/16 inch and use a grey grout close to the tile tone.
- Dry-lay two or three sheets on the counter before you commit, and alternate the direction sheet by sheet.
- Butt sheets tightly against each other with no gap between them.
Cost: mid range per square foot. Difficulty: moderate DIY. Time: one to two days.
Good to know: lay sheets square to the wall rather than diagonally near a finished edge, since a diagonal cut at a corner is hard to hide. Buy a few extra sheets because a future repair needs an exact pattern match.
5. Warm Beige Zellige Backsplash
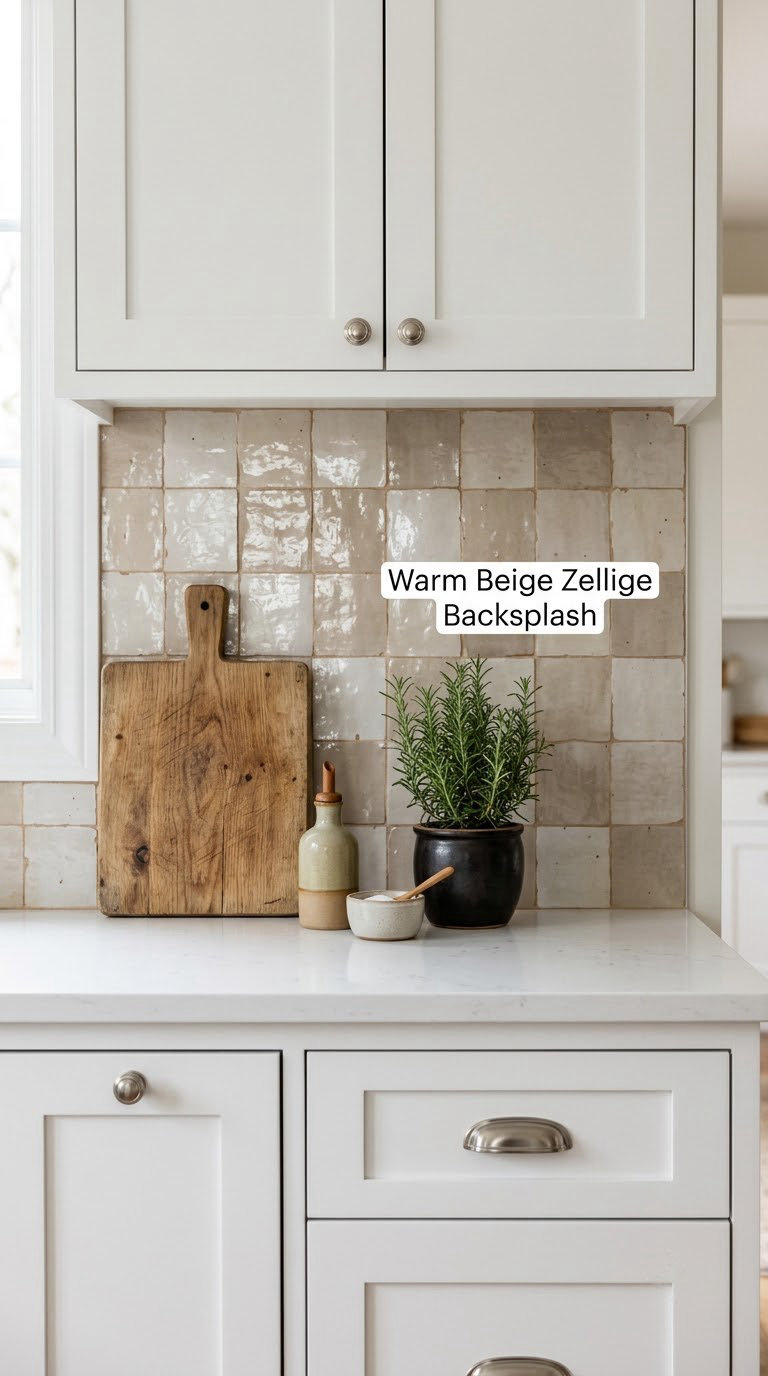
Zellige is the cure for an all-white kitchen that feels cold. The glaze pools unevenly across each handmade-look tile, so no two pieces are exactly the same shade, and that variation is the whole point. Beige tones warm the wall without adding a colour you have to live with for ten years.
How to do it:
- Pick a square format around 4 by 4 inches or a handmade rectangle for a softer line.
- Use a 1/8-inch joint because zellige edges are slightly irregular and thicker.
- Choose a light grout or an off-white grout depending on whether you want the variation to read as a patchwork or a single field.
- Dry-fit a whole board before setting anything; the tile moves in colour more than any other material.
Cost: mid to premium per square foot. Difficulty: hire a pro. Time: two to three days.
Good to know: the movement tolerance means the wall needs to be flatter than for flat-backed porcelain. Glossy glaze shows fingerprints and soap marks more than matte tile, which is a fair trade for the light it throws back.
6. Soft Green Square Tile
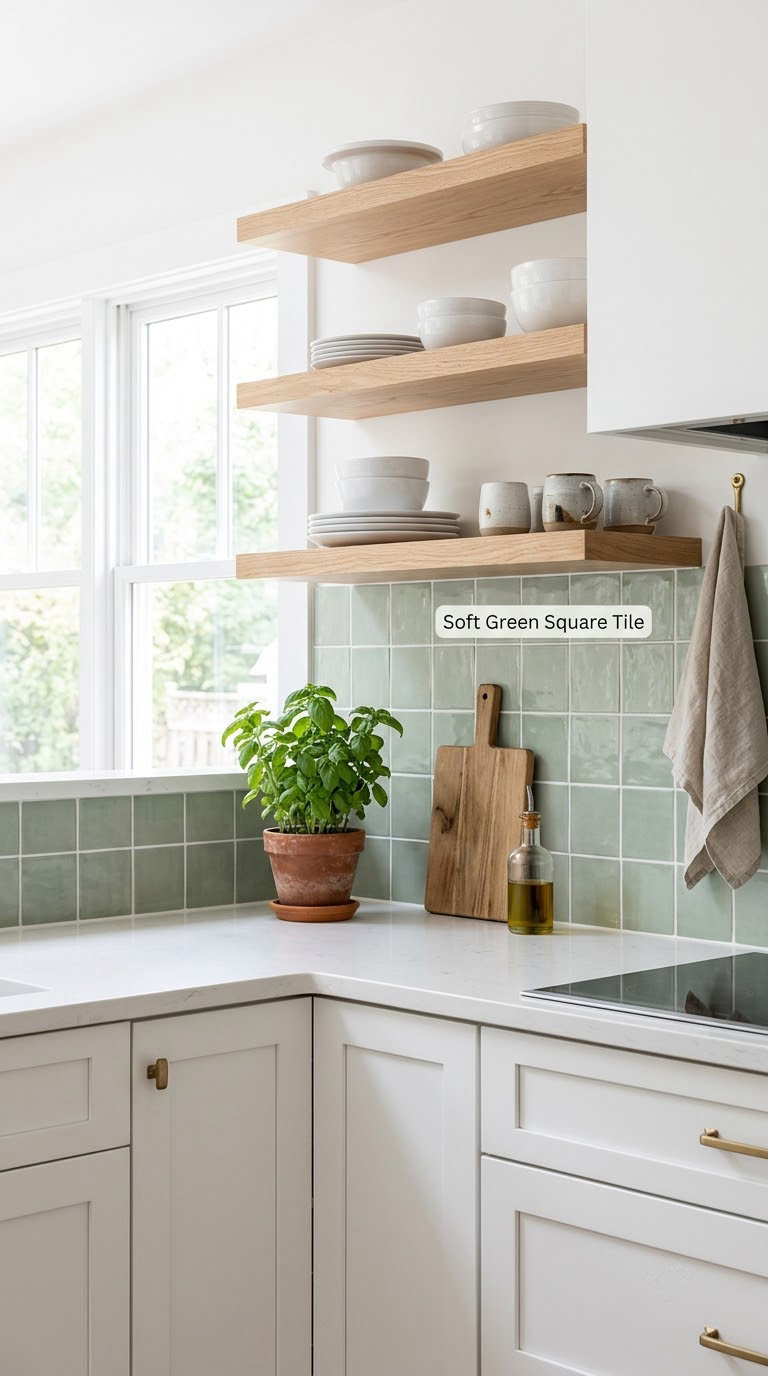
A muted sage or celadon square tile is the easiest way to add a colour accent to white cabinets without repainting a single door. Squares in a straight grid keep the lines calm, and the low saturation keeps the cabinetry looking crisp rather than busy. This is the one idea on the list that works in a rental if you use removable panels.
How to do it:
- Go 4 by 4 inches for a bolder grid or 2 by 2 inches for a finer, quieter one.
- Set the grid from a level line across the wall so the joints stay even over a long run.
- Keep the grout at 1/16 inch, in white or a very light grey.
- Repeat the green once elsewhere in the room, on a shelf edge or a stool, so the colour feels deliberate.
Cost: budget range. Difficulty: easy DIY. Time: half a day.
Good to know: if you are renting or want a weekend-only update, peel-and-stick panels in a similar sage work well. Expect to remove them carefully, because aggressive scraping can take paint off the drywall.
7. Powder Blue Bead Tile
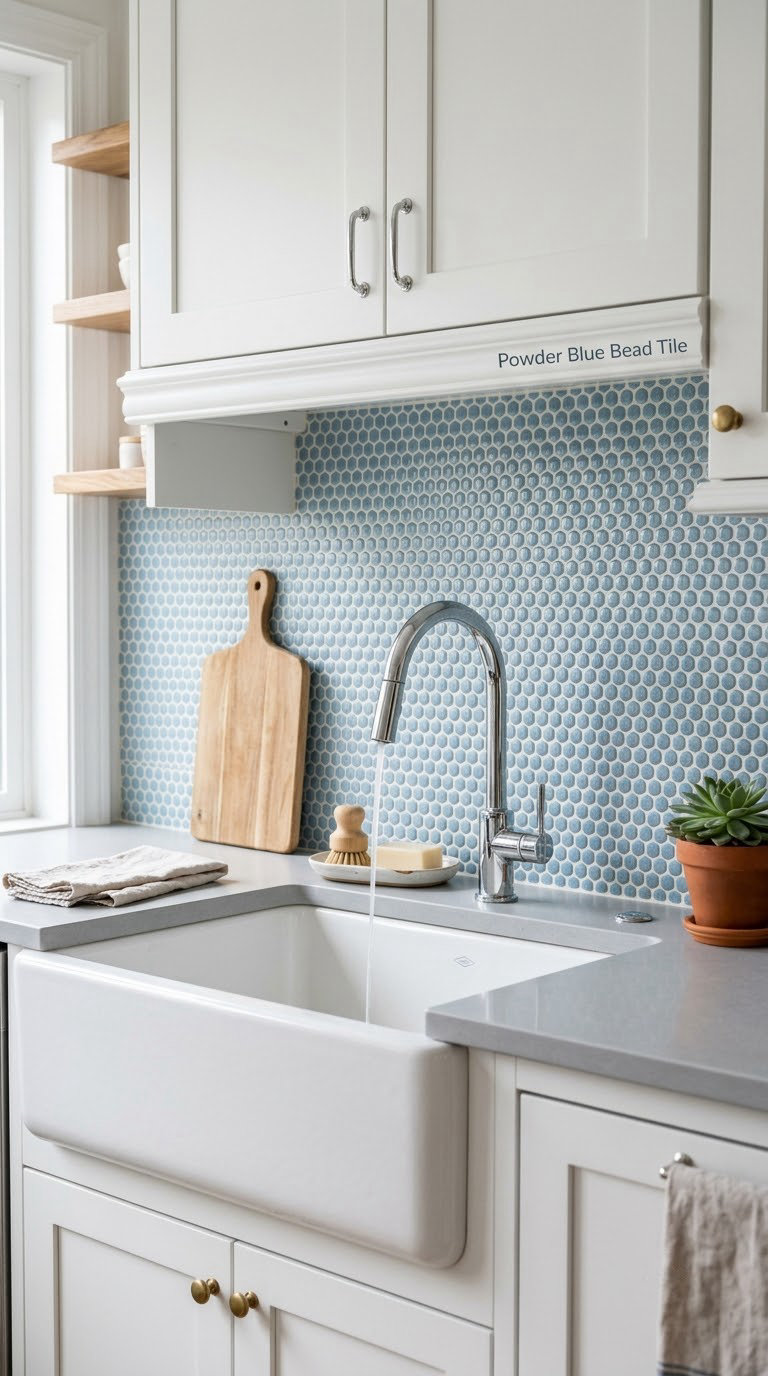
Bead or pill-shaped tile catches light along every rounded edge, so it produces depth and soft shadows on an otherwise flat wall. In a pastel powder blue it adds a gentle traditional note that works with white shaker doors. The shape is the interest, so keep the colour quiet.
How to do it:
- Check the sheet layout before you buy; bead tile often comes in offset half-drop sheets rather than straight stacks.
- Plan the edge and outlet trim now, since curved tiles need a matching profile or a bullnose to finish cleanly.
- Keep grout joints at 1/8 inch so the rounded shapes do not crowd each other.
- Buy a spare sheet in case a piece breaks during the cut around a tap.
Cost: mid range. Difficulty: moderate DIY. Time: about a day.
Good to know: a strong dark grout next to a pastel tile looks like a mistake. Stay with a light grout, and expect some tonal variation from the kiln even within one colour.
8. Stacked Sage Ceramic Tile
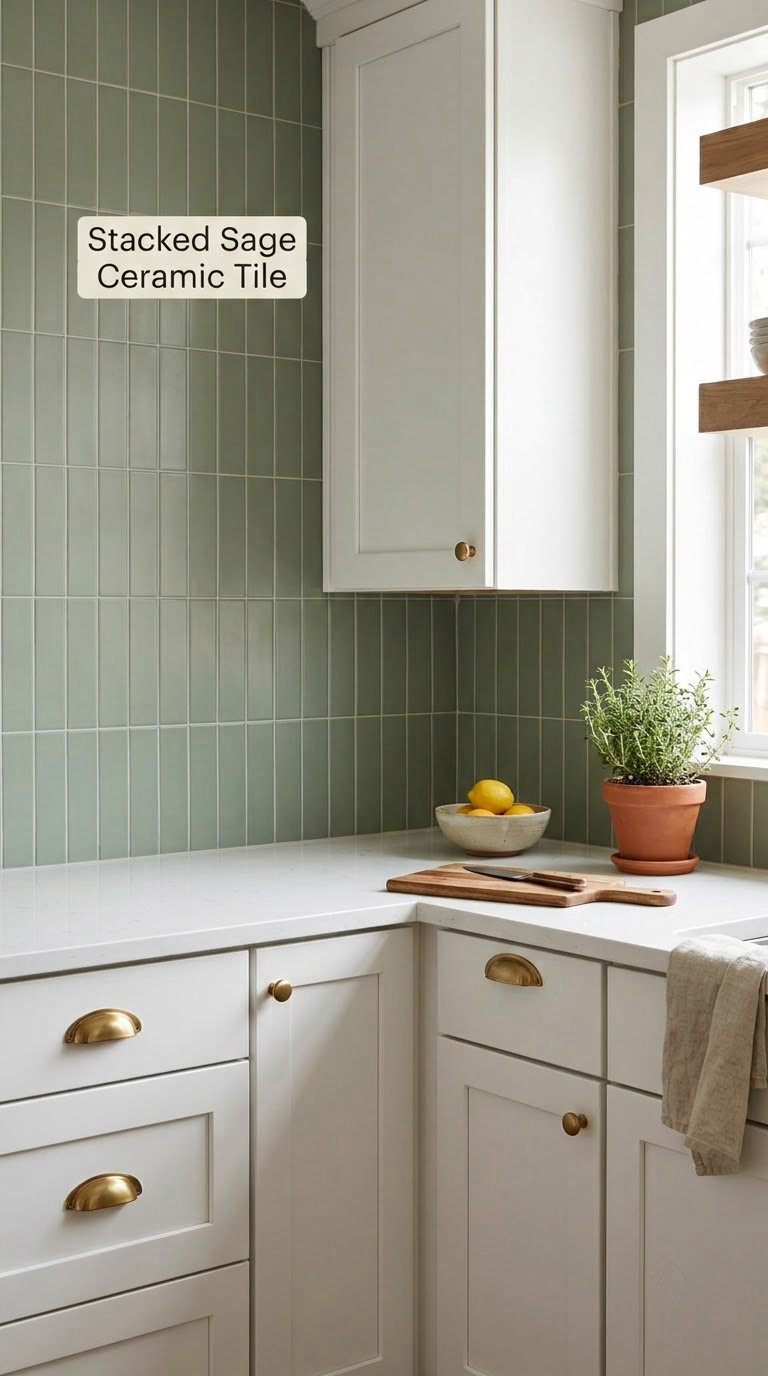
Stacking a long rectangular tile vertically makes a standard-height wall look taller, and the unbroken vertical line is flattering in a room with white cabinets. The sage tone softens the grid and pairs naturally with brass pulls and warm wood cutting boards. It is a quieter, more architectural option than a scattered mosaic.
How to do it:
- Choose a 3-by-6-inch or 4-by-8-inch format so the vertical run is obvious.
- Set a level centre line first and build outwards in a stacked grid.
- Decide on a border or a simple trim tile before you start, because adding one later means cutting the whole wall.
- Pick a grout one shade off the tile so the joints soften the stack without disappearing.
Cost: budget range. Difficulty: easy DIY. Time: half a day.
Good to know: 4-by-8-inch tiles cost more per square foot than 3-by-6-inch. If the budget is tight, the smaller stacked format reads almost identical from across the room.
9. Navy Blue Ceramic Tile
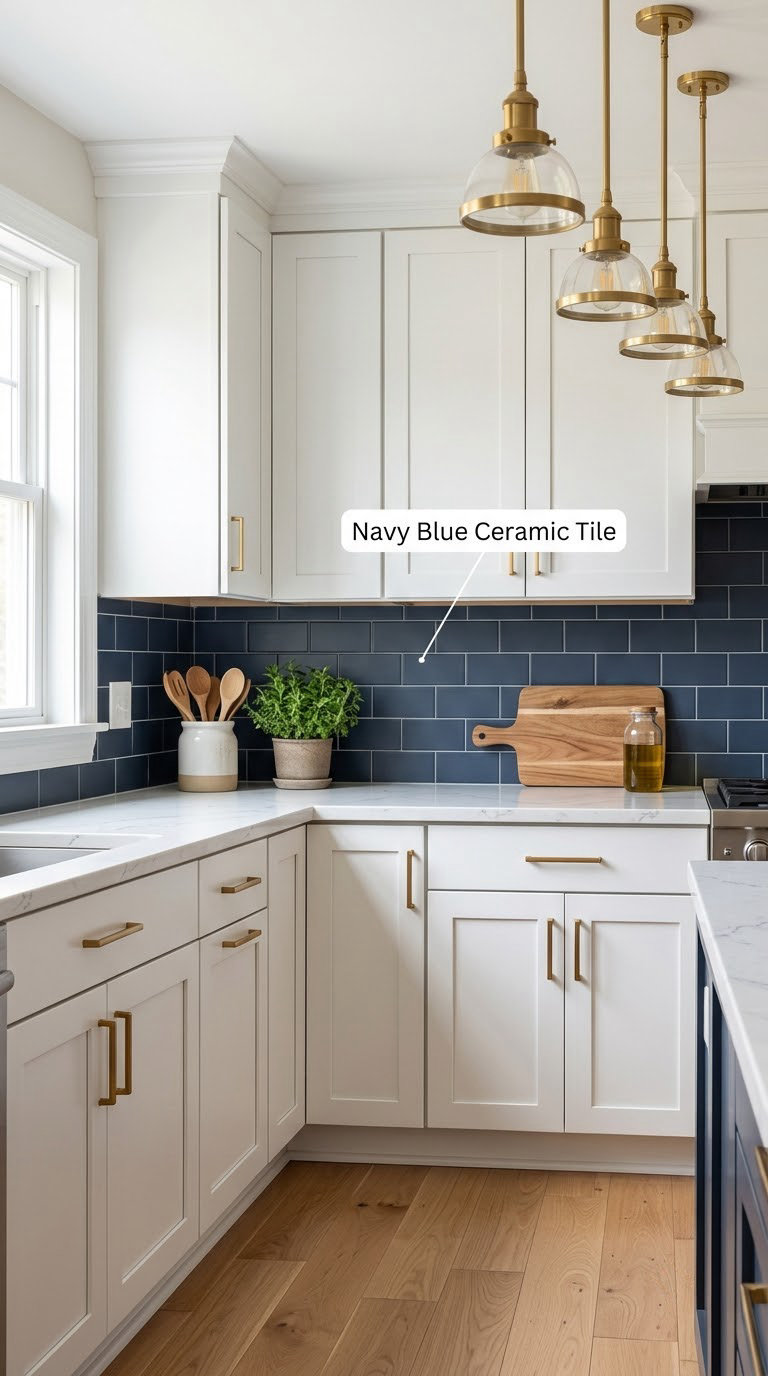
Navy is the contrast answer: it anchors an otherwise pale kitchen and makes the white cabinet doors look crisp and expensive. Because it is a deep colour rather than a loud one, it stays out of fashion the way a bright blue would not. Limiting it to one wall keeps the room calm.
How to do it:
- Choose matte navy for a soft, modern room or gloss navy if you want the wall to bounce light around.
- Confine it to a single wall, a panel behind the range, or the area between counter and hood.
- Use a warm white or light grey grout to break up the field of colour.
- Pull one navy element elsewhere, a bar stool or a ceramic vessel, to balance the wall.
Cost: mid range. Difficulty: moderate DIY. Time: about a day.
Good to know: in a small kitchen, dark tile on more than one wall shrinks the room. Softer glazes with visible veining or a slightly greyer navy also sit more comfortably beside white quartz.
10. Natural Stone Ledger Tile
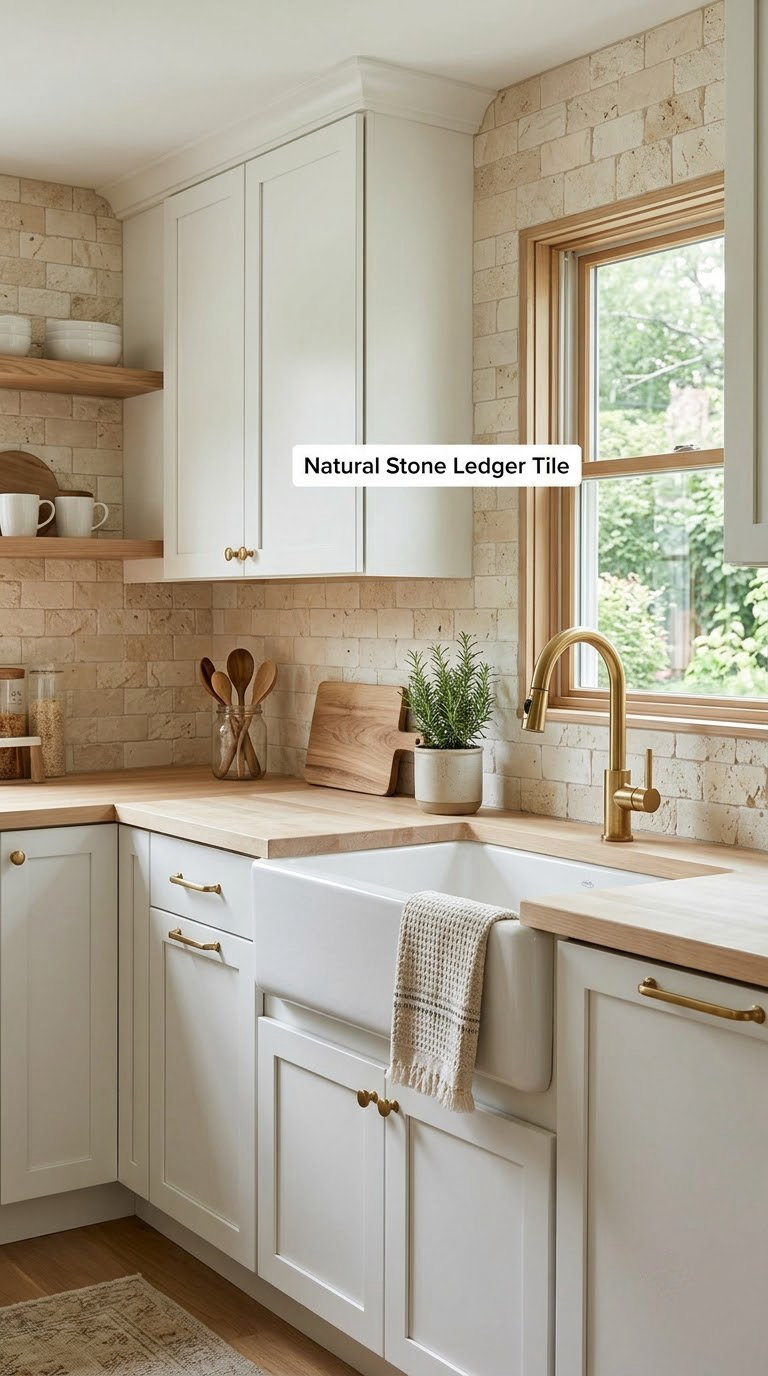
Ledger pieces are long and narrow, and laying them in a staggered offset gives a wall a stacked-stone look with real depth. Cream limestone or sandstone warms a white kitchen in a way that a glazed tile cannot, because the texture does the work instead of colour. It makes a plain cabinet run feel handcrafted.
How to do it:
- Know the nominal size versus the actual size; nominal ledger pieces are often a fraction larger than what arrives.
- Stagger every row by roughly a third of a tile and cut the ends to fit, expecting uneven lengths.
- Use a 1/8-inch joint because natural edges are irregular.
- Confirm the surface is compatible with your adhesive before starting, and seal the stone if the manufacturer requires it.
Cost: premium range. Difficulty: hire a pro. Time: two to three days.
Good to know: limestone and sandstone need sealing to resist staining, and a penetrating sealer is worth budgeting for. A whitewash or limewash treatment tones the contrast down if the natural colour is too strong next to white doors.
11. Beige Travertine Mosaic
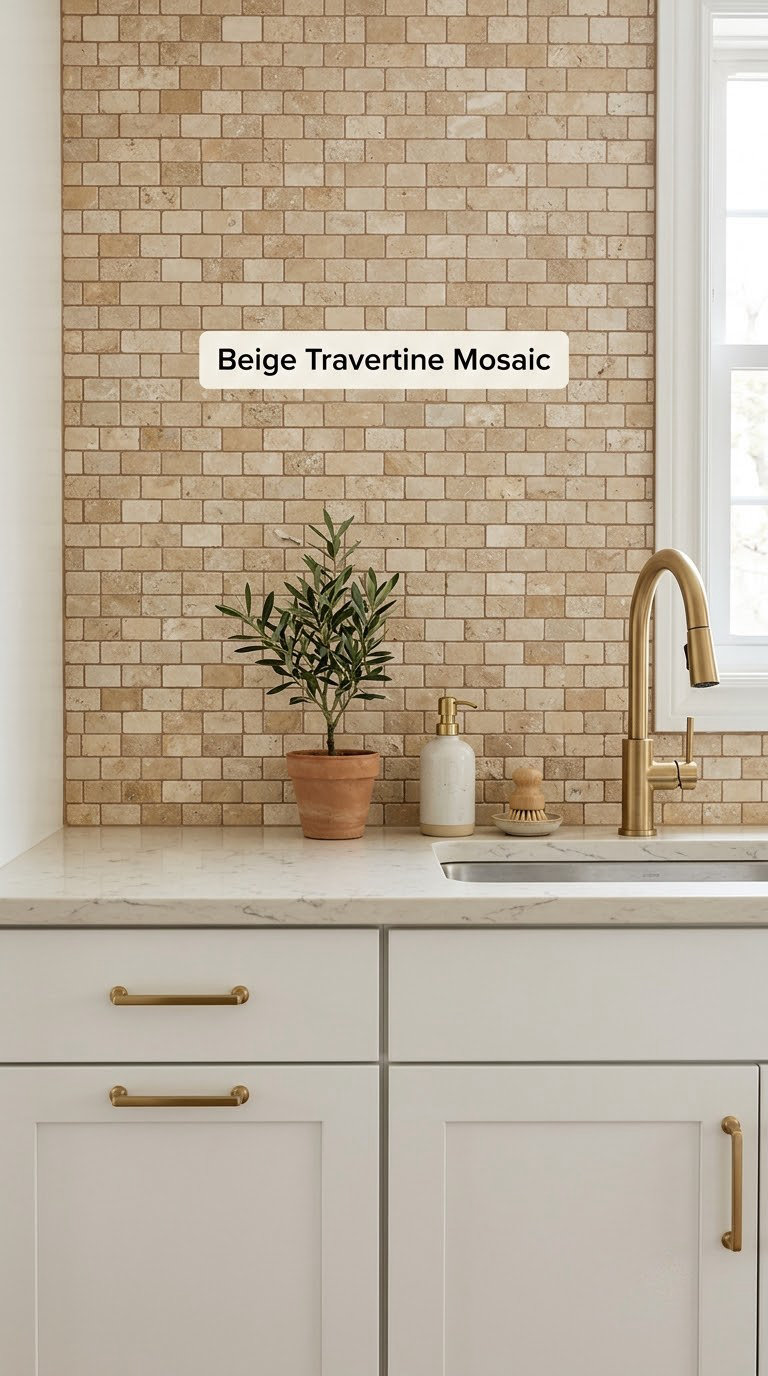
Small travertine pieces carry the movement of a stone slab into a much easier install. The warm beige sits cleanly against white cabinetry and picks up the cream in a quartz counter, so the wall and the counter read as one material family. Because the pieces are small, you can fit the layout around awkward outlets without a stone cutter.
How to do it:
- Choose sheet-mounted mosaics so the chips are already spaced and even.
- Decide between filled travertine, which arrives sanded and smooth, and unfilled, which needs filling after setting.
- Pick a grout that is one shade lighter than the stone to keep the joints from reading as a grid.
- Seal before grouting and again afterwards, following the product instructions.
Cost: premium range. Difficulty: hire a pro. Time: about two days.
Good to know: travertine is limestone, so acidic cleaners will etch it permanently. Use a pH-neutral kitchen cleaner and never lemon-based products near the splash zone.
12. Wood-Look Porcelain Planks
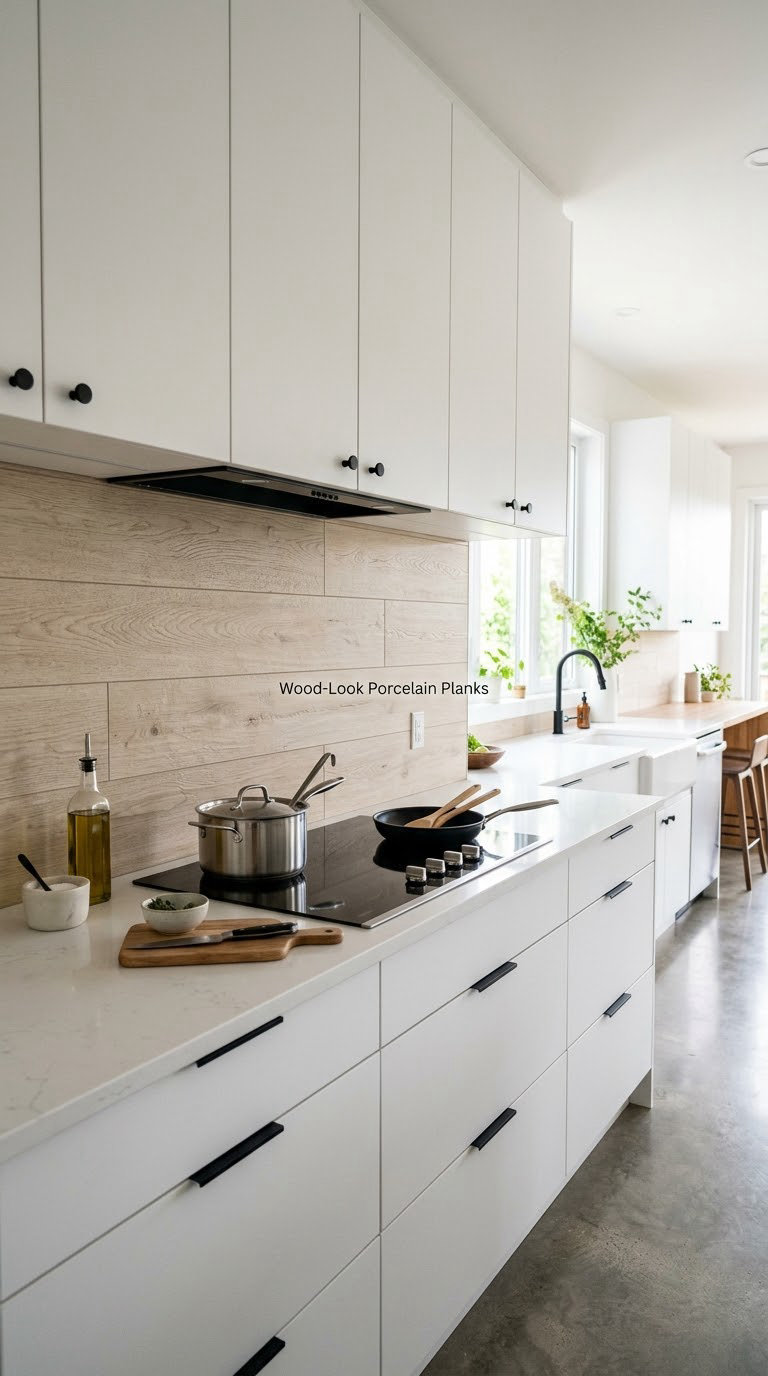
Wood brings warmth to a white kitchen, and wood-look porcelain planks give you that warmth with the durability of tile. They are the compromise most homeowners land on after ruling out real wood, because they wipe clean and they will not swell behind the sink. Pale oak tones keep the effect soft rather than orange.
How to do it:
- Check plank dimensions; common backsplash planks are about 6 by 36 inches.
- Stagger the plank ends by at least a third of the length from row to row.
- Use porcelain-rated thin-set with 1/16-inch spacers, and confirm the edges are rectified for tight joints.
- Plan the waterproof membrane behind the planks if the wall is not masonry.
Cost: mid range. Difficulty: moderate DIY. Time: one to two days.
Good to know: never install real wood veneer in a splash zone. Even sealed veneer lifts at the edges with repeated moisture and leaves you with bare wall behind it.
13. Black-and-White Geometric Tile
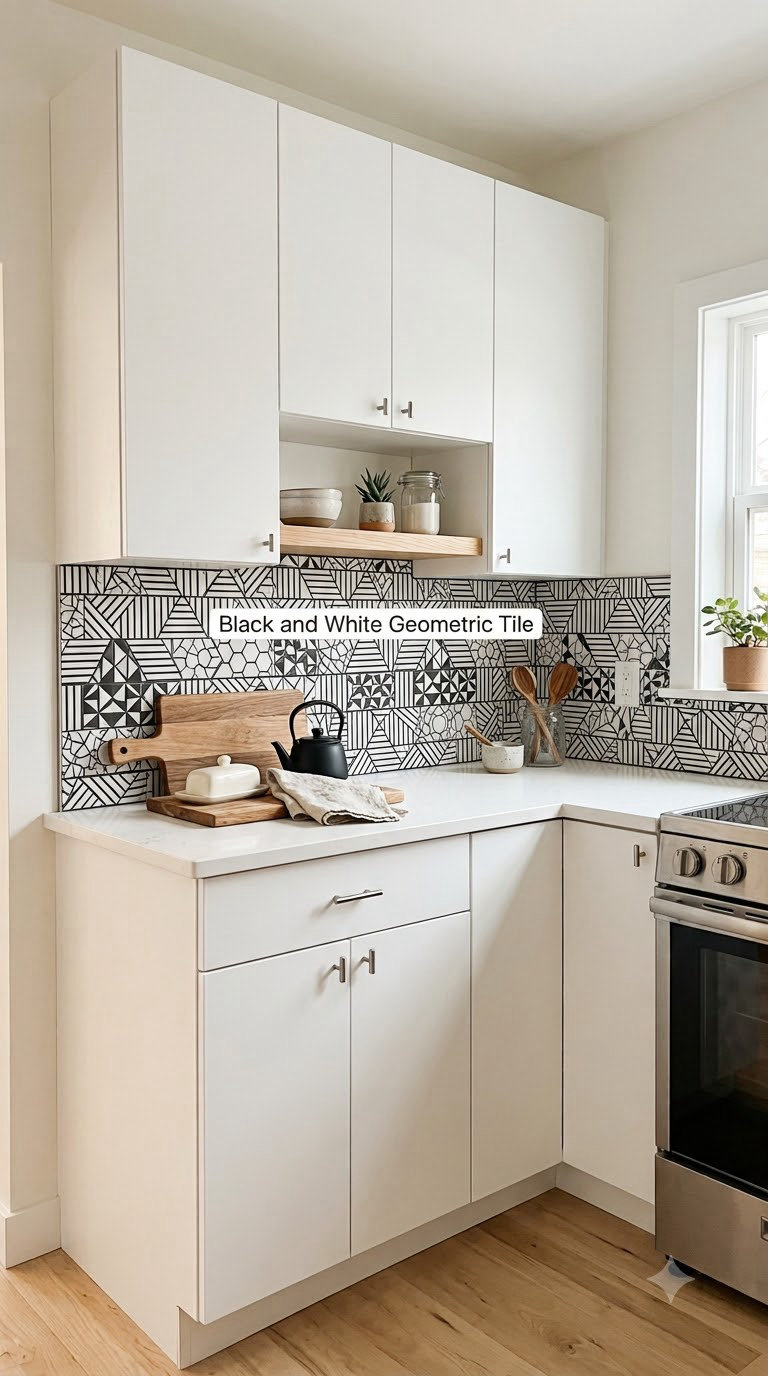
A restrained black-and-white pattern gives white cabinets graphic interest while staying inside a neutral palette, which is why it holds up in a small kitchen. The key is scale and placement: pattern on the whole wall of a compact room will crowd it, so put it where you want the eye to land.
How to do it:
- Keep the pattern to the cooking zone, behind the range, or between counter and upper cabinets.
- Preserve border alignment around any opening by snapping grid lines before cutting.
- Mix the accent tile evenly across the field rather than clustering it in one spot.
- Use white or light grey grout to keep the pattern crisp.
Cost: mid to premium range. Difficulty: moderate DIY. Time: one to two days.
Good to know: if a full pattern feels loud in your room, drop to a small-format black and white mosaic in a simple basketweave. The colour contrast stays, the noise drops away.
14. Hand-Painted Floral Tile
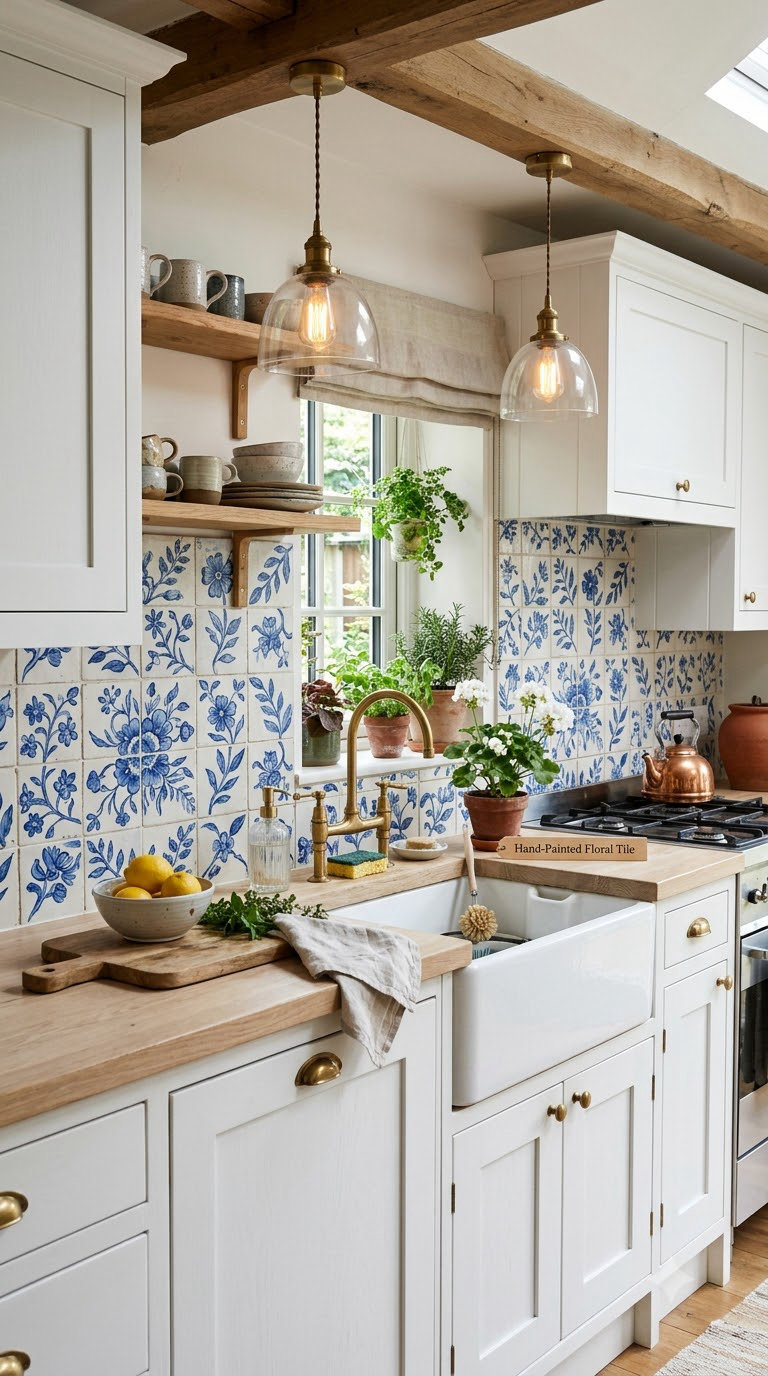
Hand-painted floral or botanical tile is the most characterful option on this list, and it lets you add personality without coloured cabinetry. White stays the dominant colour because the design itself carries the interest. For a period home or a cottage kitchen it does more work than any paint choice.
How to do it:
- Plan the repeat before cutting, since a half-tile of floral pattern looks like a mistake.
- Match the cut edges to the nearest complete motif at outlets and at the ends of the run.
- Choose a gloss glaze for a traditional look or matte for a softer, painted feel.
- Grout in a warm off-white so the joints do not cut across the design.
Cost: mid to premium range per square foot. Difficulty: hire a pro. Time: two to three days.
Good to know: a stencil on plain tile is the cheap version of the same look and lets you repaint later. Prime the glazed surface properly first, or the paint peels within a few cleanings.
15. Colorful Encaustic-Inspired Tile
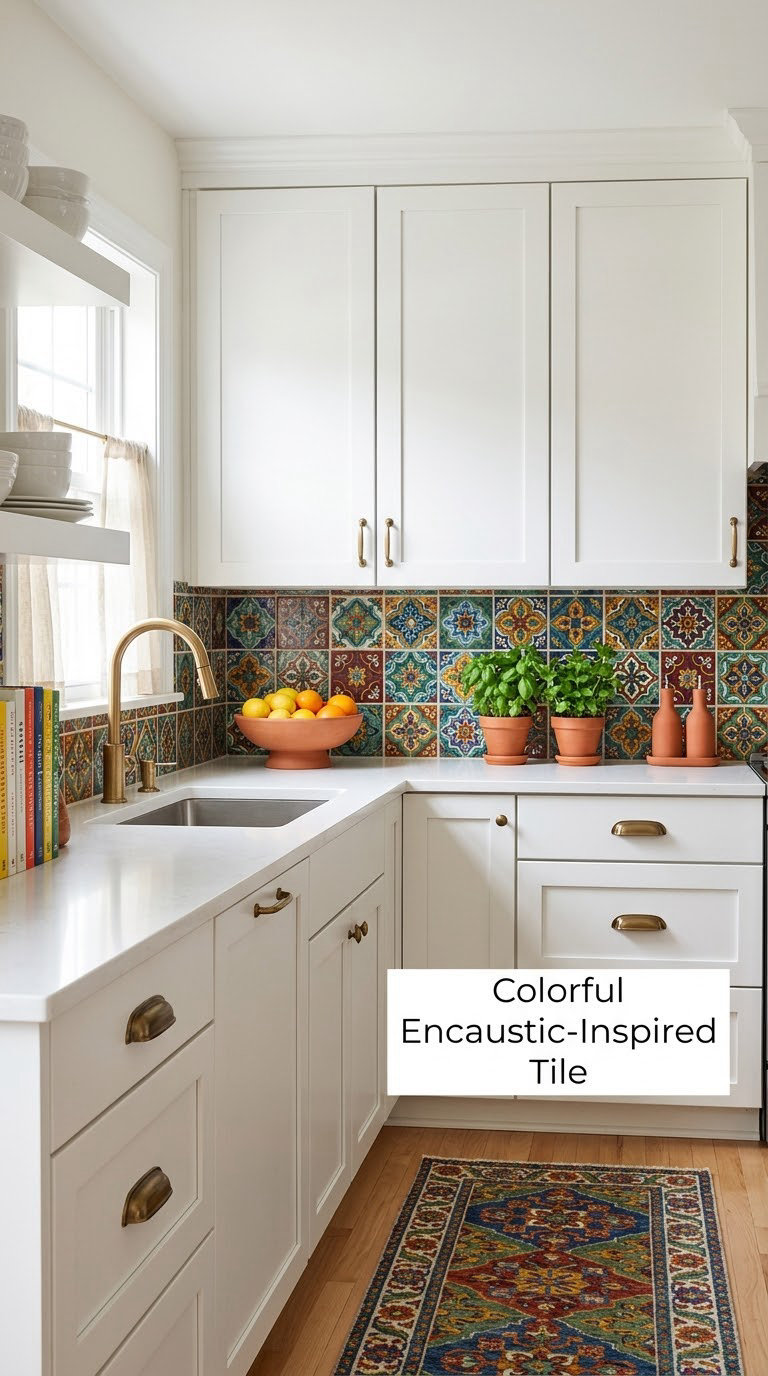
Encaustic-inspired cement-look tile energises a white kitchen because the colour lives in the pattern rather than in the cabinets. White shaker doors frame it perfectly, and the repetition gives the wall a rhythm you cannot get from plain colour. Modern porcelain versions of the pattern cost less and need no sealing, so they suit more kitchens.
How to do it:
- Look for a repeating motif in 2-by-2-inch or a larger format and confirm the repeat size before ordering.
- Test grout colour against the pattern; a mid-tone grout can mute a busy design considerably.
- Flat-set the surface thoroughly, because cement-look tiles show any waviness behind them.
- Seal genuine cement tile after install; porcelain versions need no sealer.
Cost: mid range. Difficulty: moderate DIY. Time: one to two days.
Good to know: in a compact kitchen, pull the pattern back to a two-colour version, or confine it to the range wall. Designers in the r/kitchenremodel threads say the same thing repeatedly: a busy pattern behind plain white doors works as a focal area, not as a full surround.
16. Brushed Brass Grid Tile
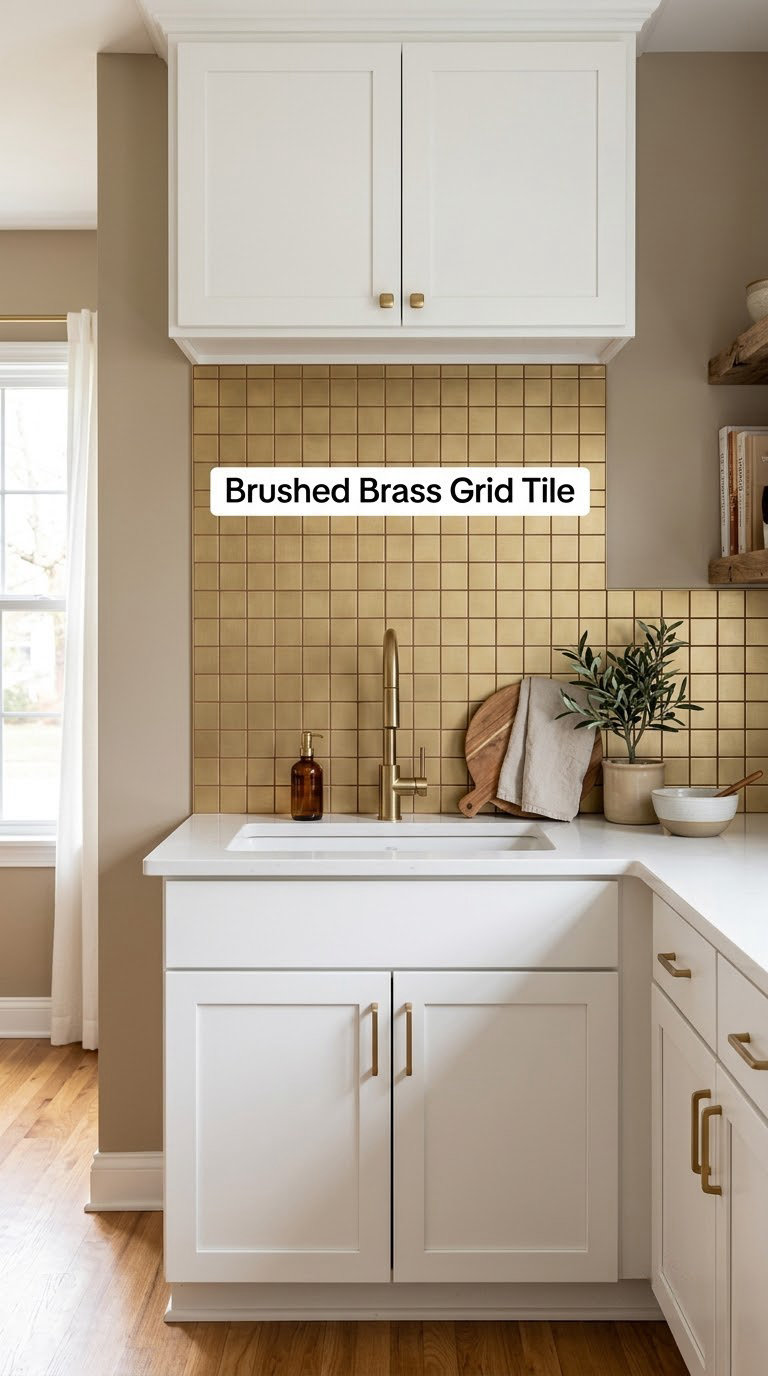
A small-scale metal-look grid adds warmth, reflectivity and a clean architectural line to white cabinets. It behaves like a subtle pattern rather than a colour statement, and it picks up brass hardware so the metal reads as a single decision across the room. It also handles grease and wiping without any fuss.
How to do it:
- Coordinate the metal finish with your taps and cabinet pulls before ordering.
- Pick a grout close to the metal tone so the grid lines do not fight the shine.
- Verify the product is rated for a kitchen splash zone and near heat if it sits beside a cooktop.
- Seal porcelain or ceramic pieces if the finish is matte rather than metallic.
Cost: mid to premium range. Difficulty: moderate DIY. Time: about a day.
Good to know: some metal-look tiles are thin decorative overlays rather than true porcelain, and those are not always approved for wet areas. Check the specification before you commit, especially behind a sink.
17. Textured White Microcement
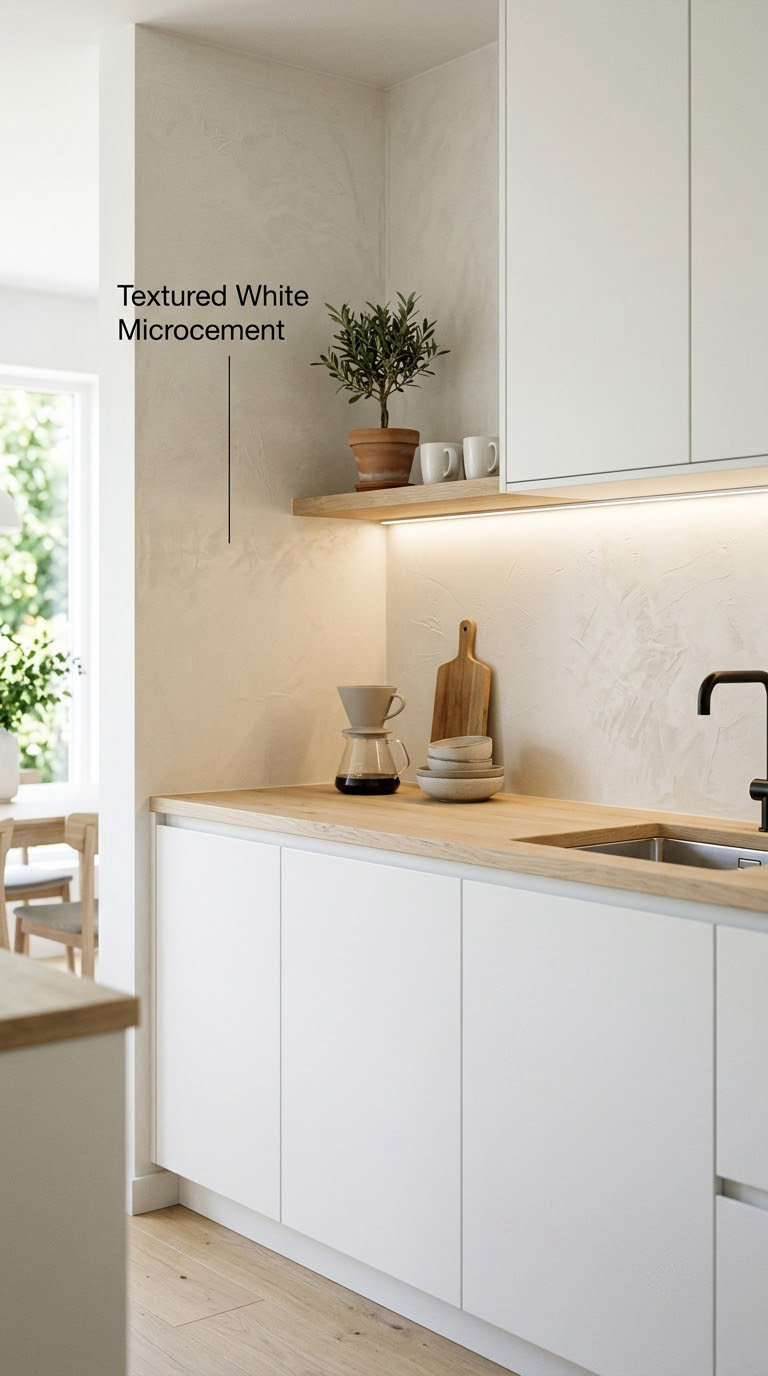
Troweled microcement gives a white kitchen depth without adding a single colour, because the variation lives in the surface rather than the pigment. For handleless cabinets and a pale wood counter, it delivers the quietest possible backdrop that is still not flat. Warm white pigment is usually more forgiving than pure white.
How to do it:
- Prepare and level the substrate, then mask edges and any fixed fixtures with tape and film.
- Apply in thin coats with a trowel, letting each layer dry fully before the next; the usual window is a few hours per coat.
- Test a sample board first, because troweled results vary by hand more than any other finish.
- Keep pigment batches consistent so the wall cures as one even tone.
- Install a waterproof membrane system where the specification requires it.
Cost: premium range. Difficulty: hire a pro. Time: three to five days including curing.
Good to know: on a large or uneven surface, hire a pro. Hand-applied microcement is unforgiving, and the cost of a failed wall is high.
18. Two-Tone Vertical Color Block
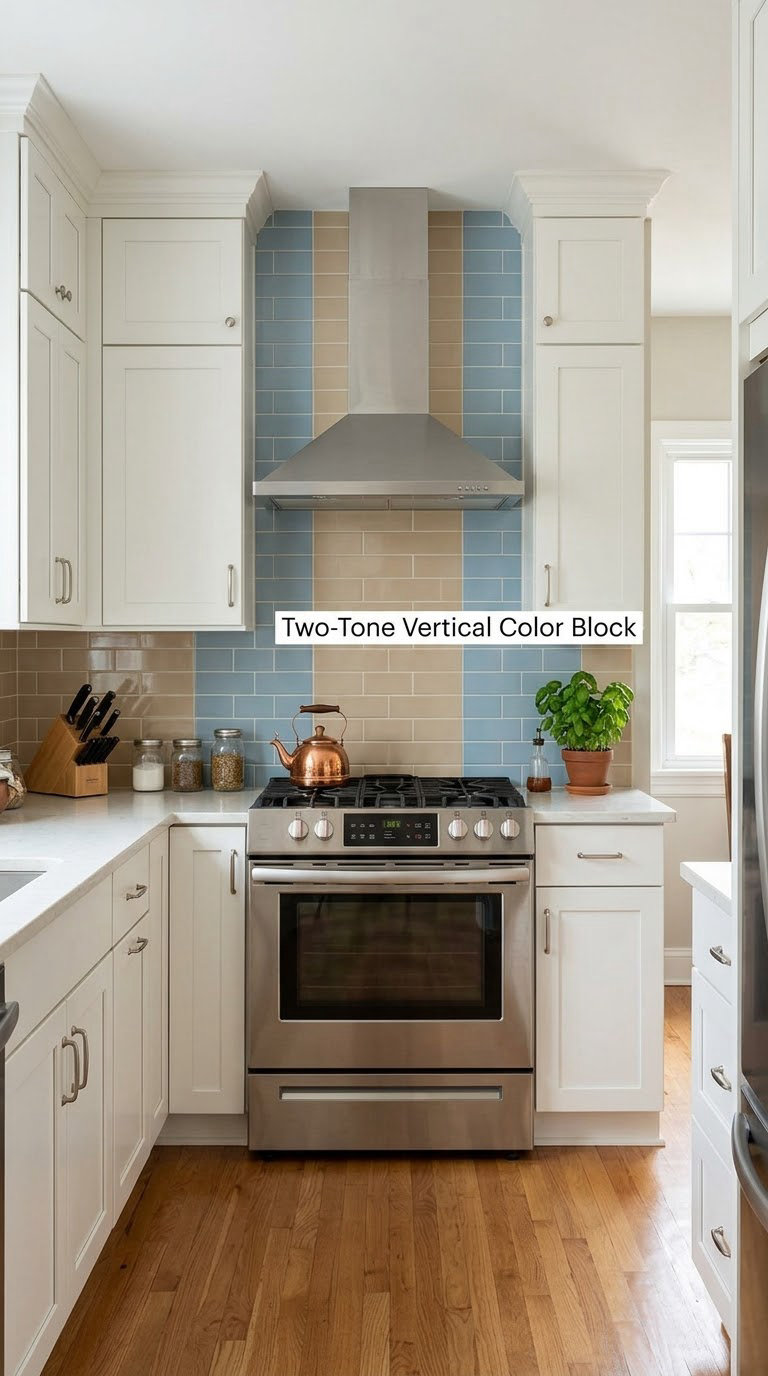
Two complementary colours split into clean vertical sections can divide zones in a galley kitchen, frame a range, or simply brighten a narrow run without touching the cabinet colour. Because both sections are quiet tones, the effect is architectural rather than loud. It is also one of the few patterns that reads well full height.
How to do it:
- Measure the wall, then centre the colour break or align it with a window edge or the range centreline.
- Mark the break in pencil and snap a plumb line so both sections stay vertical.
- Coordinate the grout across both colours; a neutral mid-grey works when the two tones differ.
- Keep the finish consistent, glossy with glossy or matte with matte, or the join looks like a mistake.
Cost: budget to mid range. Difficulty: moderate DIY. Time: one to two days.
Good to know: painting sections of flat tile is the lower-cost route, and it works well on a stable wall. Use a bonding primer rated for glazed surfaces, and expect to touch up the paint every few years.
Planning Tips
- Measure every wall in inches and mark out the outlets, switches and window edges before ordering anything.
- Take sample boards home and look at them in your own lighting at both morning and evening, since colour reads differently under warm bulbs and daylight.
- Match grout to both the tile and the cabinets, and remember grout is the cheapest design lever in the whole job.
- Confirm any product is approved for a wet area and for heat if it sits beside a cooktop.
- Order 10 to 15 percent extra tile and keep it for cuts now and a matched repair later.
- Decide the backsplash height early, since a 12-inch band and a full-height install need different quantities and different labour.
Related reading: our guides to bathroom backsplash ideas and whimsy wallpaper ideas cover the same choosing-and-matching decisions in other rooms, and spring bedroom decor ideas works the same colour-and-finish logic.
Frequently Asked Questions
What is the best backsplash color for white kitchen cabinets?
Warm neutrals such as beige, cream and soft warm white are the safest choices, because they add depth without competing with white doors. Greige and pale grey read more modern. If you want drama, black, navy or deep green give strong contrast; if you want calm, stay within one shade of the cabinet colour and let texture and grout do the work.
What backsplash works best in a small kitchen with white cabinets?
A light material with visible texture works best, such as a small-format mosaic, a pale herringbone or a full-height light tile that draws the eye upward. Avoid a dark colour on more than one wall, and keep any bold pattern to a single zone behind the range. Full-height tile makes a low ceiling look taller without adding visual weight.
Can I paint a backsplash instead of installing tile?
Yes, and it is a sensible option on a stable wall you intend to keep. Use a bonding primer rated for glazed or ceramic surfaces, and pick a finish that can handle kitchen grease and repeated wiping. Painting over tile that is loose, cracked or in a damp area will lift within a year. Real tile lasts far longer when the layout is settled.
What backsplash material is easiest to clean?
Glazed ceramic and porcelain are the easiest, because a non-porous surface just needs warm water and a neutral cleaner. Large-format panels or groutless metal panels have fewer joints, so there is less to scrub. Natural stone and cement-look tile need sealing and a pH-neutral cleaner, and anything with acid will etch travertine and limestone.
How should I plan 18 kitchen backsplash ideas for white cabinets?
Start by measuring the wall and marking outlets, windows and the range, then shortlist ideas by material and colour against your countertop and cabinet finish. View full-size samples in your own light before you commit. Set the backsplash height, pick the grout colour, and order 10 to 15 percent extra material for cuts and future repairs.
Measure the wall first, then compare full-size material samples in your own kitchen light. That one afternoon of work will tell you more than another month of scrolling. Whatever style you land on, make sure it has texture, a warm or contrasting tone, or visible grout lines, and the white cabinets will stop looking unfinished. There is more about painting and finishing ideas on the site if you are planning the rest of the room at the same time.