20 Wall Paneling Ideas for Living Rooms That Pop (October 2026)
These 20 wall paneling ideas for living rooms run from a Saturday-afternoon paint treatment to a full weekend of carpentry, so you can pick the one that matches your room, your budget and how much mess you are willing to live with. Every entry lists a realistic US cost range, a difficulty call and the time it actually takes.
A flat drywall wall is the most common complaint in homes we work in. Paneling fixes it by adding shadow lines, texture and a reason for the eye to stop. It also does something quieter: vertical runs make a low ceiling look taller, horizontal runs make a narrow room feel wider, and a thicker panel behind the sofa takes the hits that a painted wall would not. If you want to see how a finished scheme holds together before you commit, our dream rooms ideas are a good place to start.
Contents
If you have not decided on a colour scheme yet, the wall painting ideas we tested are a good place to sort out the paint first. Paneling and paint are the same project in two halves, and people often pick the wood tone before the wall colour.
20 Wall Paneling Ideas for Living Rooms at a Glance
These are typical US ranges for a single accent wall roughly 6 by 8 feet (1.8 by 2.4 m), including materials and a few hours of consumables. Prices swing by region, by material choice and by how much repair the wall needs underneath, so treat the numbers as a range rather than a quote.
| Idea | Cost | Difficulty | Time |
|---|---|---|---|
| 1. Shou sugi ban wood paneling | USD 200-600 | Hire a pro | 1-2 weekends |
| 2. Vertical slat wall paneling | USD 150-400 | Moderate DIY | 1-2 days |
| 3. Fluted wood paneling | USD 400-1200 | Hire a pro | 2-3 days |
| 4. Herringbone wood paneling | USD 500-1400 | Hire a pro | 3-5 days |
| 5. Checkerboard wood paneling | USD 350-900 | Moderate DIY | 2-3 days |
| 6. Beadboard paneling | USD 90-250 | Easy DIY | 4-6 hours |
| 7. Vertical board-and-batten paneling | USD 200-550 | Moderate DIY | 1-2 days |
| 8. Picture-frame wall paneling | USD 120-350 | Moderate DIY | 6-8 hours |
| 9. Arched wood paneling | USD 450-1500 | Hire a pro | 3-4 days |
| 10. Geometric wood paneling | USD 500-1600 | Hire a pro | 3-5 days |
| 11. Reclaimed-barn-wood paneling | USD 250-700 | Moderate DIY | 2-3 days |
| 12. Pegboard wall paneling | USD 120-350 | Easy DIY | 4-6 hours |
| 13. Framed fabric panels | USD 200-600 | Moderate DIY | 6-8 hours |
| 14. Faux brick or stone-look panels | USD 350-1100 | Moderate DIY | 2-3 days |
| 15. Metal-look wall panels | USD 700-2200 | Hire a pro | 2-4 days |
| 16. Woven cane or rattan panels | USD 180-500 | Easy DIY | 5-7 hours |
| 17. Two-tone painted paneling | USD 80-200 | Easy DIY | 1 day plus drying |
| 18. Micro-cement or limewash-style panels | USD 600-2000 | Hire a pro | 4-7 days |
| 19. Decorative plaster wall panels | USD 400-1500 | Hire a pro | 3-6 days |
| 20. Built-in shelving with paneled backing | USD 900-3500 | Hire a pro | 1-2 weeks |
1. Shou sugi ban wood paneling
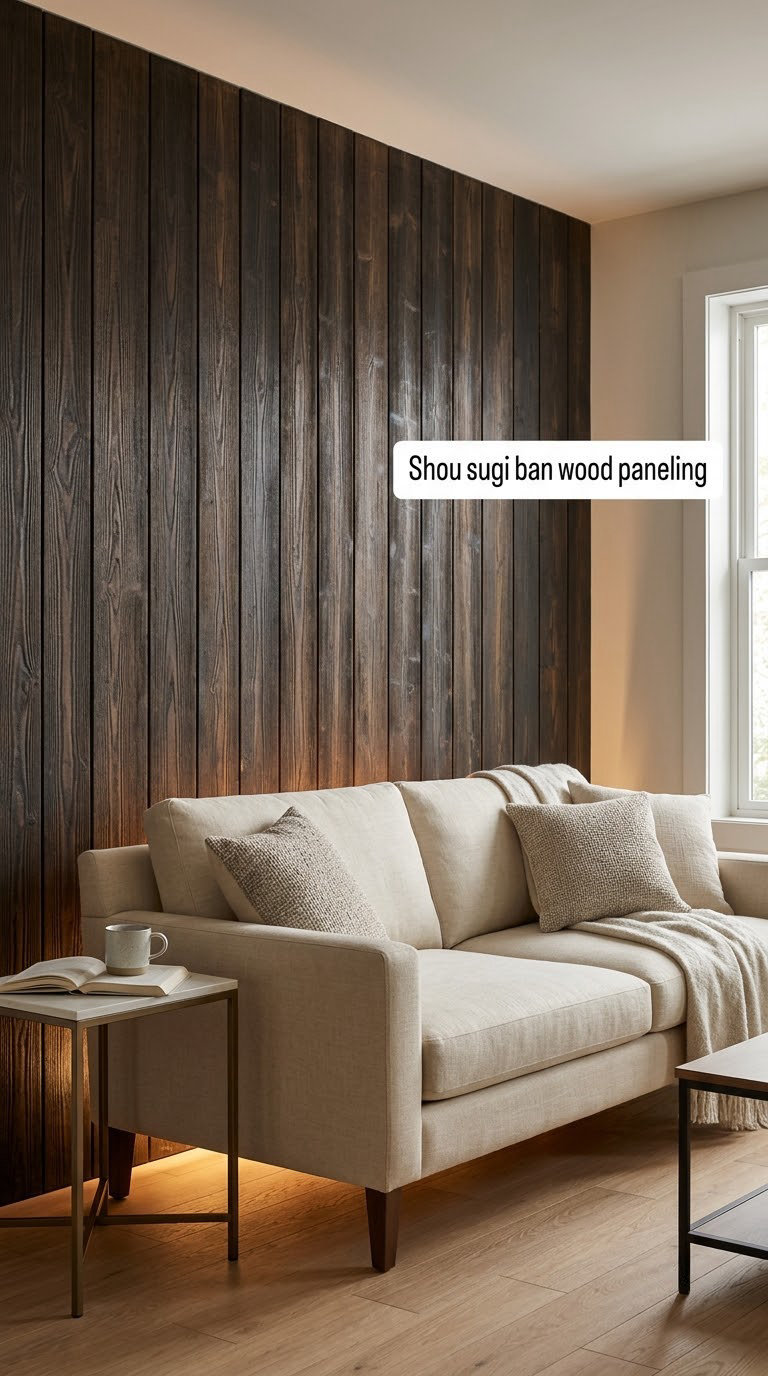
Shou sugi ban is cedar or hinoki cladding burned on the face to create a black char that fades to soft silver-grey over a year. The charred surface is nearly maintenance-free and gives a living room wall a dark, textured backdrop that makes pale furniture pop.
How to do it:
- Order kiln-dried cladding boards at least 1/2 inch (13 mm) thick, 4 to 6 inches (10-15 cm) wide, with a tongue-and-groove or shiplap edge.
- Burn the boards outdoors on a non-combustible surface or buy pre-charred cladding; never torch inside.
- Fix onto horizontal furring strips set 16 inches (41 cm) apart so you can level an uneven wall and leave an air gap behind.
- Leave the silvering to happen naturally rather than sealing it, and keep the reveal between boards tight.
Cost: USD 200-600 for a 6 by 8 foot accent wall. Difficulty: Hire a pro unless you have already worked with a torch. Time: 1-2 weekends including curing.
Good to know: Charred boards are dark enough that outlets and switches need a raised trim ring so the plate does not disappear into the wall.
2. Vertical slat wall paneling
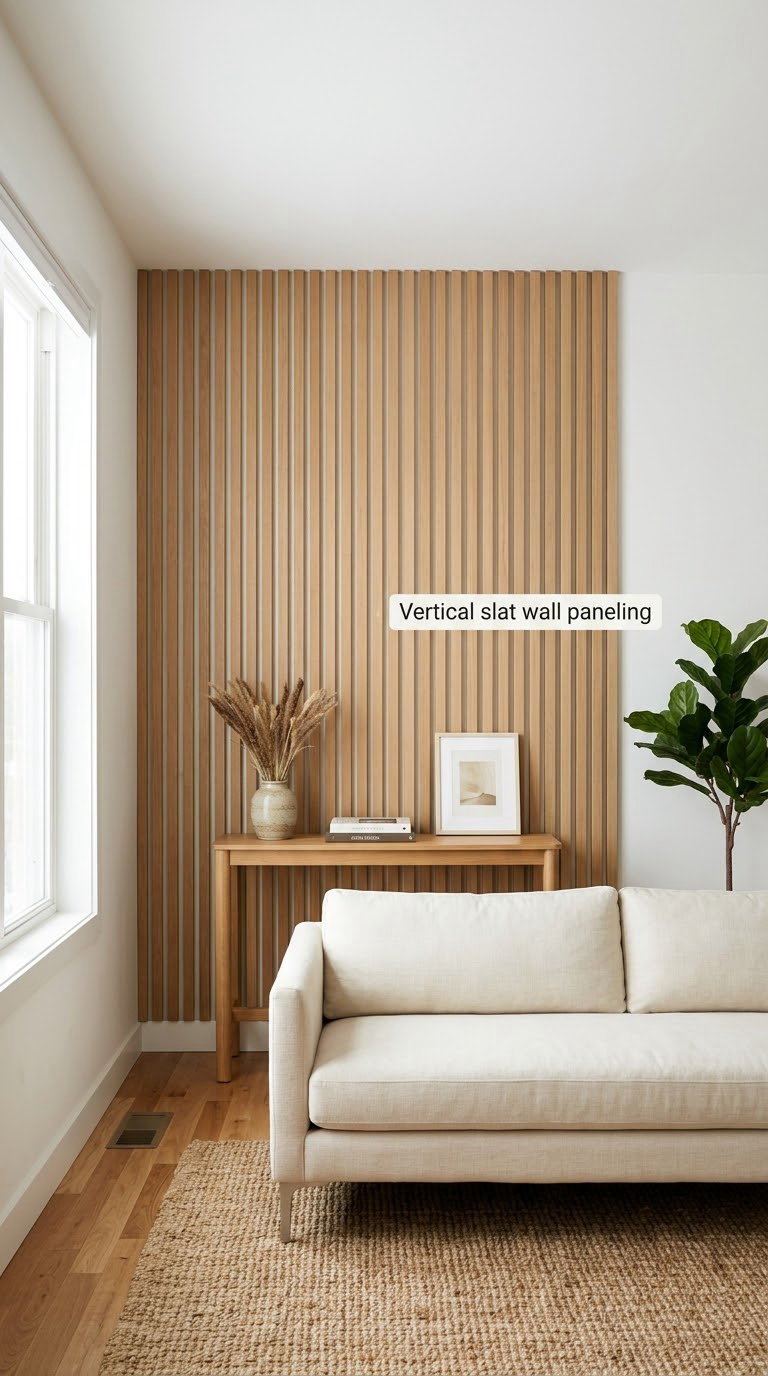
Vertical wood slat paneling is a run of narrow boards with even gaps behind them, and it stays the most requested wall treatment in living rooms we see. The shadow gaps catch light all day, so the wall changes from morning to evening without anyone touching it.
Are slats the best wall paneling ideas for living rooms with low ceilings?
They are the first thing I suggest below 8 feet (2.4 m) of ceiling, because the uninterrupted vertical lines pull the eye upward. If the room is narrow instead, run the slats horizontally and the wall reads wider.
How to do it:
- Mark a level baseline the full width of the wall and a second reference line 8 to 10 inches (20-25 cm) up.
- Space slats 2 to 3 inches (5-8 cm) apart, measuring gap-to-board rather than board-to-board for an even rhythm.
- Build up uneven spots with furring strips so the whole run reads as one plane.
- Cut the slat nearest any outlet so it frames the plate instead of crossing it.
Cost: USD 150-400. Difficulty: Moderate DIY. Time: 1-2 days. Plan roughly 150 to 400 USD all-in for a 6 by 8 foot pine or plywood slat panel, and closer to 300 USD for a 10 by 10 foot wall, before you add the cost of outlet work.
Good to know: Undersized slats at floor and ceiling are the number one regret. Buy them long enough to run past the line, then trim square.
3. Fluted wood paneling
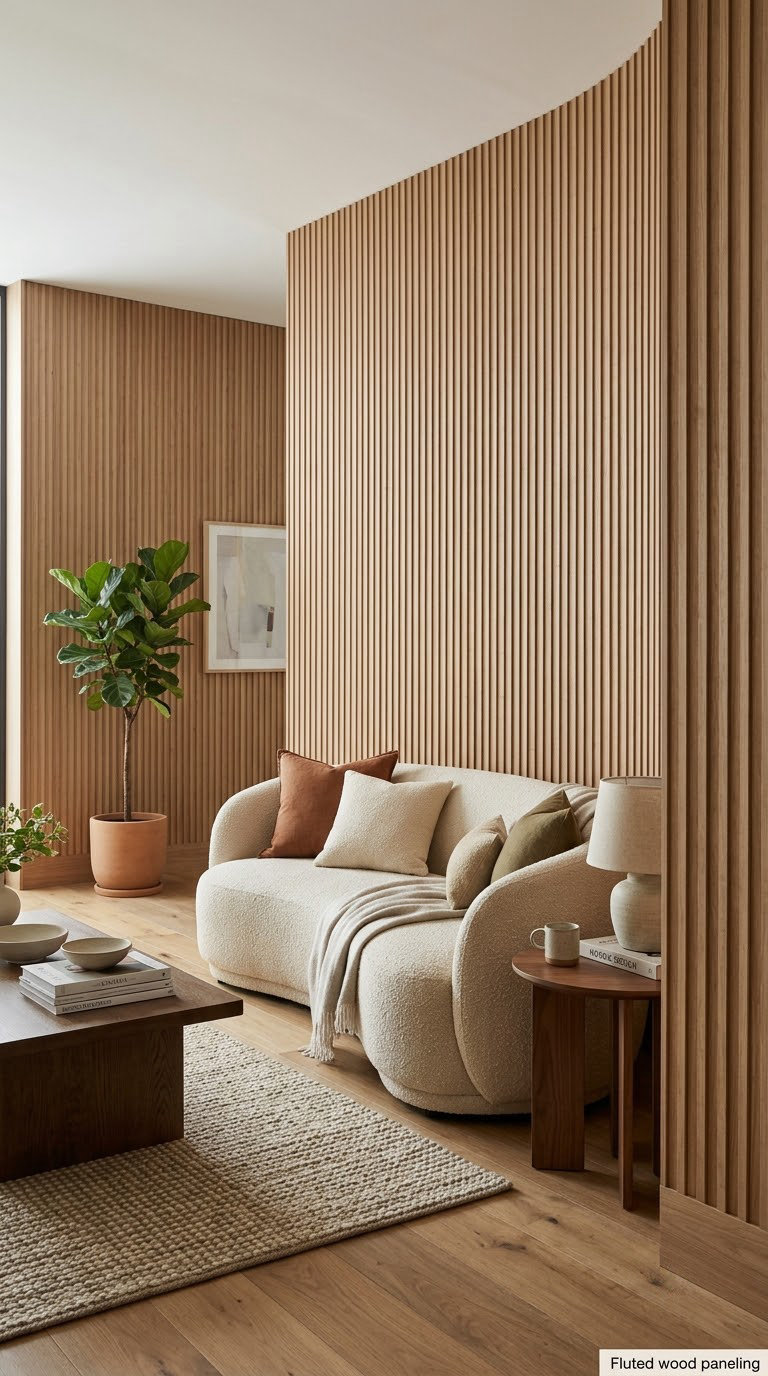
Fluted paneling is a series of half-round or quarter-round mouldings packed edge to edge, so the wall reads as one continuous piece of sculpture rather than boards. It is the most refined-looking option on this list and the least forgiving to install.
How to do it:
- Choose a profile width that divides your wall width evenly, usually 2 to 4 inches (5-10 cm).
- Mark the wall into equal vertical bays with a level line and a pencil, then work in thirds across the wall rather than across it in one pass.
- Glue and brad each moulding to a continuous furring backer, keeping the tops level as you go.
- Stain or paint before installation, and cut end pieces with a fine-tooth blade to prevent chipping.
Cost: USD 400-1200. Difficulty: Hire a pro. Time: 2-3 days plus finish drying.
Good to know: Flutes collect dust in the grooves. A soft brush takes ten minutes a month, but vacuuming is not optional if anyone in the house has allergies.
4. Herringbone wood paneling
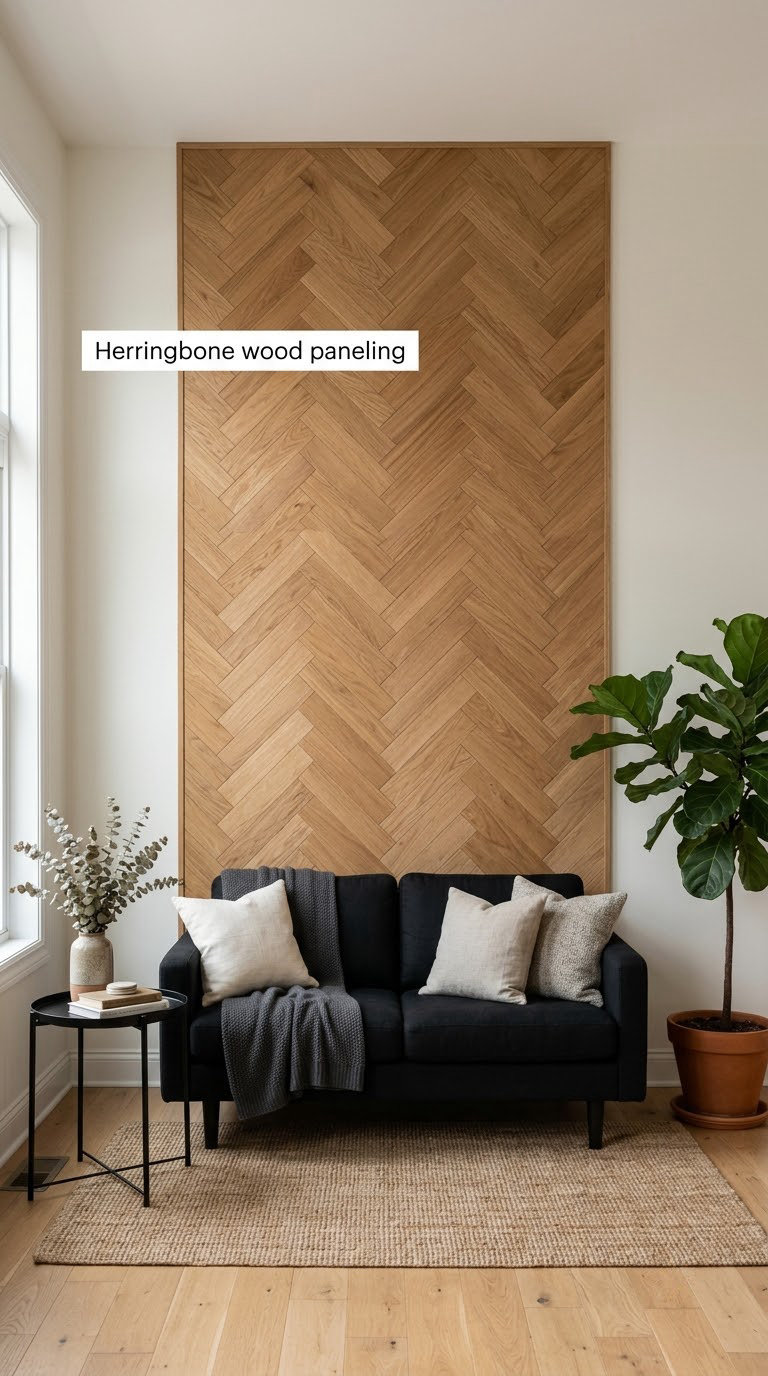
Herringbone paneling sets short pieces of wood at 45 degrees in a broken zigzag. The pattern is loud and directional, so it wants a big wall and a confident piece of furniture in front of it.
How to do it:
- Cut all pieces to one length before you start; varying lengths break the pattern’s rhythm.
- Draw a 45 degree guide line across the wall and mark every row position before nailing.
- Build a full-size paper or card template of the first six rows and use it to check alignment.
- Control the wall with a laser or line level and a temporary batten, then nail into studs every 8 to 10 inches (20-25 cm).
Cost: USD 500-1400. Difficulty: Hire a pro. Time: 3-5 days.
Good to know: Patterning installs waste more timber than flat runs, often 15 to 20 percent. Order that surplus on purpose rather than running short on the final row.
5. Checkerboard wood paneling
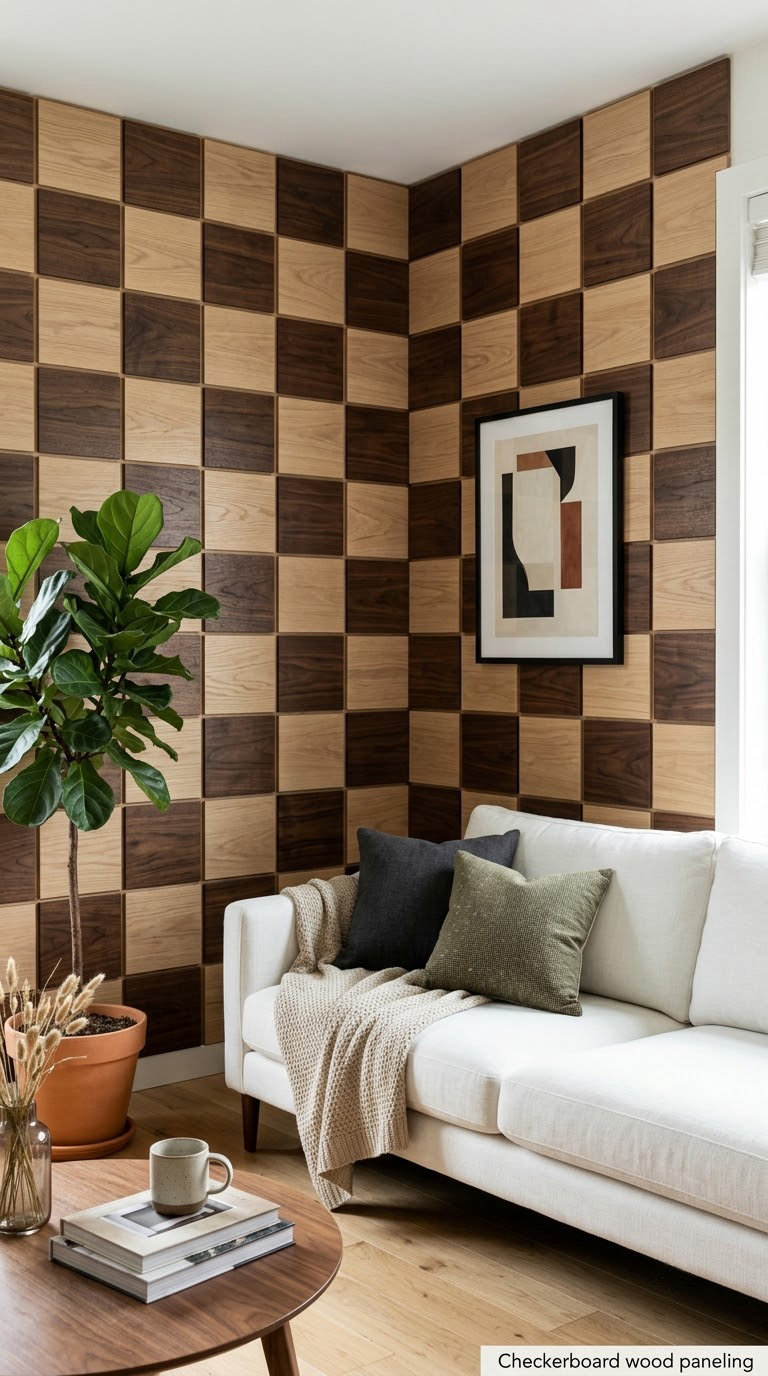
Checkerboard paneling alternates squares of two woods, or two stained finishes of the same wood, to make a graphic grid across the wall. It reads clearly from a distance, which makes it a good trick for a wall with windows or a vent in an awkward spot.
How to do it:
- Divide the wall width by the number of squares you want, aiming for 12 to 24 inches (30-60 cm) per square.
- Keep the grain running the same direction in every square so the light behaves evenly.
- Glue squares to a solid furring backer first, let it cure overnight, then hang the finished grid.
- Use the contrast between the two tones to hide scuffs in the high-traffic bottom row.
Cost: USD 350-900. Difficulty: Moderate DIY. Time: 2-3 days.
Good to know: Cheap MDF squares swell at the seams in humid rooms. If the wall is not conditioned, spend the extra on plywood.
6. Beadboard paneling
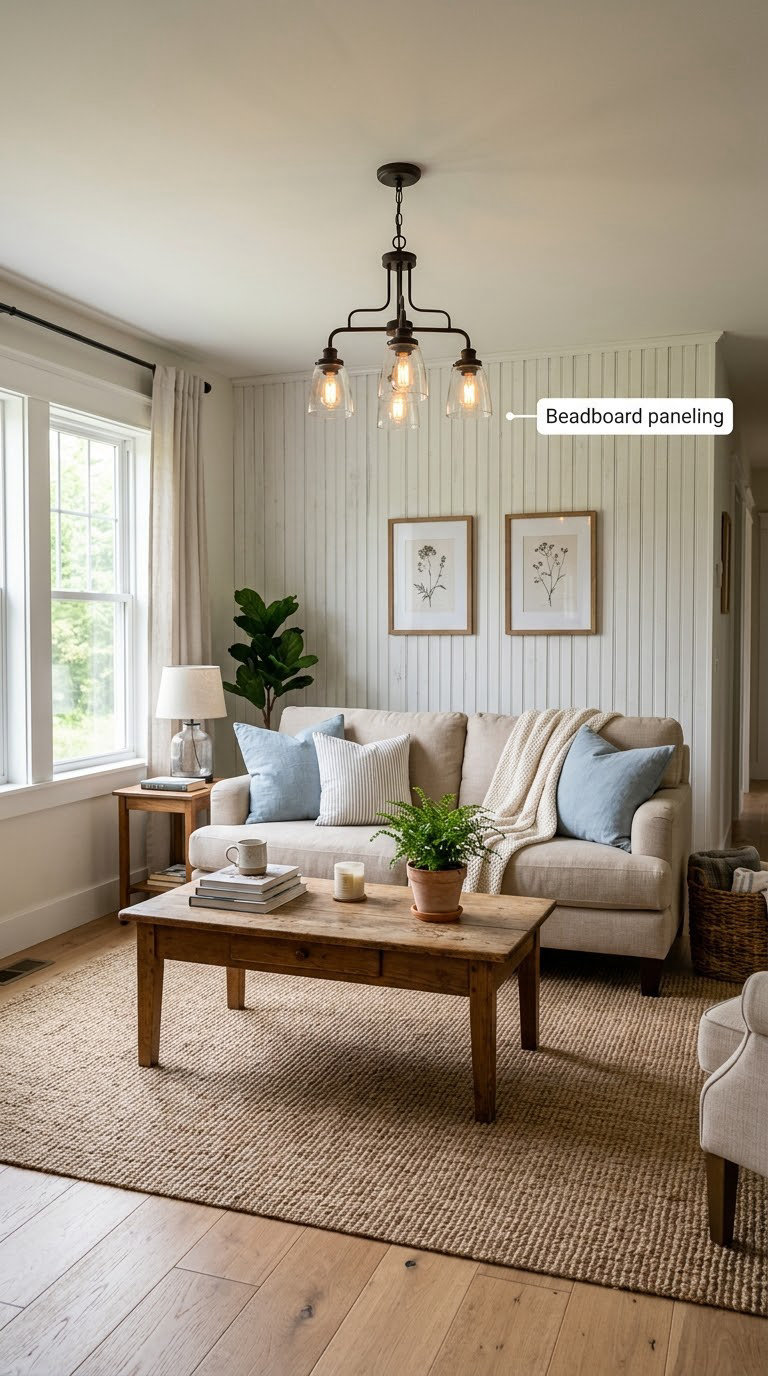
Beadboard is the smallest profile on this list, a series of half-inch (13 mm) boards with a rounded bead down the centre. It is inexpensive, forgiving and about the fastest way to give a plain living room a cottage character.
How to do it:
- Buy tongue-and-groove beadboard for a tight seam, or 1×3 furring strips with a separate bead moulding for a looser cottage look.
- Face nail through the tongue into studs at 16 inches (41 cm) centres, or fasten into furring strips on an uneven wall.
- Fill nail holes and seams, then paint in two coats with a satin or matte finish.
- Run a cap or nosing trim along the top edge where the beadboard meets open wall.
Cost: USD 90-250. Difficulty: Easy DIY. Time: 4-6 hours plus drying.
Good to know: For a renter, paint-grade beadboard sheets that glue on without nails give the same read on a single wall, and the holes are smaller than a picture hook.
7. Vertical board-and-batten paneling
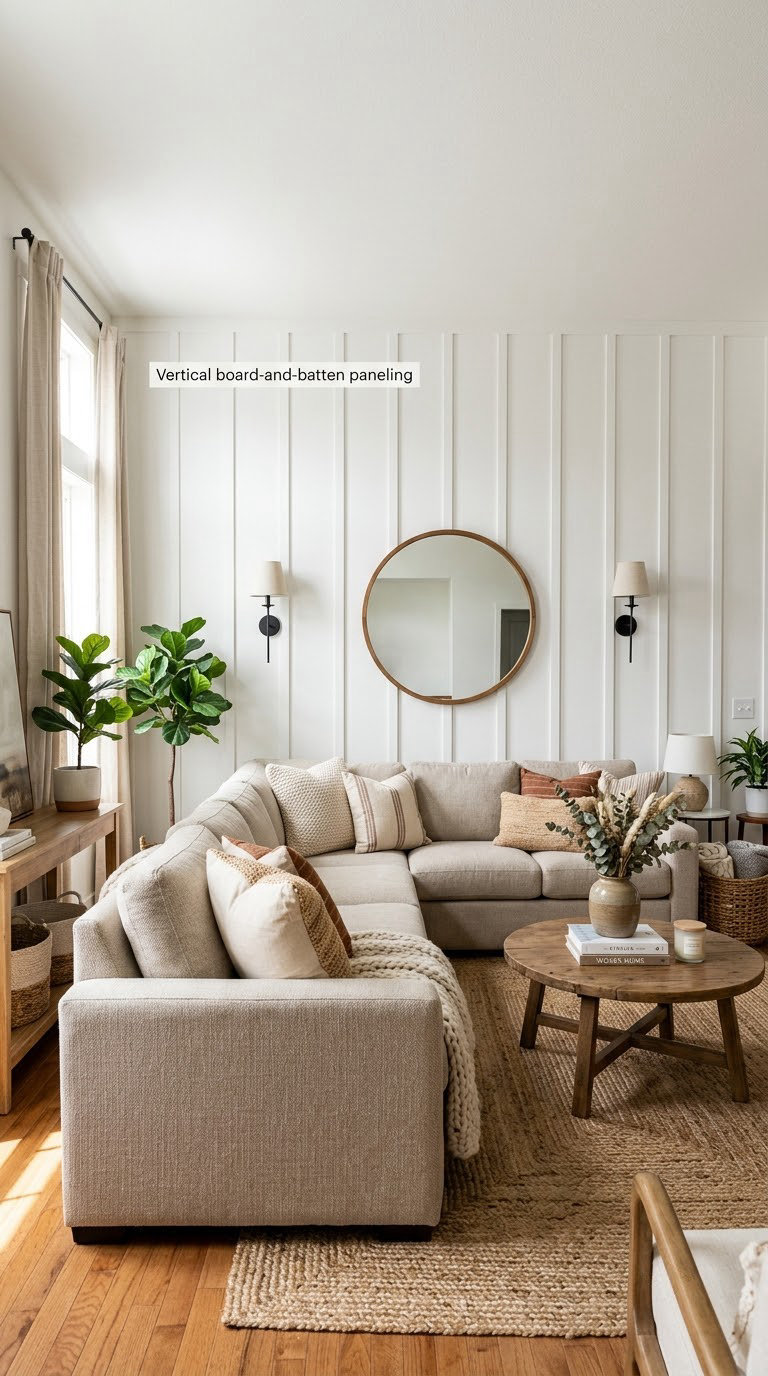
Board and battens is wide vertical boards with narrow cover strips on top, so every seam throws a hard line. It is the most traditional treatment here and the one that makes flat drywall look deliberate rather than patched.
How to do it:
- Lay 1×4 boards vertically with a 1/2 inch (13 mm) gap between them, then cover each gap with a 1×2 batten.
- Count positions from the fireplace or window rather than from a room corner so the pattern lands symmetrically.
- Use 2-1/2 inch (64 mm) drywall screws into studs with countersunk heads, not nails, in areas with movement.
- Block the corners with square pieces cut from the offcut so the battens meet cleanly.
Cost: USD 200-550. Difficulty: Moderate DIY. Time: 1-2 days.
Good to know: Paint the boards and battens separately before installation if the wall is tricky, because working around an outlet with four separate pieces is miserable.
8. Picture-frame wall paneling
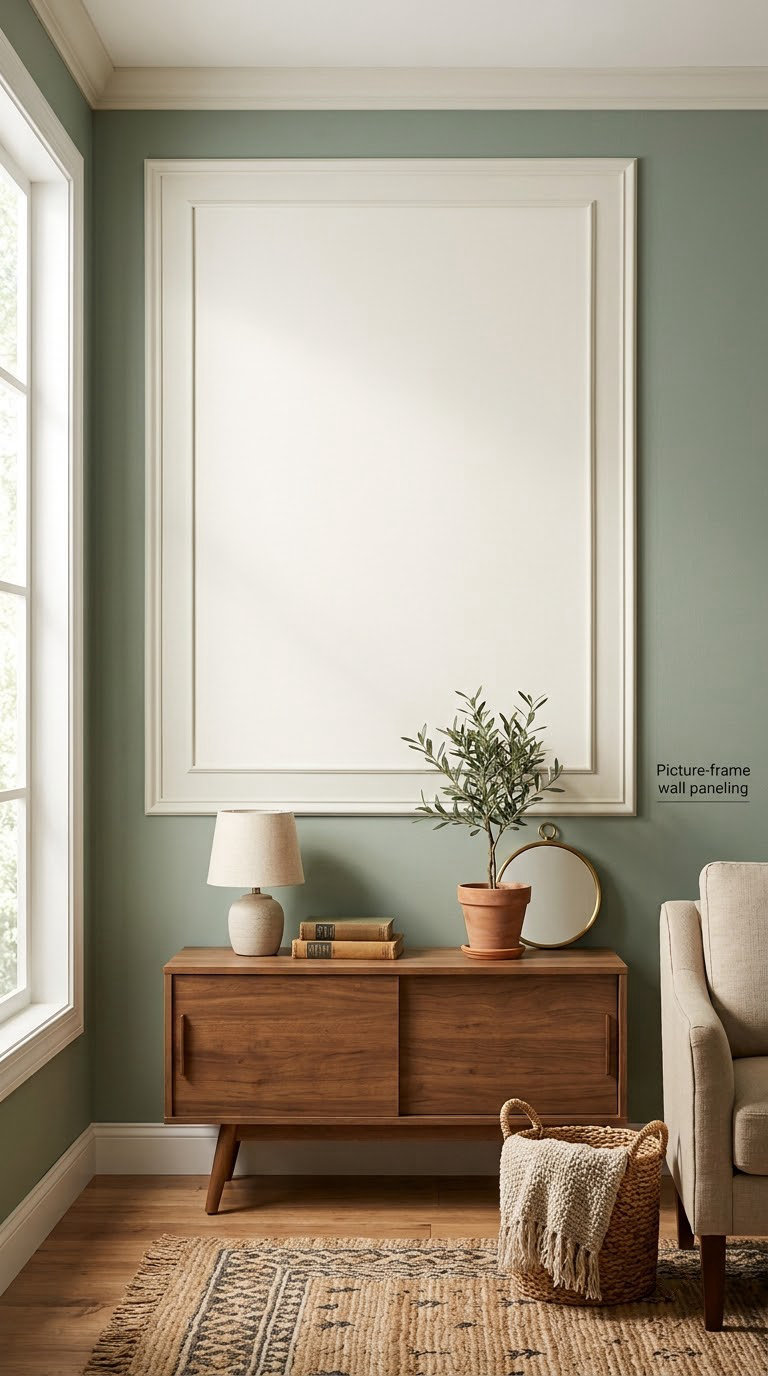
Picture-frame molding paneling builds one large rectangle out of flat trim, without covering the wall inside it. It is the cheapest way to add architectural detail, and it works in a rental because the trim can be held with removable adhesive strips.
How to do it:
- Pick trim 2 to 3.5 inches (5-9 cm) wide and use one profile throughout; mixing widths is what makes this look homemade.
- Mark the rectangle with a level and a chalk line, then mitre each corner and test-fit before fastening.
- Cut the inner corners as scarf joints or cope them with a coping saw for a tight seam.
- Split the panel around outlets and switches with short scrap blocks so the trim runs behind the plates.
Cost: USD 120-350. Difficulty: Moderate DIY. Time: 6-8 hours.
Good to know: Add a second, smaller frame inside the first and the same trim gives you a layered architectural wall for very little material.
9. Arched wood paneling
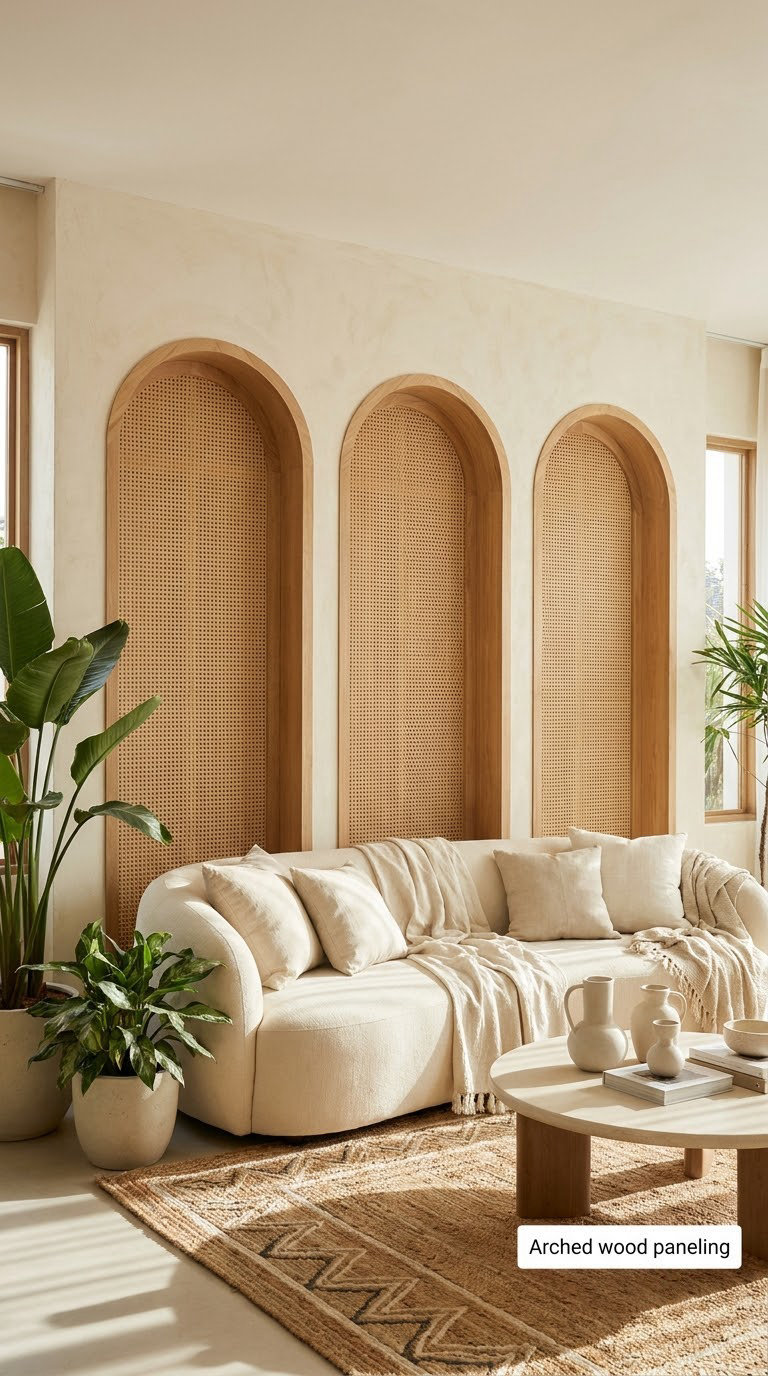
Arched paneling cuts full-height shapes with semicircular tops, and it softens a rectangular room in a way no flat grid can. A single arch over a sofa reads calmer; three arches read like a gallery wall in wood.
How to do it:
- Mark the arch centre on the wall and drive a screw on the exact spring line to trace the curve with a string and pencil.
- Cut the curve with a jigsaw fitted with a fine blade, working from a scrap of the same thickness.
- Handle the arch sections as a pair, joining them with a butt joint at the crown so the grain stays readable.
- Back each arch with a solid panel for rigidity, and sand the crown seam to a single plane before finishing.
Cost: USD 450-1500. Difficulty: Hire a pro. Time: 3-4 days.
Good to know: Partial arches that stop at 6 feet (1.8 m) cost less and hide ceiling problems better. Full-height arches demand a level ceiling and a plainer colour on the rest of the room.
10. Geometric wood paneling
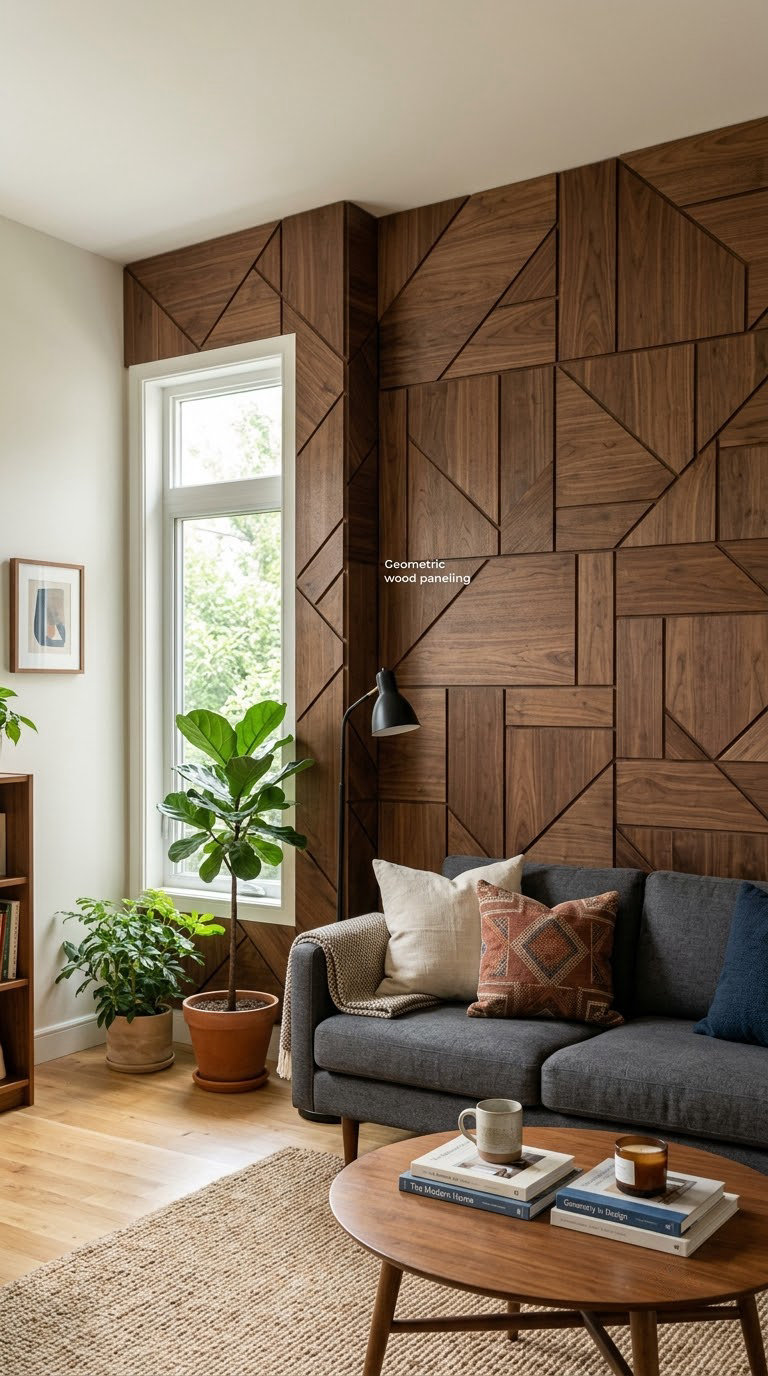
Geometric paneling sets rectangles, triangles or offset blocks into an asymmetric composition, usually with two finishes doing the work. It suits a room with strong furniture and less suited to one that needs to feel calm.
How to do it:
- Lay out the whole composition on the floor in masking tape before you cut a single piece.
- Keep every reveal the same width, around 3/8 inch (10 mm), or the asymmetry reads as error rather than design.
- Cut components on a table saw or with a track saw and a straightedge clamped to a stable surface.
- Stain or lacquer each block before assembly so the edges stay crisp.
Cost: USD 500-1600. Difficulty: Hire a pro. Time: 3-5 days.
Good to know: Diagram the pattern to scale and pin it to the wall. Scaling by eye on a wall that is 12 feet (3.7 m) wide is where patterns drift.
11. Reclaimed-barn-wood paneling
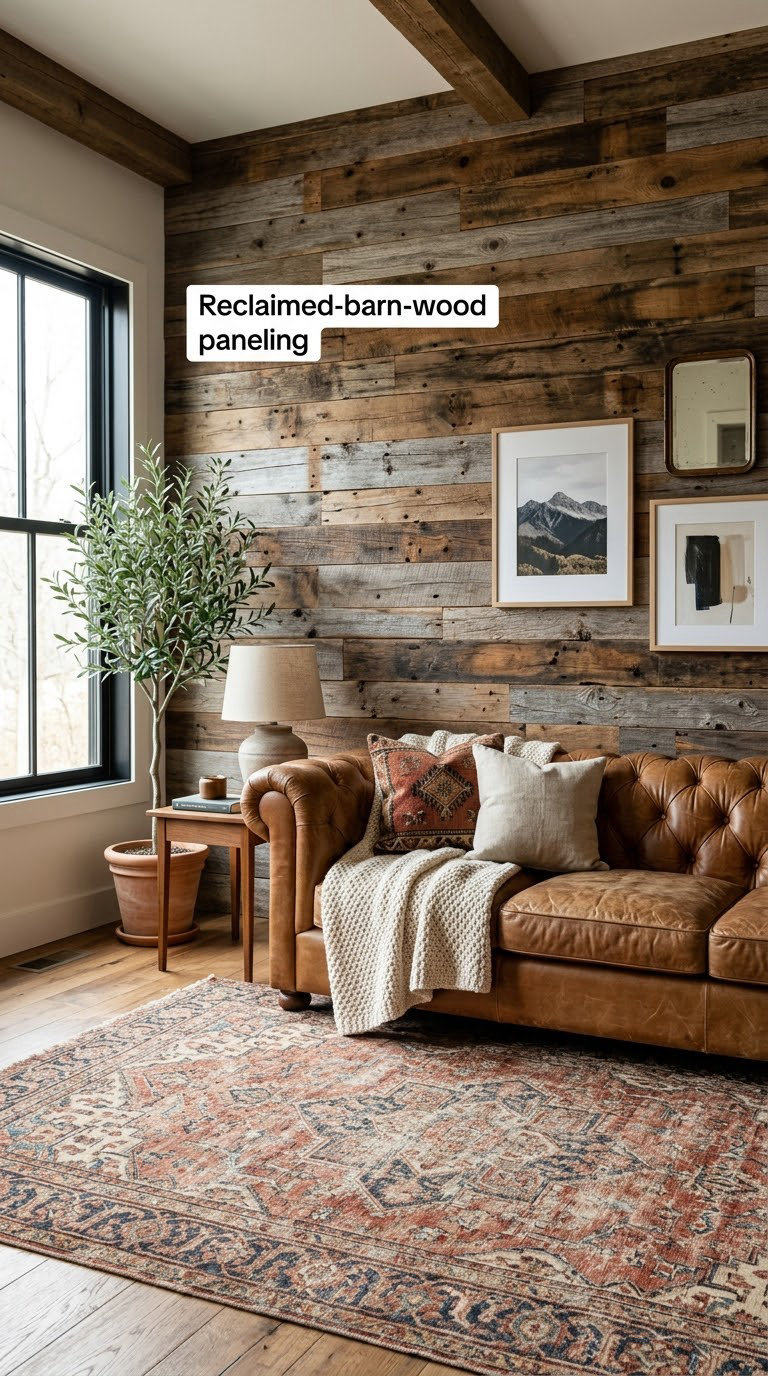
Reclaimed barn wood brings colour variation no new board can imitate, because each plank weathered differently under a barn roof for decades. In a living room it warms up hard modern furniture quickly.
How to do it:
- Pull nails, brush off dust, and scrub with a stiff nylon brush and warm water; skip a pressure washer, which adds grain.
- Skip any plank with deep rot or active insects, and check for lead paint on very old material before disturbing it.
- Cut nail holes off the face or drive new fasteners into the hidden side of the board.
- Sort planks by tone before layout and fasten each one into furring strips so cupped boards can move.
Cost: USD 250-700. Difficulty: Moderate DIY. Time: 2-3 days.
Good to know: Seal with a matte water-based topcoat if you want the patina to hold its colour, and expect the wall to look better in two years than it does today.
12. Pegboard wall paneling
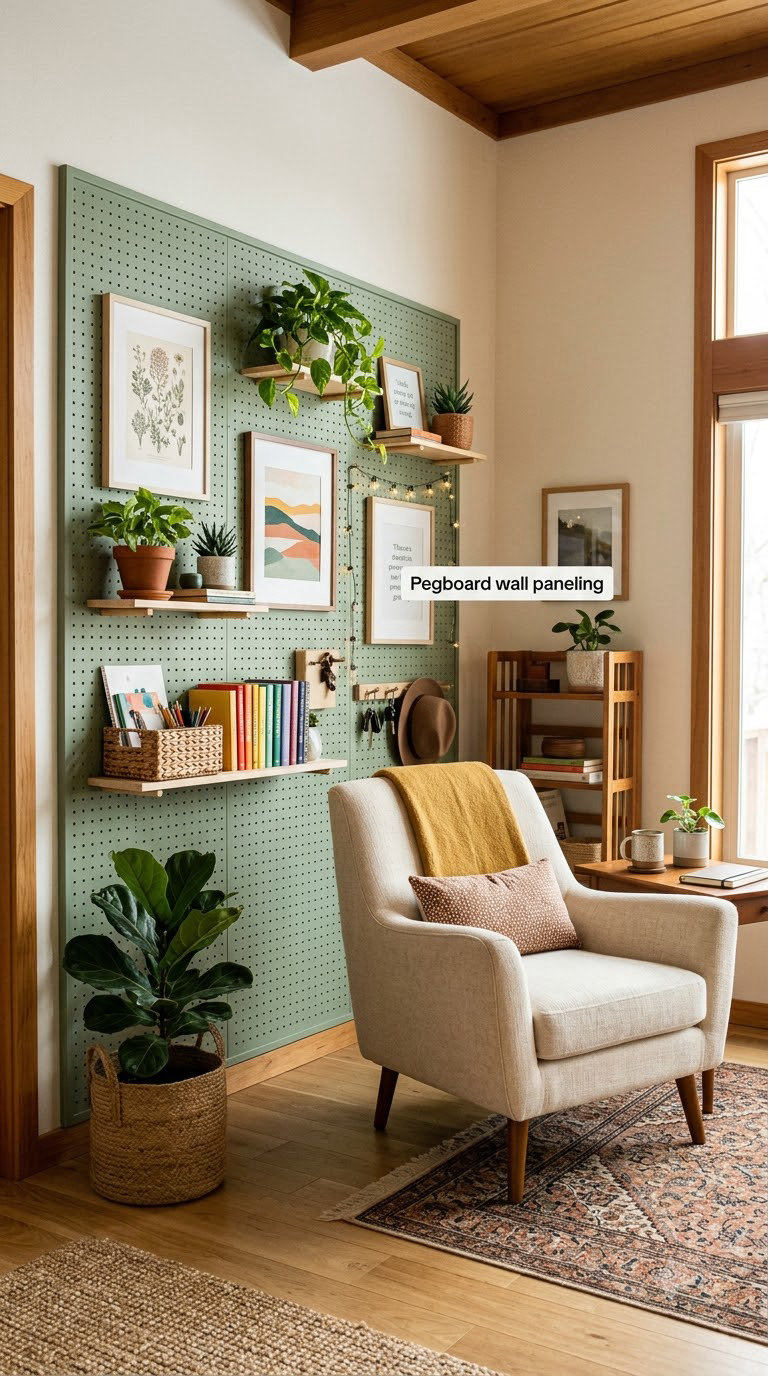
Hardboard pegboard paneled and painted turns a flat wall into a display system that you can rearrange every few months. It is part storage, part gallery, and it suits people who hate committing to art.
How to do it:
- Fit 1/4 inch (6 mm) pegboard to 1×2 furring strips set 16 inches (41 cm) apart so it stands off the wall and holds real weight.
- Paint both faces before installing, using a roller for the field and a brush for the holes, with two coats.
- Use a single consistent hole spacing of 1 inch (25 mm) across the whole wall so hooks line up.
- Keep loads honest: light frames and small shelves on pegboard, heavy art on picture hangers into studs behind it.
Cost: USD 120-350. Difficulty: Easy DIY. Time: 4-6 hours.
Good to know: Raw pegboard absorbs paint like a sponge. Filling the holes with a quick coat of primer first makes the difference between a wall and a mess.
13. Framed fabric or upholstered panels
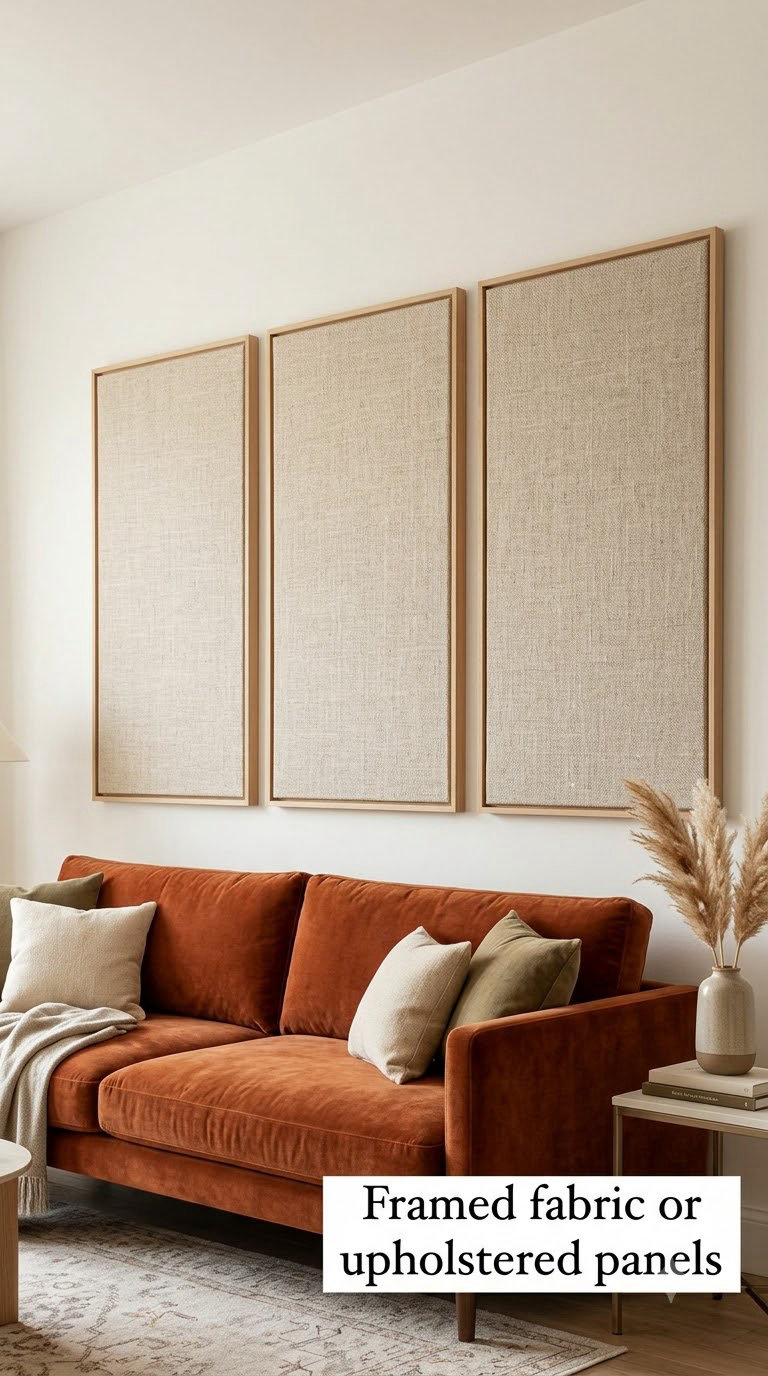
Framed fabric panels stretch a textile over a foam board in a shallow wood frame, giving a living room softness that wood cannot and absorbing a surprising amount of echo. They also take the scuffs from a busy household without marking.
How to do it:
- Cut 1 inch (25 mm) foam board slightly larger than the frame’s inner opening, and wrap the fabric over it with a staple every 2 inches (5 cm) along the back.
- Pull the fabric taut across the front and pull in opposite directions to keep the grain straight.
- Build or buy frames at least 1.5 inches (4 cm) deep so the foam does not bulge out of the plane.
- Space panels 2 to 3 inches (5-8 cm) apart so the wall still reads as separate objects.
Cost: USD 200-600. Difficulty: Moderate DIY. Time: 6-8 hours.
Good to know: Vacuum with an upholstery tool monthly. Natural fibres like linen and wool also help with room sound, which is why they work well on a TV wall.
14. Faux brick or stone-look paneling
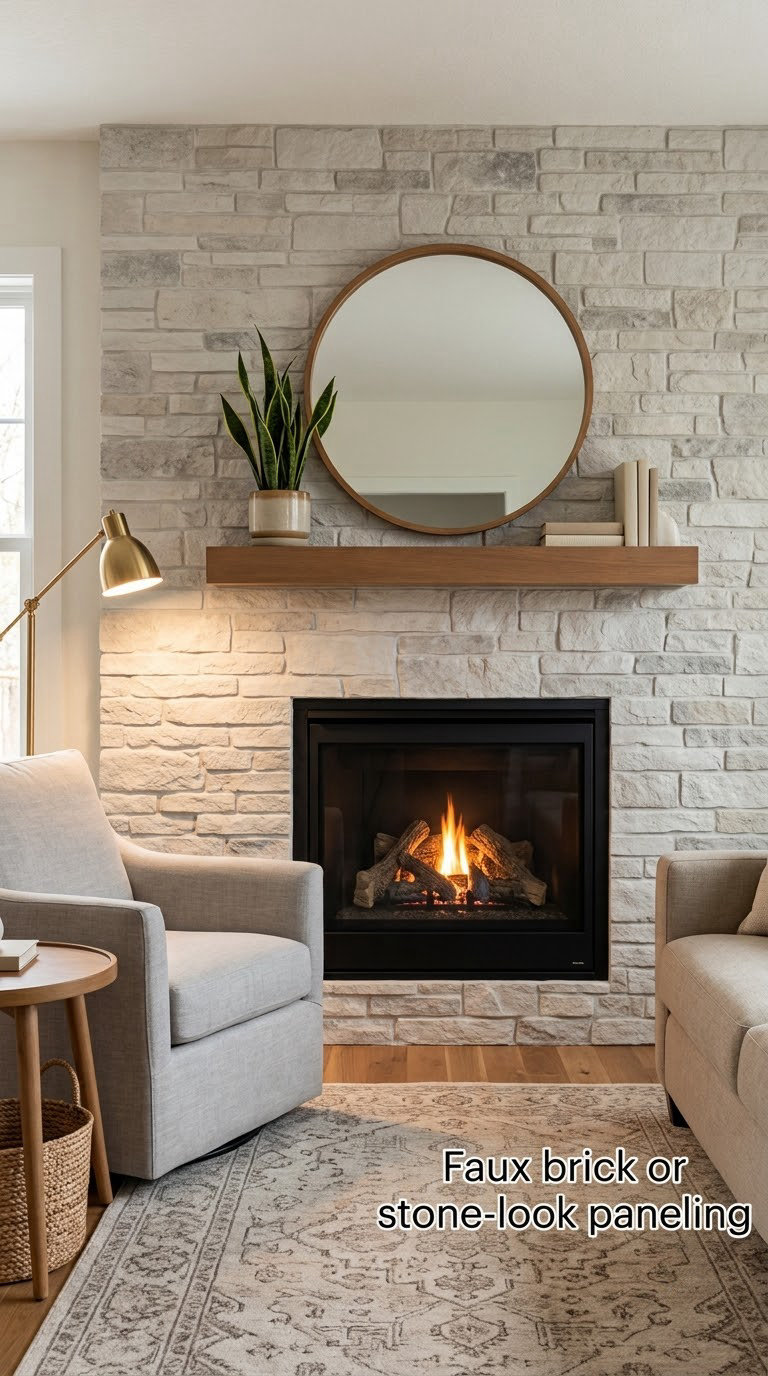
Lightweight faux-stone panels are thin stone or brick veneers that give a real masonry shadow line without the weight of the real thing. On a fireplace surround they add mass and texture where flat plaster always looks thin.
How to do it:
- Level the wall first; stone panels show every dip and are unforgiving of uneven drywall.
- Work from a chalk baseline across the full width so courses stay level across windows and returns.
- Butter each panel with thinset or construction adhesive and back it with temporary battens until it grabs, then remove the battens.
- Cut with a score-and-snap or a diamond blade with water cooling, and wear eye and ear protection.
Cost: USD 350-1100. Difficulty: Moderate DIY. Time: 2-3 days.
Good to know: Never clad a vent, a radiator or a heater outlet. Stone veneer panels must keep a clear air gap and must not sit where heat builds behind them.
15. Metal-look wall panels
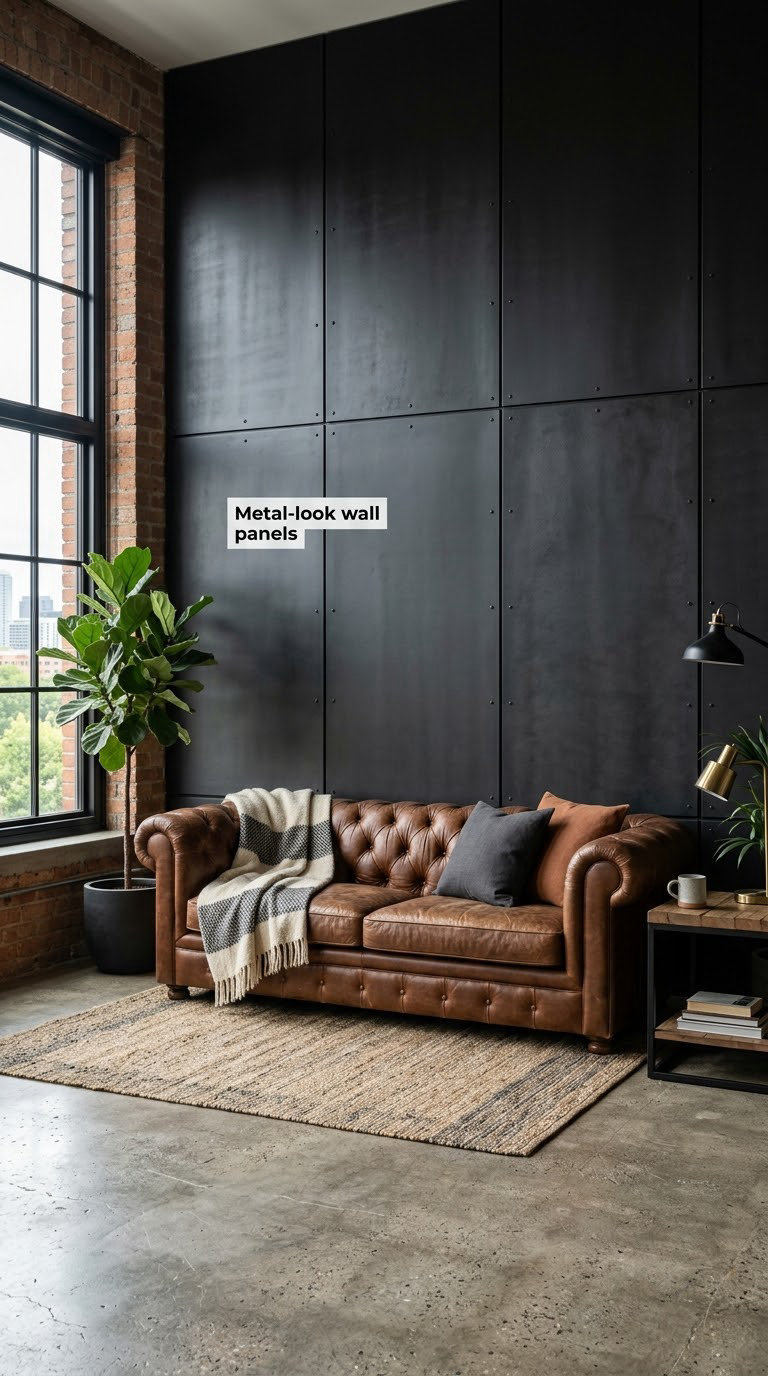
Metal-look panels, usually aluminium or steel sheet with a powder-coated finish, bring a hard reflective edge to a living room and shrug off scuffs completely. They read as architectural rather than decorative, which is why they suit big open rooms.
How to do it:
- Fit panels to a furring frame with visible screw heads or a shadow-gap clip system, and never assume the wall behind is flat.
- Cut with a metal-cutting blade on a chop saw or angle grinder, wearing eye protection and a respirator.
- Deburr every edge with a file and a green pad before panels go up; raw metal edges are the real injury risk here.
- Cap exposed edges and keep panels clear of fireplaces, heaters and any electrical panel access.
Cost: USD 700-2200. Difficulty: Hire a pro. Time: 2-4 days.
Good to know: Metal panels are hard to repair once installed. Replacing one needs a carpenter behind it, so plan the layout so a damaged panel lands at the bottom.
16. Woven cane or rattan panels
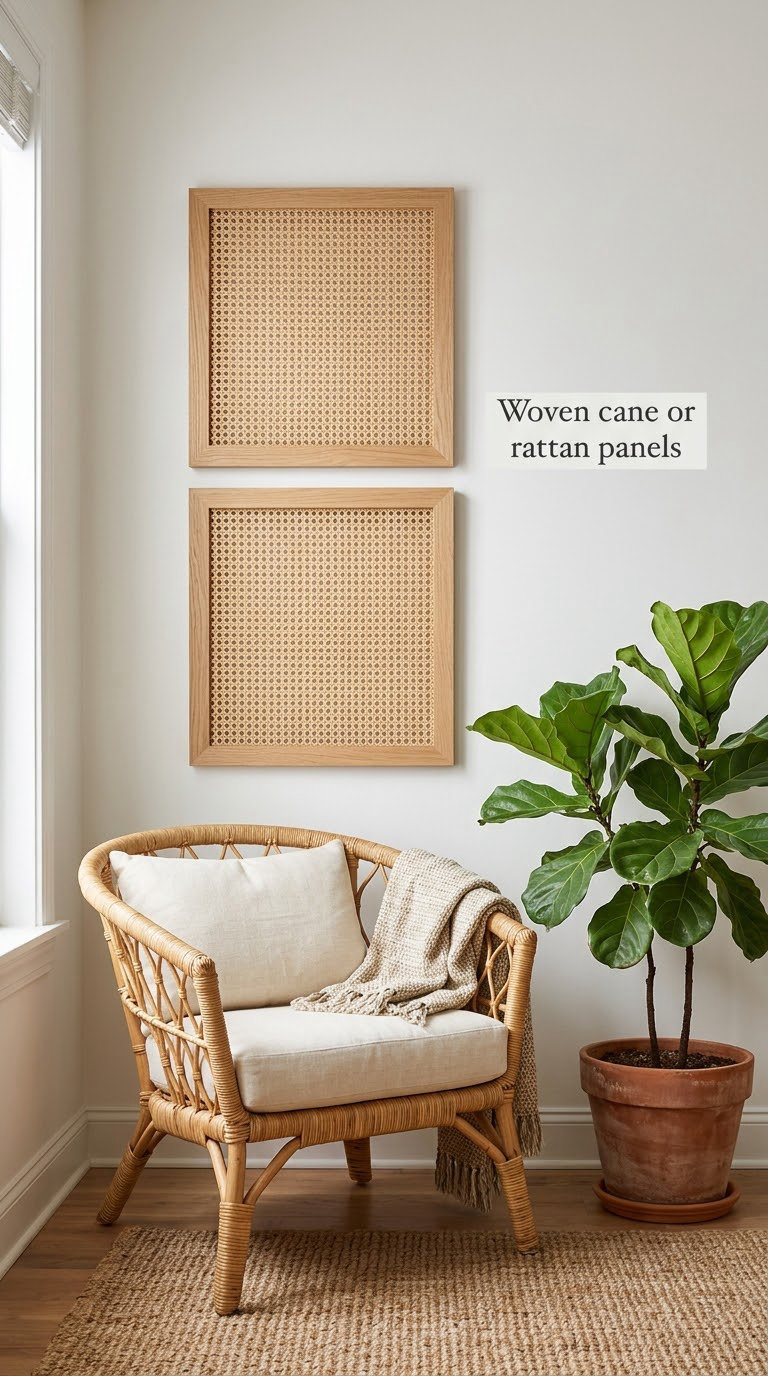
Cane webbing stretched in a slim wood frame adds warmth and pattern without weight, and it suits rooms that feel cold even after new flooring. It is also the fastest paneling idea here to change on your own.
How to do it:
- Choose cane with an open weave if you want the wall colour to show through and a tight weave if you want more opacity.
- Soak the cane for an hour before fitting so it stretches instead of splitting.
- Staple or screw it to the back of the frame and let it settle for a day before hanging.
- Keep frames off damp exterior walls; cane goes slack and brittle with humidity swings.
Cost: USD 180-500. Difficulty: Easy DIY. Time: 5-7 hours.
Good to know: Aim a lamp or picture light across the panel rather than straight at it. Flat lighting kills the weave; raking light is what makes it worth putting up.
17. Two-tone painted paneling
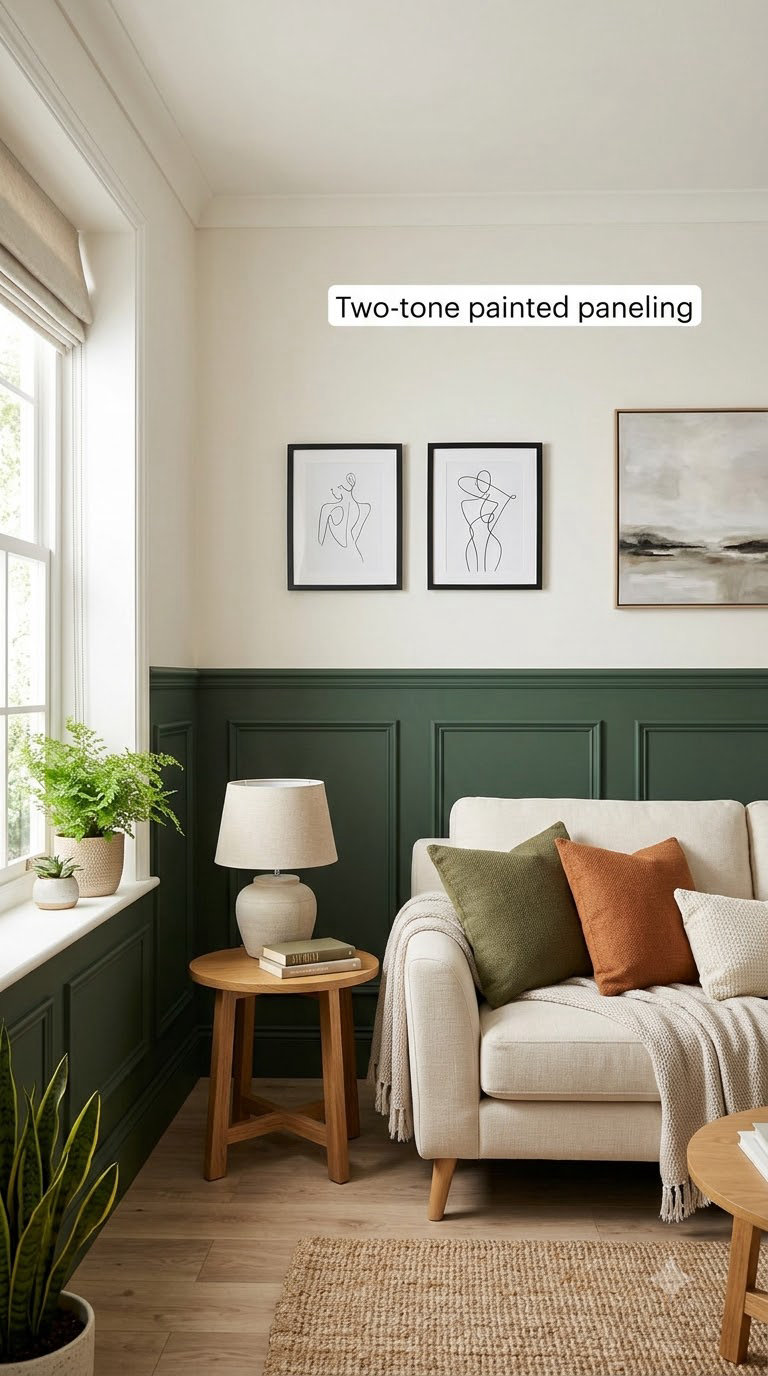
Two-tone painted paneling is the cheapest idea on this list and the one most people can finish in a weekend. Deep colour below a chair rail, pale colour above, and the wall gets proportion and contrast without any premium material.
How to do it:
- Paint the whole wall in the lighter colour first, including the new trim, then cut in the second colour along the rail.
- Tape only the trim edge; tape on the wall leaves a ridge that catches light in raking sun.
- Prime bare MDF or MDF trim and use a paint rated for it, or the joint line will shadow through.
- Use a satin finish on the lower wall, where hands and furniture touch it most.
Cost: USD 80-200. Difficulty: Easy DIY. Time: one day plus drying. If you want the painted detail but not the timber, our monochrome living room paint ideas build on the same trick.
Good to know: This is the safest option for renters and for old plaster. Add thin flat trim that can be pulled off with a heat gun and the room still reads as panelled.
18. Micro-cement or limewash-style panels
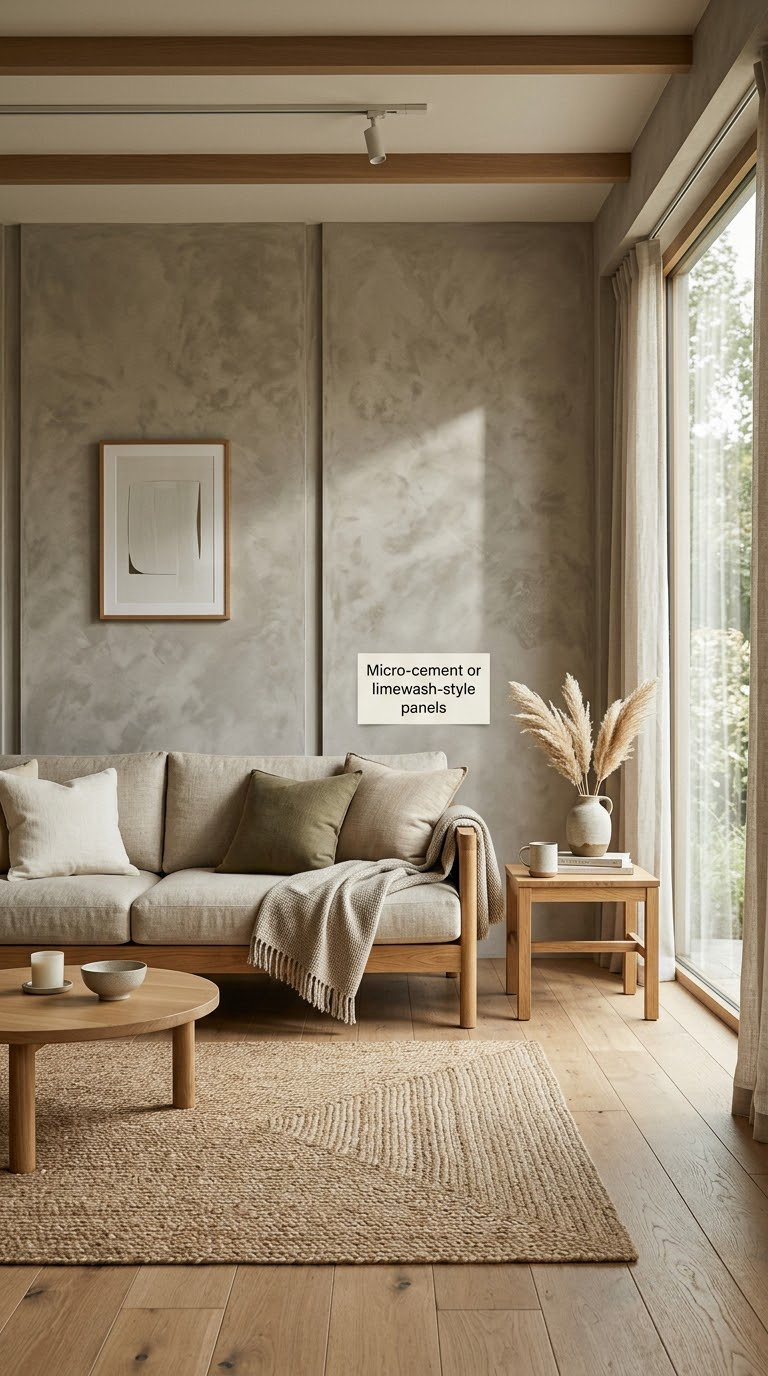
Micro-cement and limewash finishes give a wall a soft, mottled variation with no joint lines at all, which is the opposite of what most paneling ideas do. Two or three thin coats build the mottling from different trowel directions.
How to do it:
- Repair and skim the substrate first; this finish shows every patch and trowel mark you leave behind.
- Prime bare gypsum, and mesh any joint that moves, before the first coat goes on.
- Apply each coat thin and let it cure fully between passes, usually 24 to 48 hours.
- Ventilate the room and wear a respirator; lime and cement products are alkaline until cured.
Cost: USD 600-2000. Difficulty: Hire a pro for a full wall. Time: 4-7 days including curing.
Good to know: As a decorative option, buy pre-cast mineral-look panels and mount them on furring strips. That gets the look without weeks of curing in your living room.
19. Decorative plaster wall panels
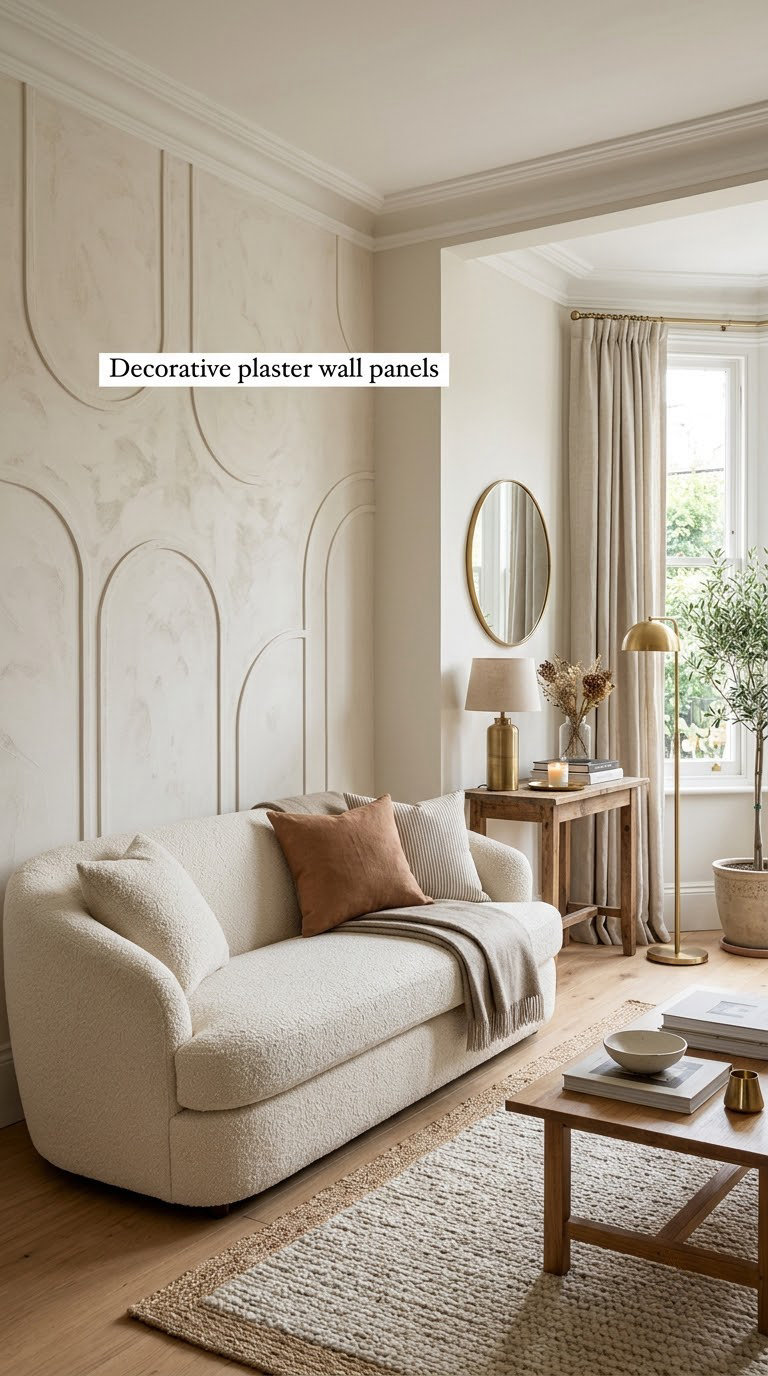
Raised plaster panels carry real relief, the kind that throws shadow from a lamp and looks flat in daylight. They are the closest thing here to traditional carved plaster without the cost of a plasterer working by hand for a week.
How to do it:
- Fix a solid cement-board or plywood backer to furring strips, because plaster needs a rigid, even base.
- Trowel the base coat on 2 to 3 mm thick and keep the surface flat with a straight edge.
- Scratch in the design while the base is still green, using a tile scratcher or a loop tool.
- Allow 24 to 48 hours between coats and keep the room above about 50 F (10 C) while it cures.
Cost: USD 400-1500. Difficulty: Hire a pro. Time: 3-6 days.
Good to know: Cracks come from movement, not from thinness. Mitre the backer at corners instead of butting two flat edges together, which is where relief panels usually fail.
20. Built-in shelving with paneled backing
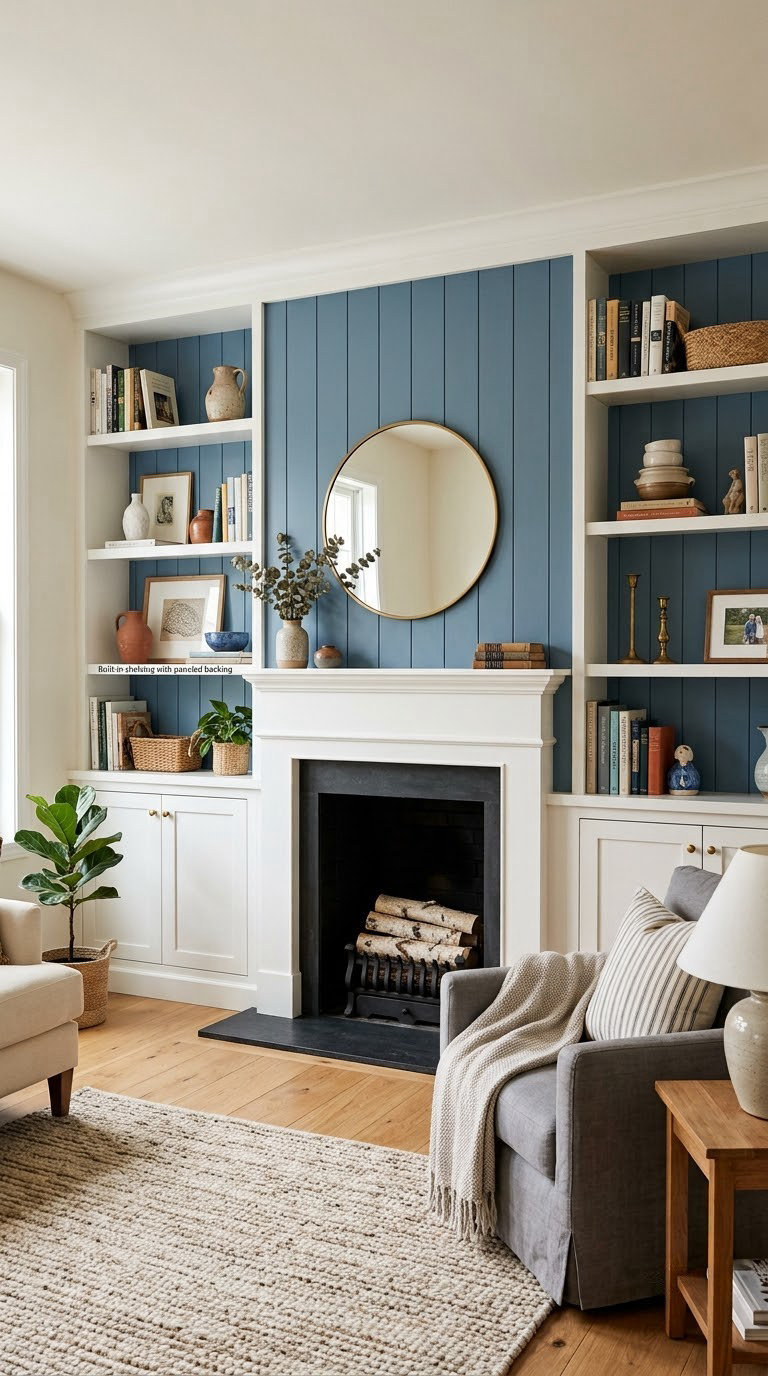
Built-in shelving with paneled backing turns storage into the wall treatment, which makes it the most permanent idea here and the one that adds the most resale value. It also solves the awkward wall with a chimney breast in the middle of it.
How to do it:
- Set the cabinet box 12 to 14 inches (30-36 cm) deep and 9 to 10 inches (23-25 cm) high for books and everyday objects.
- Level and plumb every box with a shim pack, because a 12-foot (3.7 m) run magnifies any error.
- Anchor the tall boxes into studs and into the floor, not into the drywall alone.
- Leave a removable panel below for electrical and media access rather than running cables permanently.
Cost: USD 900-3500. Difficulty: Hire a pro. Time: 1-2 weeks.
Good to know: Once the boxes are in, styling the shelves matters as much as the carpentry. Our guide to decorating built-in shelves covers spacing and scale once the work is done.
Planning Tips
- Pick one focal wall. Paneling two opposing walls in the same room usually fights itself. One accent wall behind the sofa or the TV reads as a decision; four walls read as a mistake.
- Check the wall before you buy. Press along it and look for deflection. Find the studs with a detector, confirm they are 16 inches (41 cm) apart rather than 24, and repair any damp or crumbling drywall first.
- Order two samples, not twenty ideas. Look at both in morning and evening light against your floor and sofa. Boards look completely different flat on a table.
- Plan for a 10 to 15 percent surplus. That covers the board cut wrong, the corner that is not square, and the repair compound you will need anyway. Patterns like herringbone need closer to 20 percent.
- Finish the room before the wall. Patch and paint the ceiling, lay the flooring and move the furniture out first. A wall treatment with wet paint and a drop cloth on new floor is how people scuff their own new boards.
- Light the paneling from the side. A picture light or a sconce mounted 12 to 18 inches (30-45 cm) off the wall is what makes shadow lines visible. Downlights wash the wall flat and hide everything you paid for.
Frequently Asked Questions
Which wall paneling style is best for a living room?
Vertical wood slats and board-and-batten suit most living rooms because the vertical lines make low ceilings look taller and they hide uneven drywall. Fluted paneling reads the most refined but costs the most. For a small room or a rental, two-tone paint or glued beadboard gives the same architectural feel for a fraction of the material cost.
Are wood slat wall panels worth it?
They are worth it when you use them as an accent wall behind a sofa or a TV, and you run the slats floor to ceiling so the shadow gaps stay consistent. They are not worth full-room paneling in a small space, where the extra lines make the walls look busy. Most of the value comes from the depth and texture, not from the wood species.
How much does it cost to install wood slat wall panels?
A DIY pine or plywood slat wall of roughly 6 by 8 feet runs about 150 to 400 USD in materials, and a 10 by 10 foot wall about 300 USD all-in. Solid hardwood, fluted profiles or patterned layouts push material cost up fast. Professional installation typically adds several hundred dollars per wall depending on your region and how many outlets need relocating.
What wall paneling can a renter install without drilling?
Peel-and-stick panels, thin glued beadboard sheets, fabric panels and flat picture-frame molding held with removable adhesive strips all work without drilling. Skip anything that needs stud anchors or that changes the wall surface permanently. Take photos of the wall condition before you start so you can show the landlord the wall is unchanged when you move out.
Can you paint over existing wood paneling?
Yes, and many people do it on old beadboard or thin MDF that is lifting at the seams. Sand the sheen back, repair any lifted joints or replace the panel, then use a stain-blocking primer so the tannins and old finishes do not bleed through. Painting over paneling that is still flexing or moving will crack within a year.
What is the best wall paneling for a small living room?
Keep it light in colour and simple in profile. Two-tone paint with a chair rail, glued beadboard, or one panel treatment behind the sofa uses the least visual noise and the least material. Avoid fluted, herringbone and checkerboard layouts in small rooms, since their repeating lines close in on each other and make the walls feel closer.
Start with one wall, not the room. Look at two samples against your floor in the evening, pick the profile that suits your ceiling height, and start at the least complicated end of this list if it is your first time cutting timber. You can always add a second wall next year once you know what you actually like living with.