
20 Outdoor Privacy Ideas for a Patio That Work (October 2026)
Most patios get overlooked for one simple reason: nothing stands between your lounge chair and the neighbor’s kitchen window. Twenty outdoor privacy ideas for a patio solve that without a full fence build, and most take a single weekend.
The trick is to interrupt the sightline, not to seal the patio off. A solid 8-foot barrier works, so does a 5-foot slatted panel with a row of tall planters behind it. Pick what matches your budget, your rental situation, and how much light you still want at 7pm. Here are twenty, grouped by what they are made of and how much they cost to put up.
Contents
Updated for 2026. Cost ranges are typical US figures and shift with region and season; a fence post in a high-cost zip code costs more than the same post halfway across the country.
20 Outdoor Privacy Ideas for a Patio at a Glance
| Idea | Cost | Difficulty | Time |
|---|---|---|---|
| 1. Freestanding wooden privacy screen | Moderate | Moderate DIY | One weekend |
| 2. Outdoor roller blinds | Low | Easy DIY | 2 to 3 hours |
| 3. Pergola with curtains | Moderate | Moderate DIY or hire a pro | One weekend |
| 4. Living privacy wall with trellises | Low | Moderate DIY | One weekend plus a growing season |
| 5. Layered outdoor curtain | Moderate | Easy to moderate DIY | 4 to 6 hours |
| 6. Tall potted privacy screens | Moderate | Easy DIY | A few hours |
| 7. Bamboo fence panel | Low | Easy DIY | Half a day |
| 8. Concrete or metal privacy panel | High | Hire a pro | 2 to 3 days |
| 9. Outdoor Roman shade | Low to moderate | Moderate DIY | 2 to 4 hours |
| 10. Lattice panels | Low to moderate | Moderate DIY | One weekend |
| 11. Narrow faux-living wall | Moderate | Moderate DIY | One weekend |
| 12. Curtain panels on shepherd’s hooks | Low | Easy DIY | 2 hours |
| 13. Raised patio with a privacy base | High | Hire a pro | 1 to 2 weeks |
| 14. Layered planter border | Low to moderate | Easy to moderate DIY | One weekend |
| 15. Slatted metal fence | High | Hire a pro | 1 to 2 weeks |
| 16. Hanging outdoor panels | Low to moderate | Moderate DIY | One weekend |
| 17. Reeded glass windbreak | High | Hire a pro | 1 to 2 weeks |
| 18. Hedge-style planter divider | Low | Easy DIY | An afternoon |
| 19. Outdoor acoustic panels | Moderate to high | Moderate DIY or hire a pro | One weekend |
| 20. Covered outdoor room | Highest | Hire a pro | 3 to 8 weeks |
1. Add a Freestanding Wooden Privacy Screen
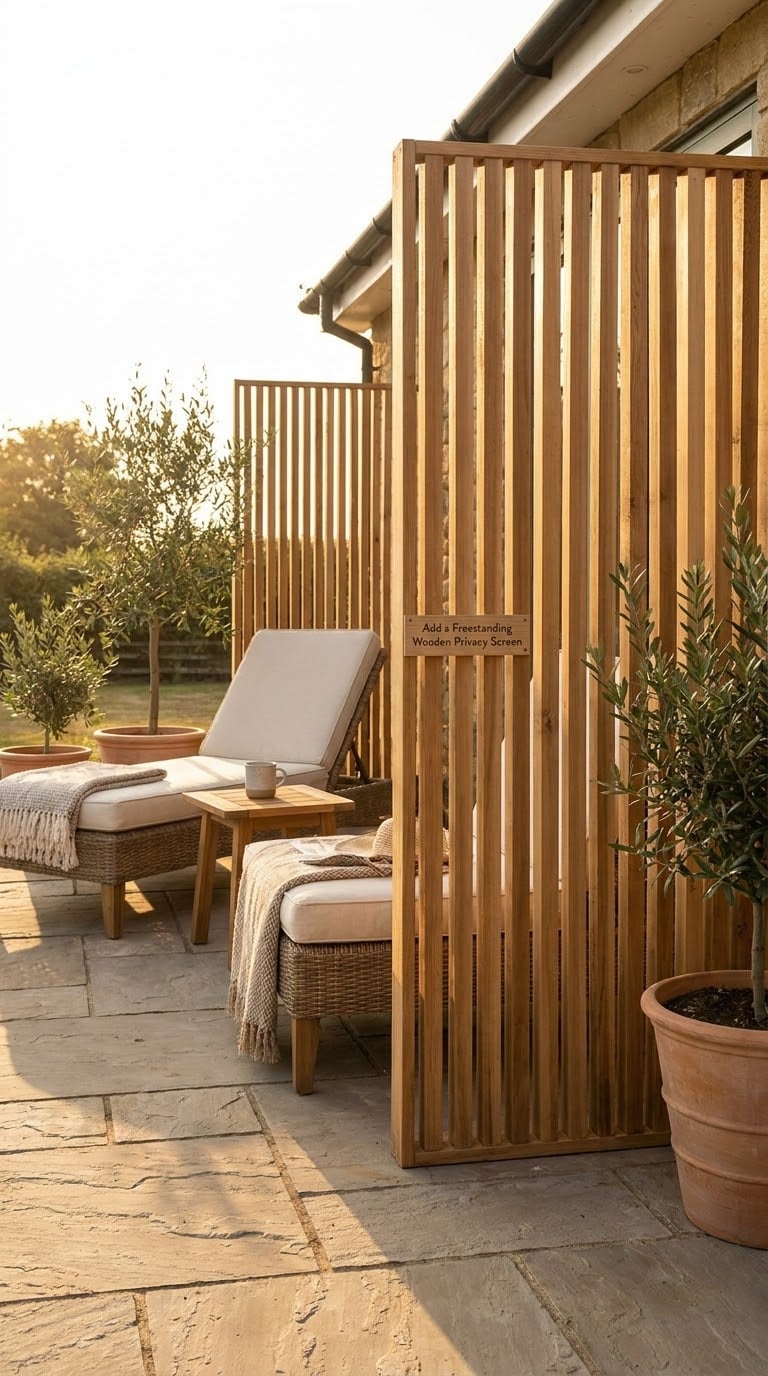
A freestanding wooden screen is the workhorse of this whole list, and it blocks a view without touching your property line. Slatted cedar warms up a patio that plain fencing would make feel boxed in.
How to do it: Measure the run you need to block and add 6 inches of overlap at each end. Build each panel from a 1×2 frame with vertical slats, leaving a 1/4 inch gap between boards so air still moves. Set the panels on 4×4 base blocks or purpose-built feet, then stain or seal with an exterior product. Anchor every third panel with a ground stake for wind.
Cost: Moderate. Difficulty: Moderate DIY. Time: One weekend for 6 to 8 linear feet.
Good to know: Renters can put the same slatted panel into a weighted planter on each leg, no ground contact needed. Before you build, check how high a screen is allowed to sit on your lot, since local rules and HOA covenants often cap screen height lower than fence height.
2. Install Outdoor Roller Blinds
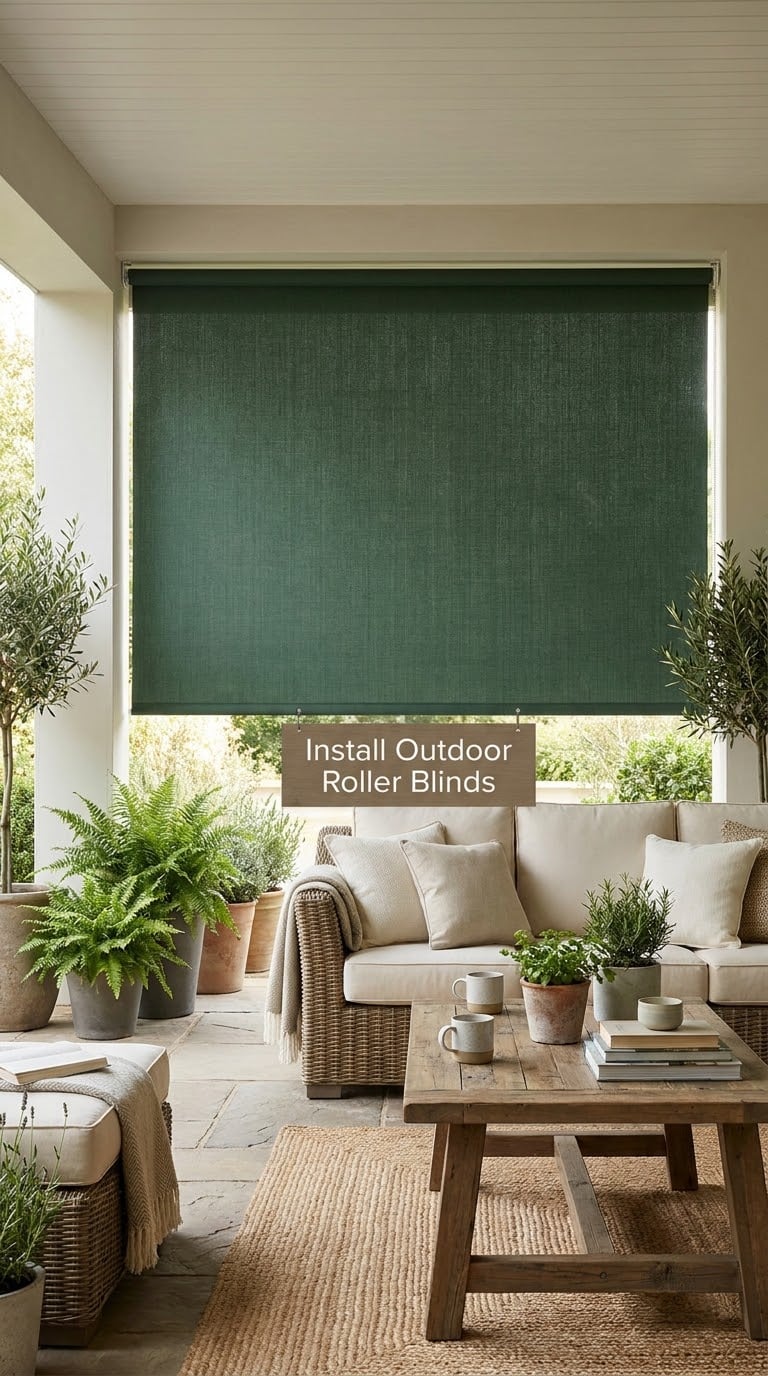
Outdoor roller blinds are the least permanent answer here. You get adjustable screening, so you can close them at dinner and open them for morning coffee.
How to do it: Measure the opening width and add 1 to 2 inches of overlap on each side. Choose a fabric rated for outdoor use and UV resistance, not a standard indoor shade. Mount the cassette to the header above the opening or tension-fit it inside the frame. Let the bottom bar rest on a sill or weighted bar so the fabric pulls flat, and check the tensioner holds it tight.
Cost: Low. Difficulty: Easy DIY. Time: 2 to 3 hours.
Good to know: Fabric is a sail in wind, so roll it up before a storm. Renter versions tension-mount inside an existing frame with no screws at all.
3. Use a Pergola with Curtains
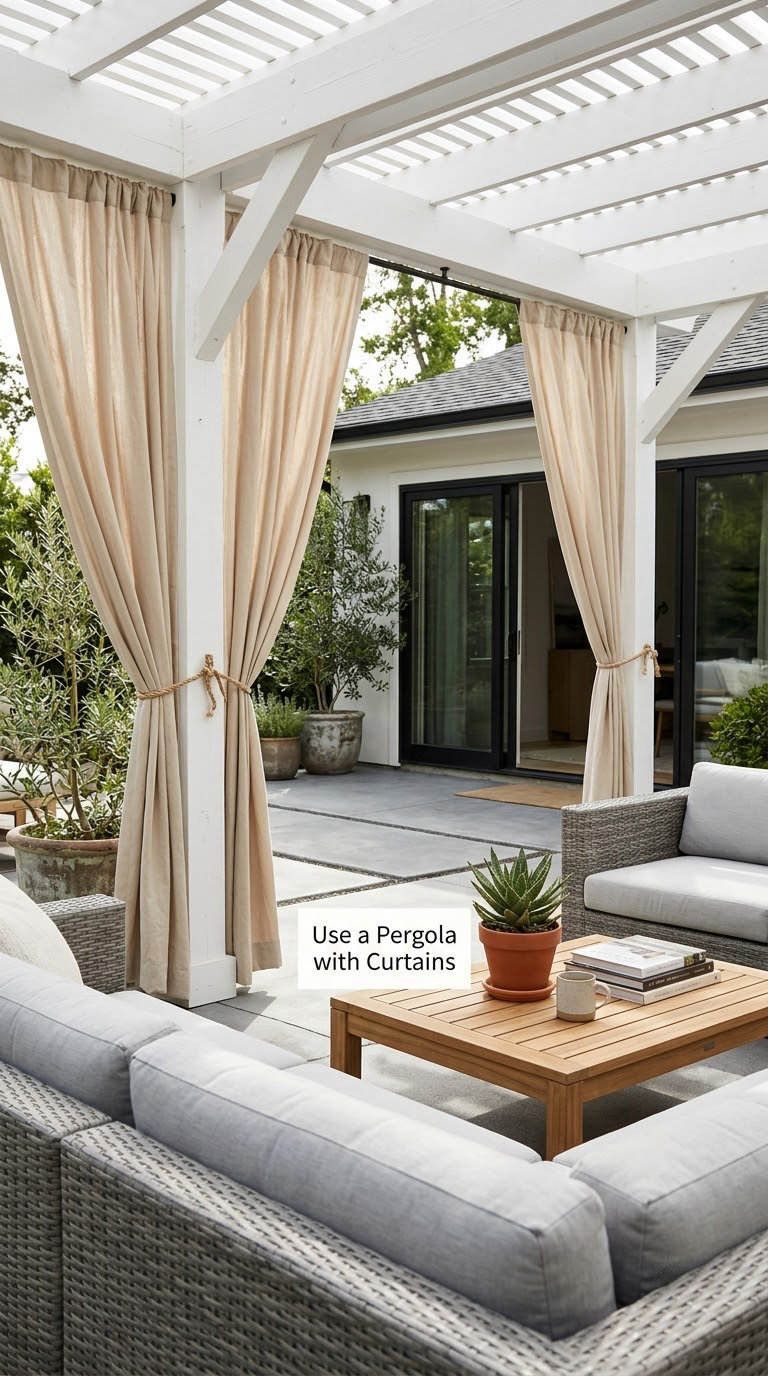
A pergola changes the whole room. Add outdoor curtains to it and the patio starts to feel like a sheltered nook rather than an open square of concrete.
How to do it: Frame the pergola with 2×2 posts on three sides, leaving one side open. Run a curtain track or install outdoor-rated hooks along the beams, spaced 12 to 18 inches apart. Buy panels at 1.5 times the beam length so they overlap generously when closed. Leave a 6 inch gap at the bottom for airflow and pool out the fabric when you need to open the view.
Cost: Moderate. Difficulty: Moderate DIY, or hire a pro for the frame. Time: One weekend.
Good to know: A pergola with open slats blocks sun you can feel but not much overhead sight. If the view comes from an upstairs window, add a solid shade cloth or canopy on top. A ceiling fan makes the space work far better once it is screened, so plan the outlet before the curtains go up.
4. Build a Living Privacy Wall with Trellises
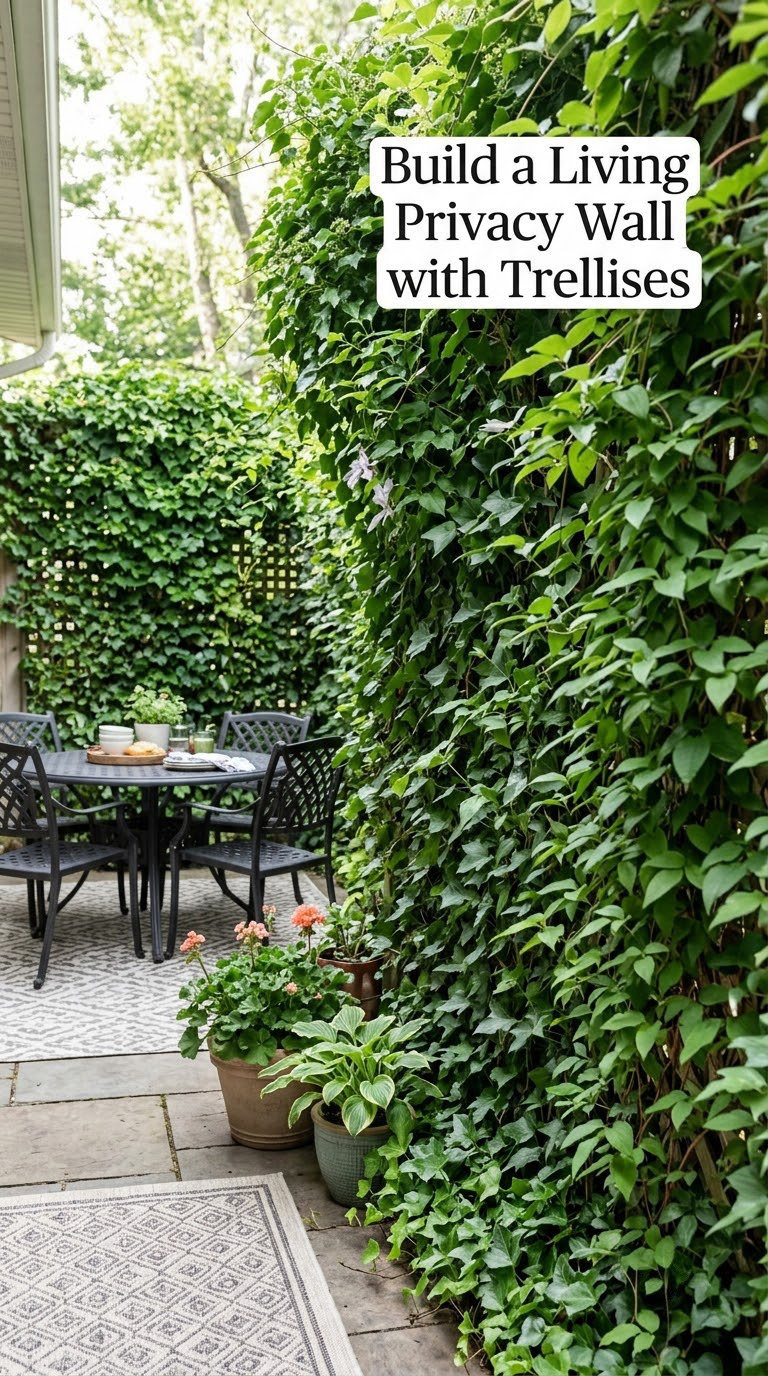
Give a climbing vine three growing seasons and it becomes a privacy wall that improves every year. Wisteria, clematis, and trumpet vine are the reliable heavy performers here.
How to do it: Mount cedar or treated trellis panels on furring strips so air can circulate 2 to 3 inches behind them. Space panels 12 to 18 inches apart to break up the view rather than form one flat wall. Run a drip line along the base instead of overhead sprinklers, which miss the root zone. Prune twice a year to keep the vine on the trellis and off the fence boards.
Cost: Low. Difficulty: Moderate DIY. Time: One weekend to install, then a season of growth.
Good to know: Wisteria is heavy enough to pull down a weak fence, so give it a trellis bolted to posts rather than a lattice nailed to pickets. If you are growing a lot under cover, ventilation matters as much as it does in a greenhouse interior.
5. Add a Layered Outdoor Curtain
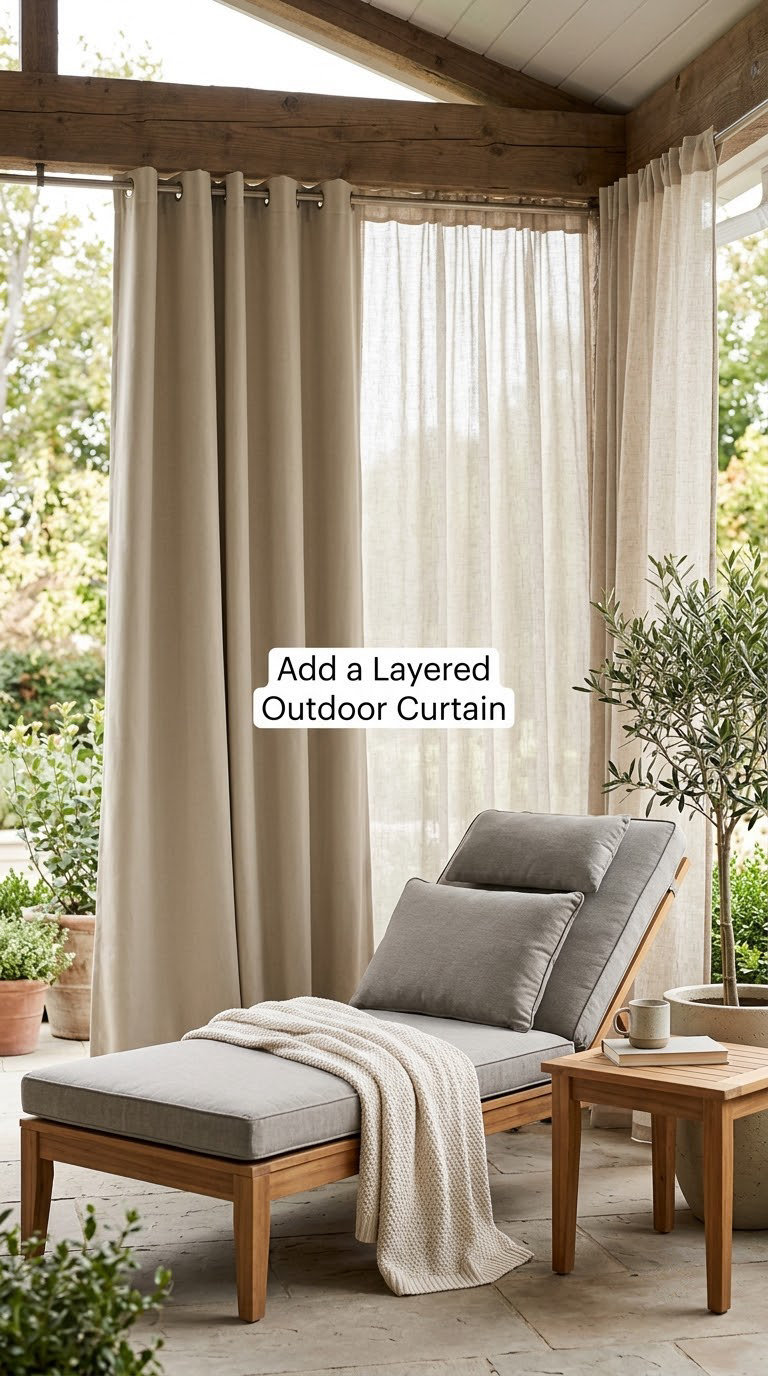
Two layers solve the problem one layer creates. A sheer inner panel softens the view and keeps light moving; a solid outer panel gives you the screening on demand.
How to do it: Ceiling-mount a track on the patio beam or the house fascia, using spacers so the fabric clears the wall by 3 to 4 inches. Hang sheer panels across the full opening and solid panels only where you actually need coverage. Overlap solid panels by 6 to 8 inches at the centre so there is no see-through seam. Add tiebacks so you can bunch the panels back against the post.
Cost: Moderate. Difficulty: Easy to moderate DIY. Time: 4 to 6 hours plus drying time for the fabric after a wash.
Good to know: Always leave the fabric able to billow, otherwise it tears at the grommets first. If you rent, a tension rod wedged between two posts gives you the same look with no holes at all.
6. Plant Tall Potted Privacy Screens
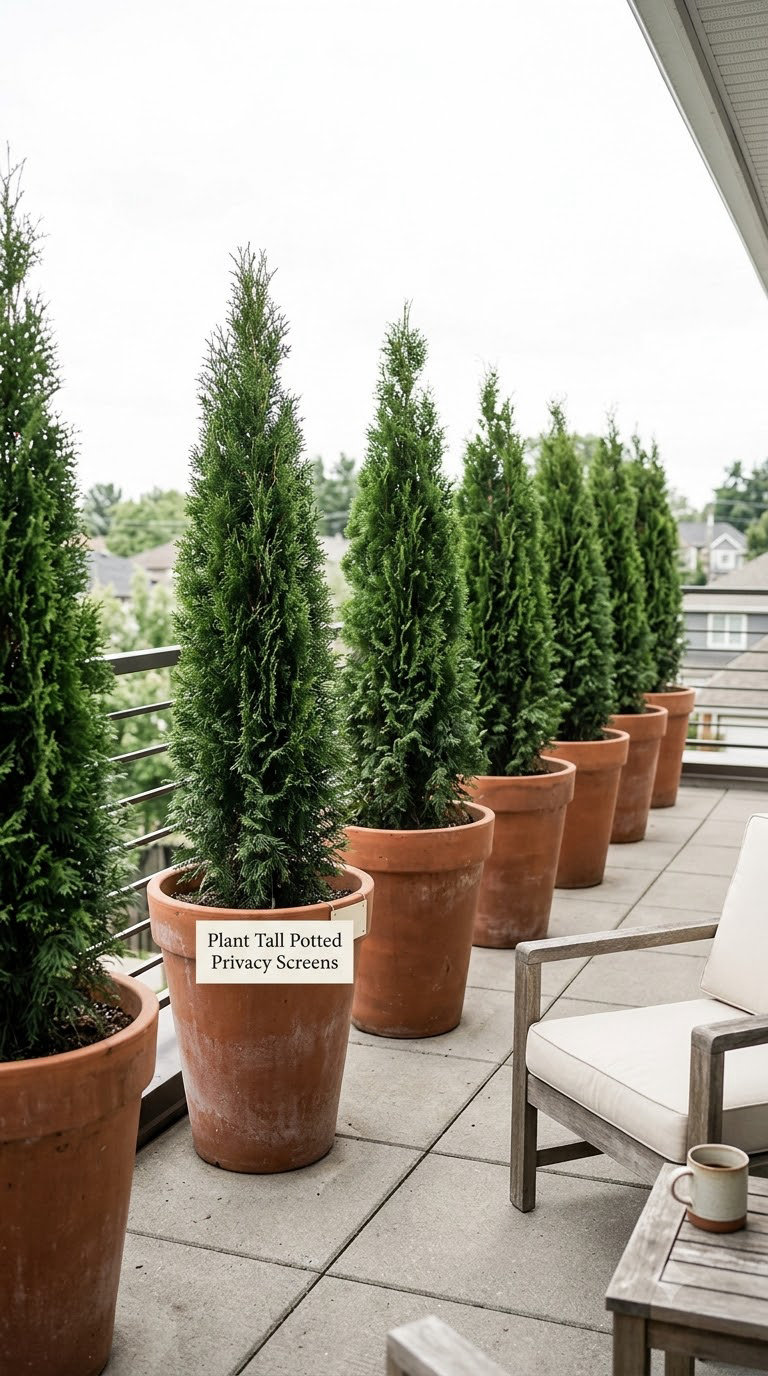
Big planters with upright evergreens give you screening you can move. That portability is the whole appeal if you rent, or if the offending view is only on one side of the patio.
How to do it: Choose planters 24 to 30 inches wide so the root ball has room, and match the pot to the mature height of the shrub. Columnar arborvitae, Italian cypress, and upright hornbeam all hold a narrow column. Fill the bottom 2 inches with gravel, set the shrub at the same depth it came out of the nursery pot, and water deeply to settle the soil. Place pots 24 to 30 inches apart so foliage overlaps.
Cost: Moderate. Difficulty: Easy DIY. Time: A few hours to pot up, then weekly watering in summer.
Good to know: Tall lightweight planters tip over in a gust, so buy pots rated for wind or weight the base with a paver. Pick the plant to your sun: Italian cypress bakes in dry heat, arborvitae handles cold winters, hornbeam tolerates partial shade.
7. Create a Bamboo Fence Panel
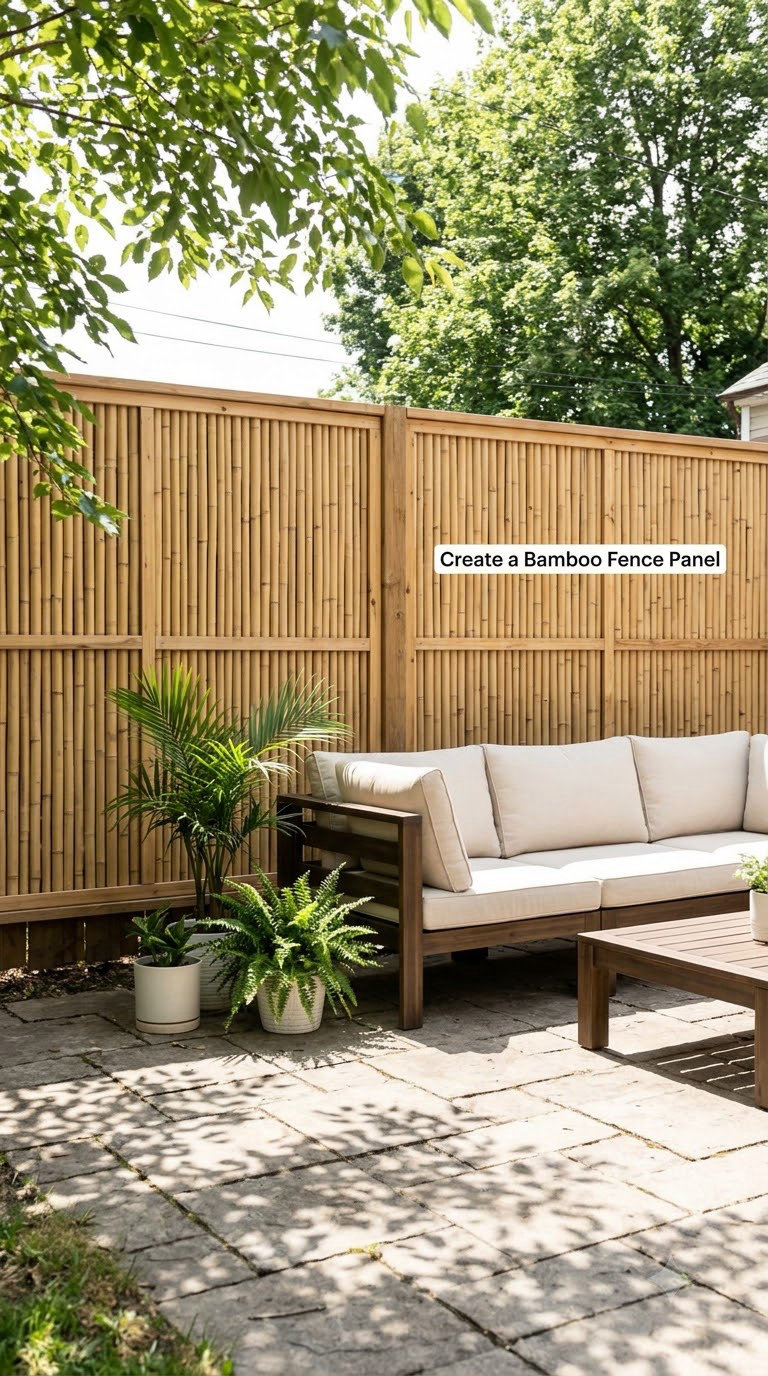
Rolled bamboo is the fastest-looking fix in this list and one of the cheapest. A framed panel reads as a considered design choice rather than a fence.
How to do it: Build a frame from 2x4s sized to your space, then staple bamboo or reed roll fencing to the back with an overlap of 2 inches between sheets. Set the panel 2 inches above the ground so rain does not rot the bottom edge. Seal both faces with an exterior water stain, and hang the finished panel between existing posts or on a small post-and-rail base.
Cost: Low. Difficulty: Easy DIY. Time: Half a day including drying.
Good to know: Bamboo greys within a year unless you re-seal it, and a full solid panel catches a lot of wind, so brace it well. It is one of the few ideas that works just as well on a rental balcony.
8. Use a Concrete or Metal Privacy Panel
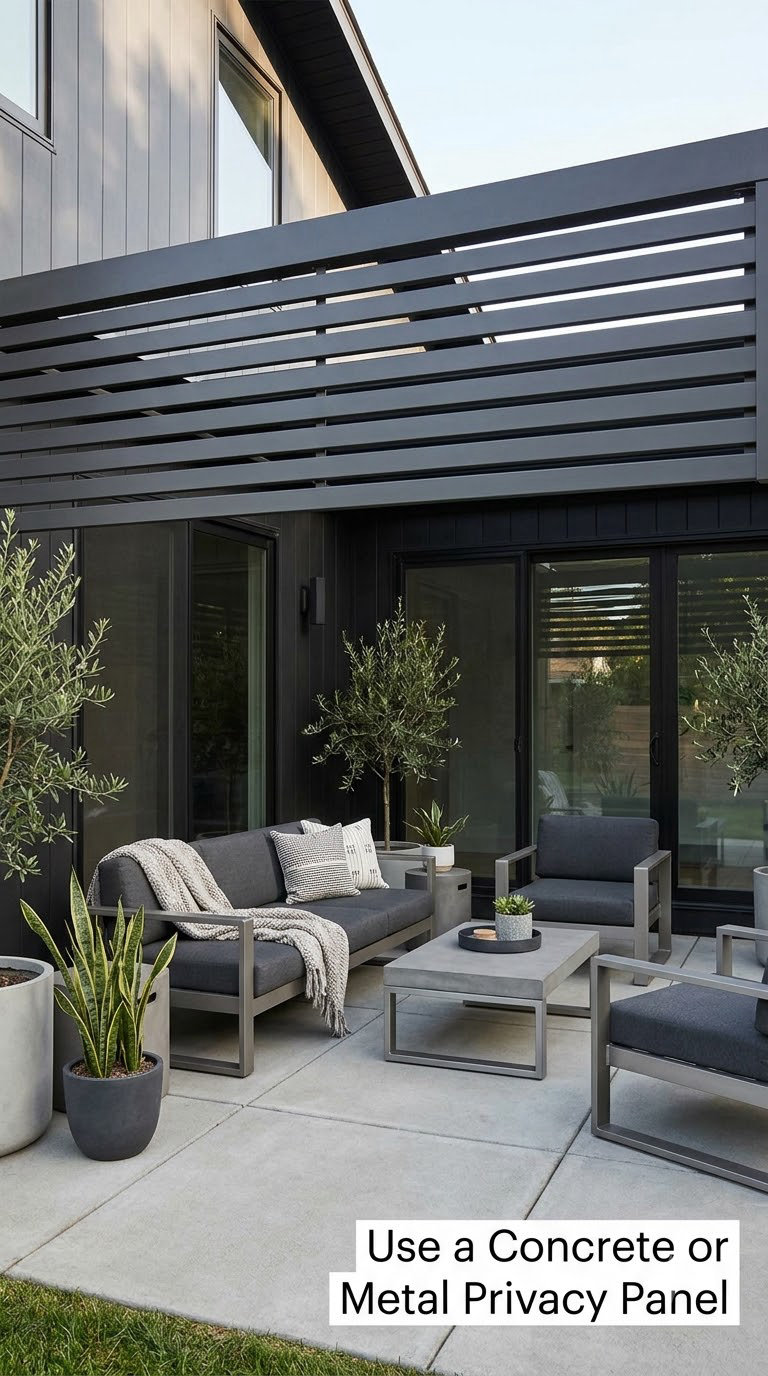
Metal and precast concrete panels suit a modern patio where a wood screen would feel heavy. They are thin, permanent, and they take a beating.
How to do it: Order panels sized to your opening, usually 4 to 6 feet wide. Set posts in concrete footings below your local frost line, spaced so panels overlap by 1 inch at the joint. Use stainless or galvanised hardware to prevent rust streaks. Leave a 1/2 inch drainage gap at the base so rain and wind can pass under, and confirm the panel is rated for your wind exposure before you build.
Cost: High. Difficulty: Hire a pro. Time: 2 to 3 days plus a week of footing cure.
Good to know: A bare metal screen can read industrial against a soft garden. Soften it by planting a row of grasses along the base, which also hides the footing.
9. Add an Outdoor Roman Shade
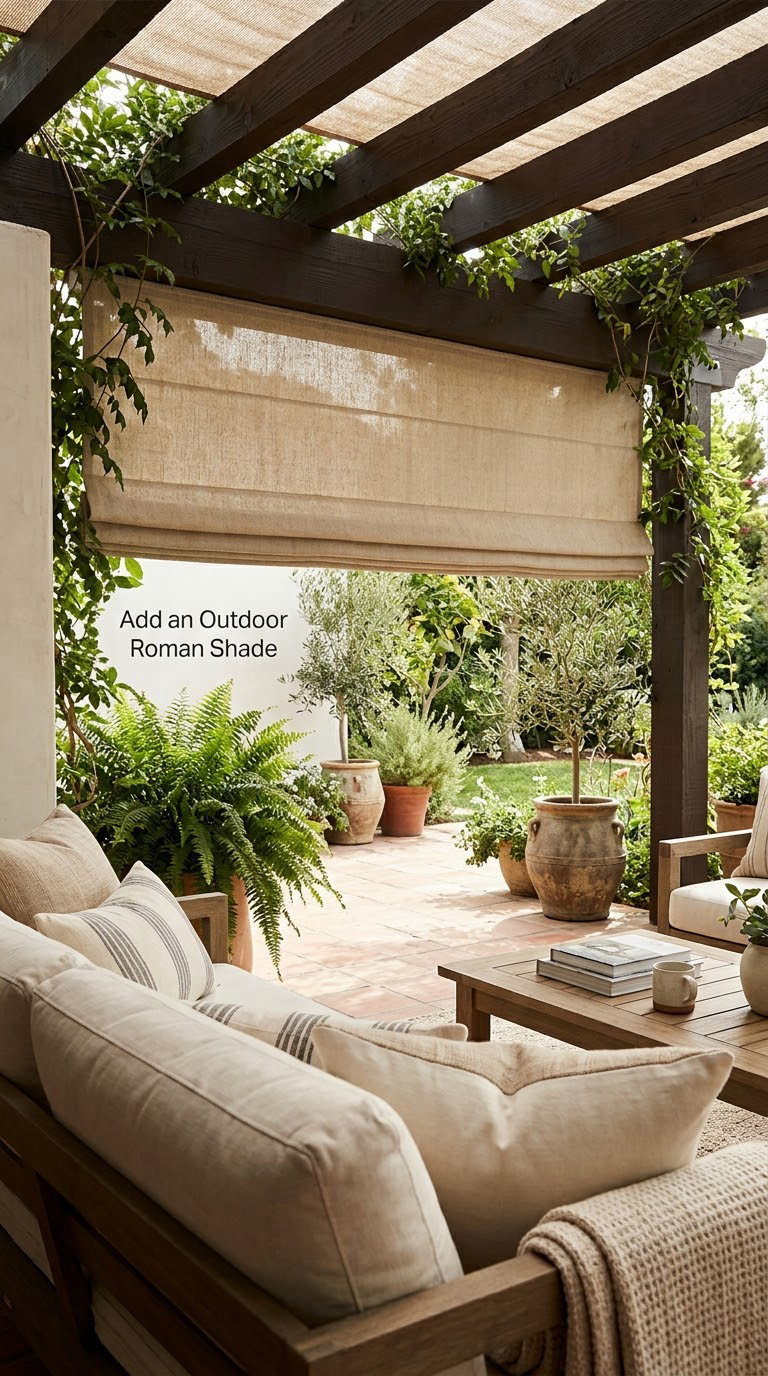
A Roman shade lowers in sections, so it filters light instead of making a patio cave. That is the version that works on a west-facing terrace.
How to do it: Measure the opening and order the shade at least 6 inches wider on each side for overlap. Set the head to the top of the opening and the drop so the hem stops 6 to 8 inches above head height at your tallest seated position. Mount to a pergola beam, a house header, or a soffit, and reinforce the hem. Choose a motorised head rail if you have a high opening you cannot reach.
Cost: Low to moderate. Difficulty: Moderate DIY, hire a pro for motor wiring. Time: 2 to 4 hours.
Good to know: Take the shade in before a storm; the wind catches the bottom rail first. Keep the pull cords or chain out of walkways, and never let the cable hang where kids play.
10. Screen the Patio with Lattice Panels
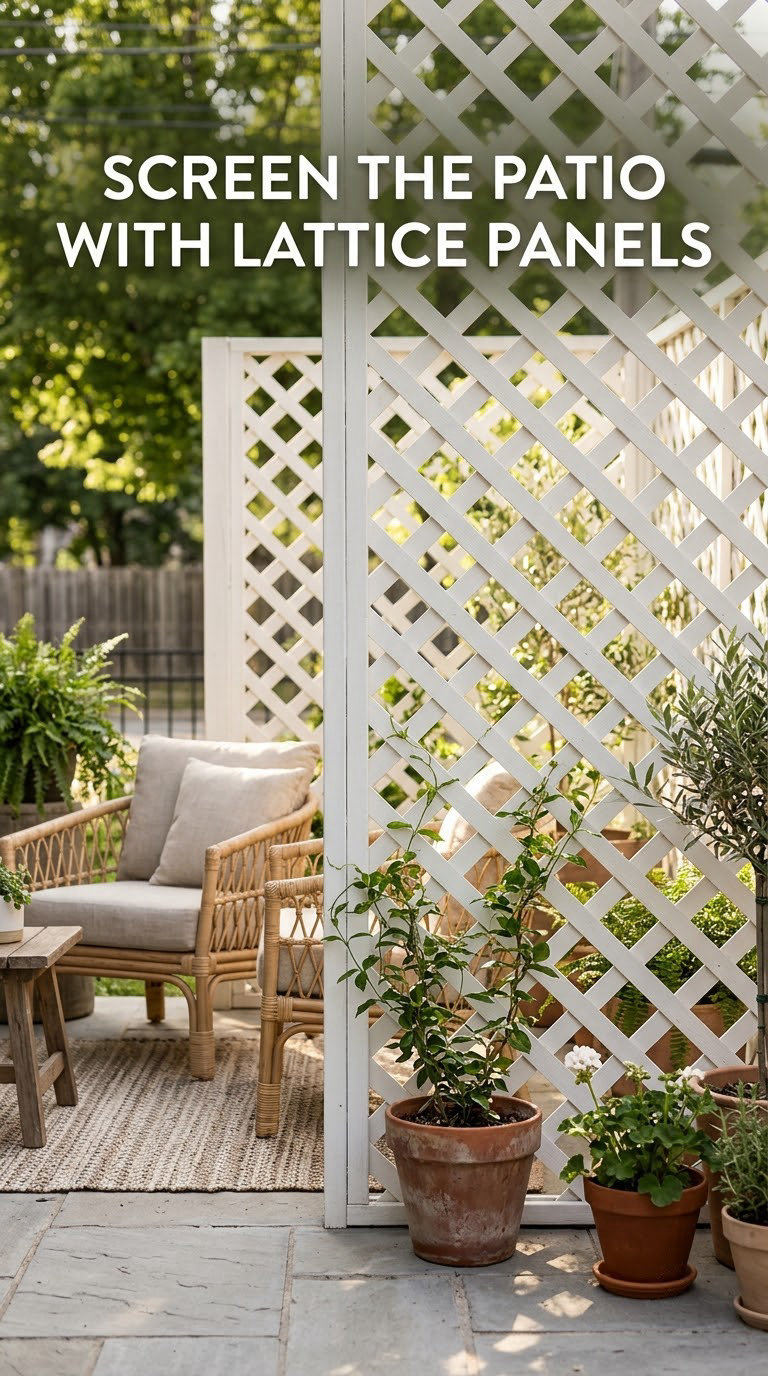
Lattice blocks about half the view and all of the direct line of sight from someone standing on the other side. It is the compromise option, and it is a good one on an open patio.
How to do it: Frame each panel from 1x2s and fit 3/4 inch cedar lattice inside it. Overlap adjacent panels by 2 inches, and fix them with exterior-rated screws rather than the brads that come in the box. Hold the panels 2 to 3 inches off the fence or house for airflow and to let the back dry out. Paint or stain before assembly, not after, so you can cover the fasteners.
Cost: Low to moderate. Difficulty: Moderate DIY. Time: One weekend.
Good to know: A climbing vine on lattice turns it into a proper living screen within two seasons. If someone sitting low can see through, add a solid panel along the bottom 24 inches.
11. Place a Narrow Faux-Living Wall
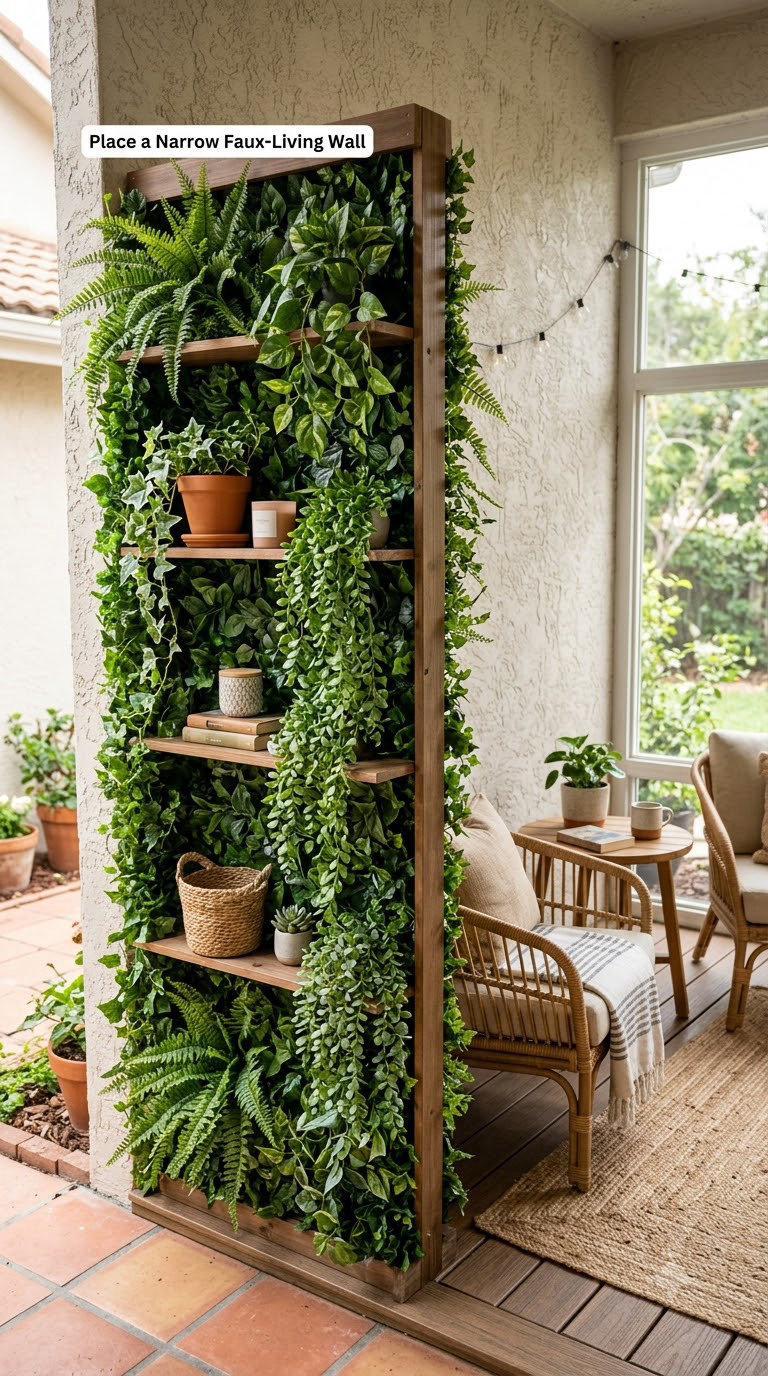
A slim partition does the job of a wall without turning a patio into a corridor. Twelve to eighteen inches of depth is all it takes to divide a shared outdoor space.
How to do it: Build a base frame the length you need, 12 to 18 inches deep, and stiffen it so it will not rack in wind. Fit shelves and finish everything with an exterior paint or stain rated for outdoor use. Keep the top clear of heavy planters that could tip in a gust, and anchor the unit to the deck or a base plate if the patio is exposed. Stop the panel a few inches short of the house so rain can drain behind it.
Cost: Moderate. Difficulty: Moderate DIY. Time: One weekend.
Good to know: Renters can build the same shape as two planters with a slatted board between them, which lifts clean when the lease ends.
12. Hang Curtain Panels from Shepherd’s Hooks
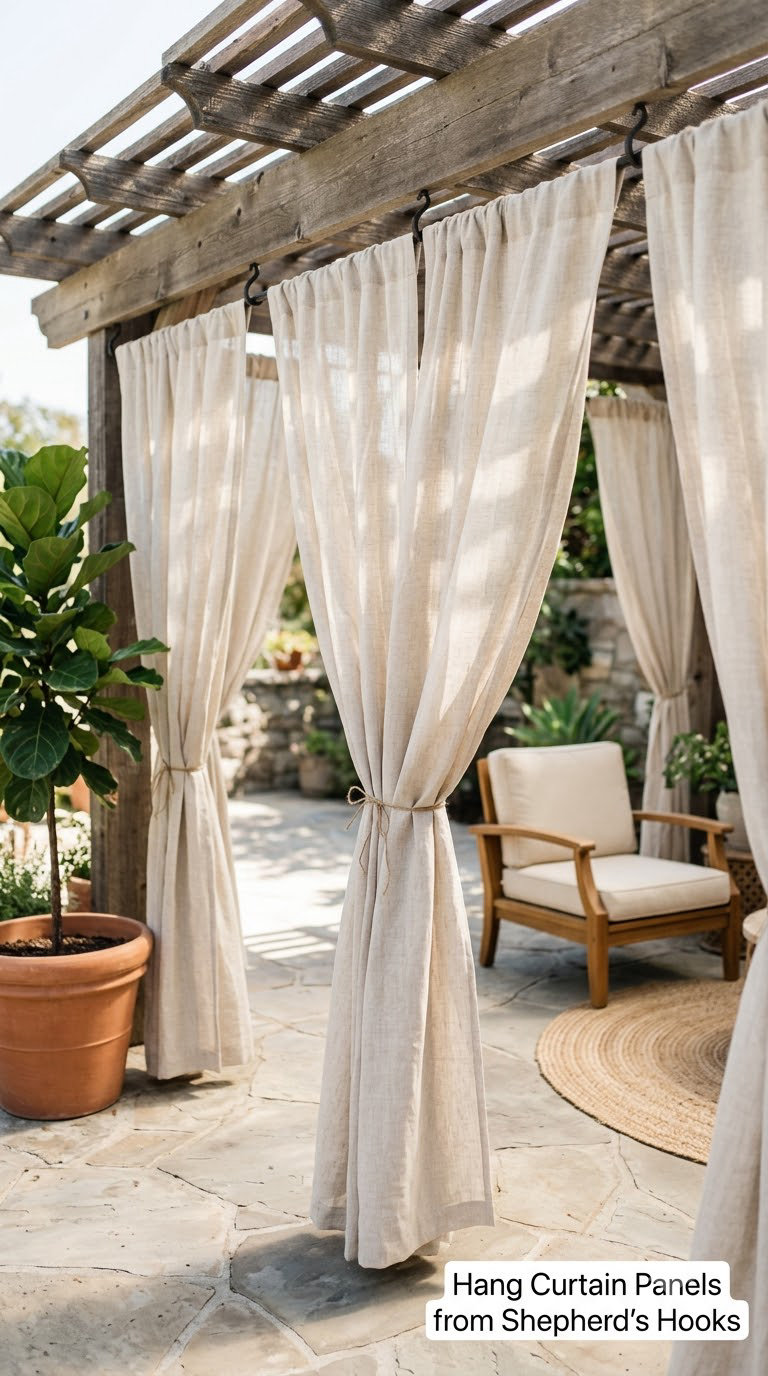
Curtain panels hung from simple hooks under a pergola beam are the renter’s version of a full curtain wall. No track, no screws, no rebuild.
How to do it: Decide the drop first, and end the panels 6 inches above the deck so they do not sit in water. Reinforce the top hem with grommets or a hook-and-loop strip if you can, because the fabric takes all the load. Space the hooks 12 to 18 inches apart along the beam and hang the panels with a 3 inch gap between each one for airflow. Use tiebacks at the centre panel so you can pull it back and open the view.
Cost: Low. Difficulty: Easy DIY. Time: 2 hours.
Good to know: Avoid one solid panel across the full span, which acts like a sail. Several narrower panels with gaps between them are far kinder to a pergola in a gust.
13. Raise the Patio with a Privacy Base
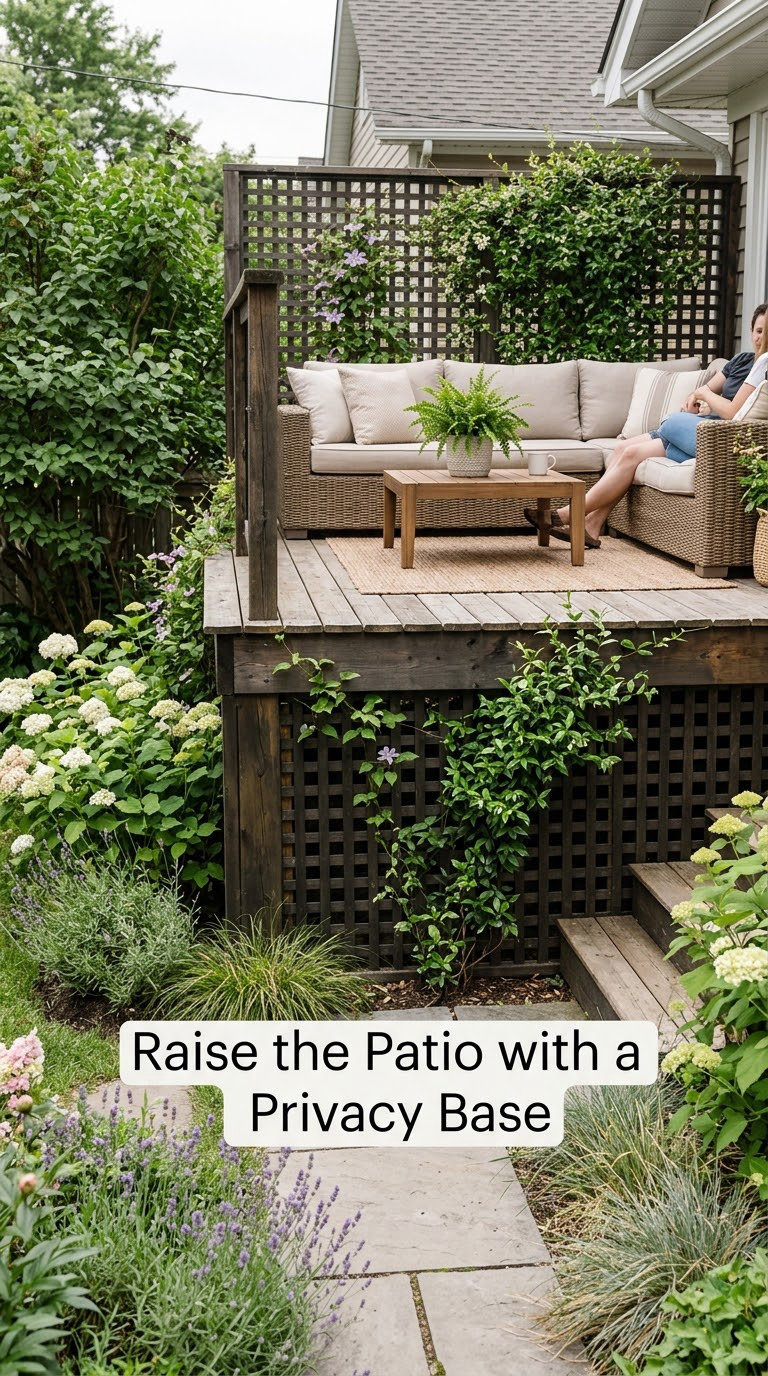
When the unwanted view comes from a neighbour standing on the ground, lifting the floor can work surprisingly well. You have to screen the space underneath, but the deck itself stays open and light.
How to do it: Sit at standing eye level on the neighbouring side and note exactly where their line of sight meets your deck. Screen that zone with a skirt, lattice, or slatted base at least 6 inches below deck level. Cut ventilation openings high enough that the crawl space does not trap moisture, and set the lattice on a base flashing so rain drains to soil rather than into the framing. Confirm the existing structure can take the extra load before anything else.
Cost: High. Difficulty: Hire a pro. Time: 1 to 2 weeks depending on the run.
Good to know: Lattice alone still lets shapes read through it, so add a dark backing behind the lower 12 inches. Elevation changes usually need a permit, and they are structural work, not a weekend job.
14. Arrange Planters as a Layered Privacy Border
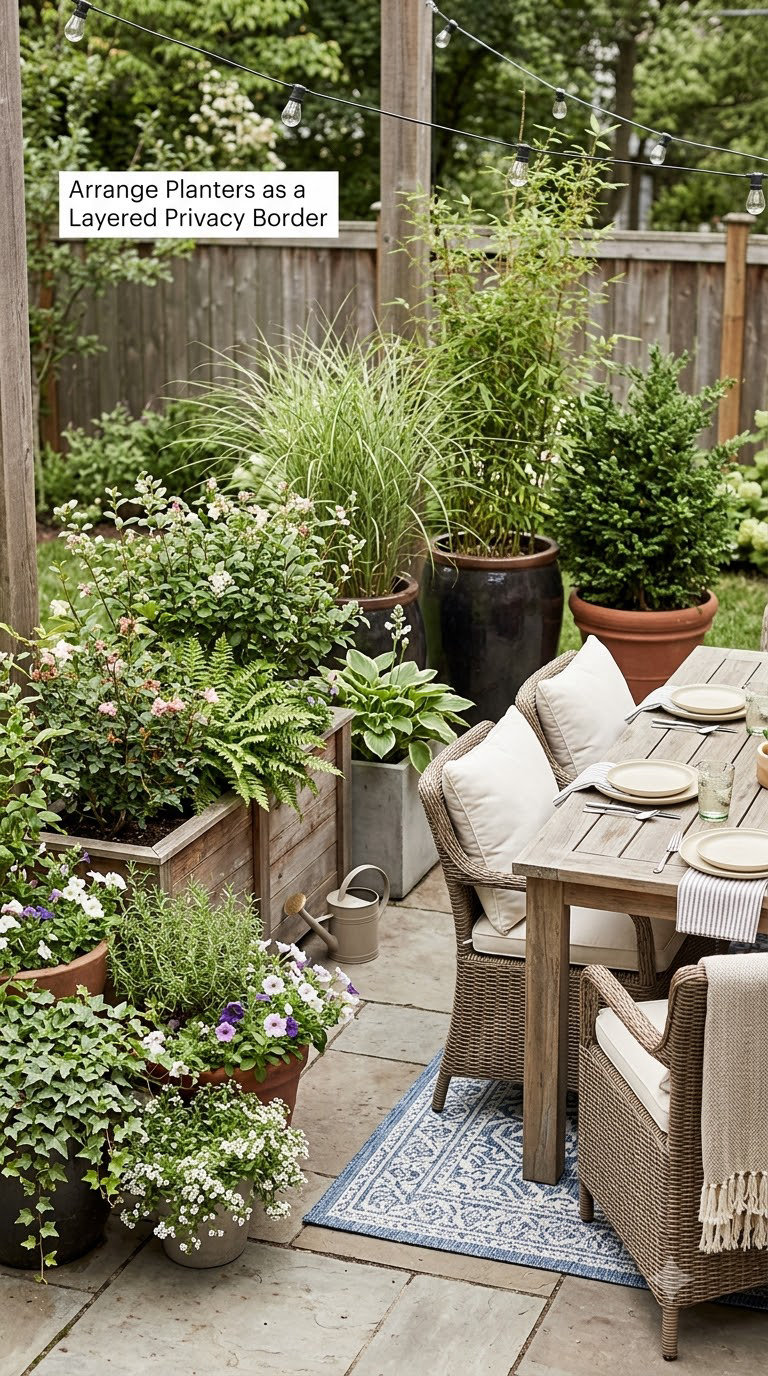
One row of identical pots looks like a pot row. Three staggered heights look designed, and they block more of the view because nothing lines up between the gaps.
How to do it: Work in bands: 12 inch pots at the front, 24 inch in the middle, and 36 inch or tall grasses behind. Offset each pot by half its width so you never get a straight sightline. Keep drainage holes clear and use a mix of evergreen shrubs for year-round screening and grasses for movement. Add a drip line on a timer so the back row is not forgotten in August.
Cost: Low to moderate. Difficulty: Easy to moderate DIY. Time: One weekend to arrange, then seasonal upkeep.
Good to know: Leave one deliberate gap where the view is good, such as a garden or a sunset. A fully closed border can make a small patio feel like a pit.
15. Add a Slatted Metal Fence
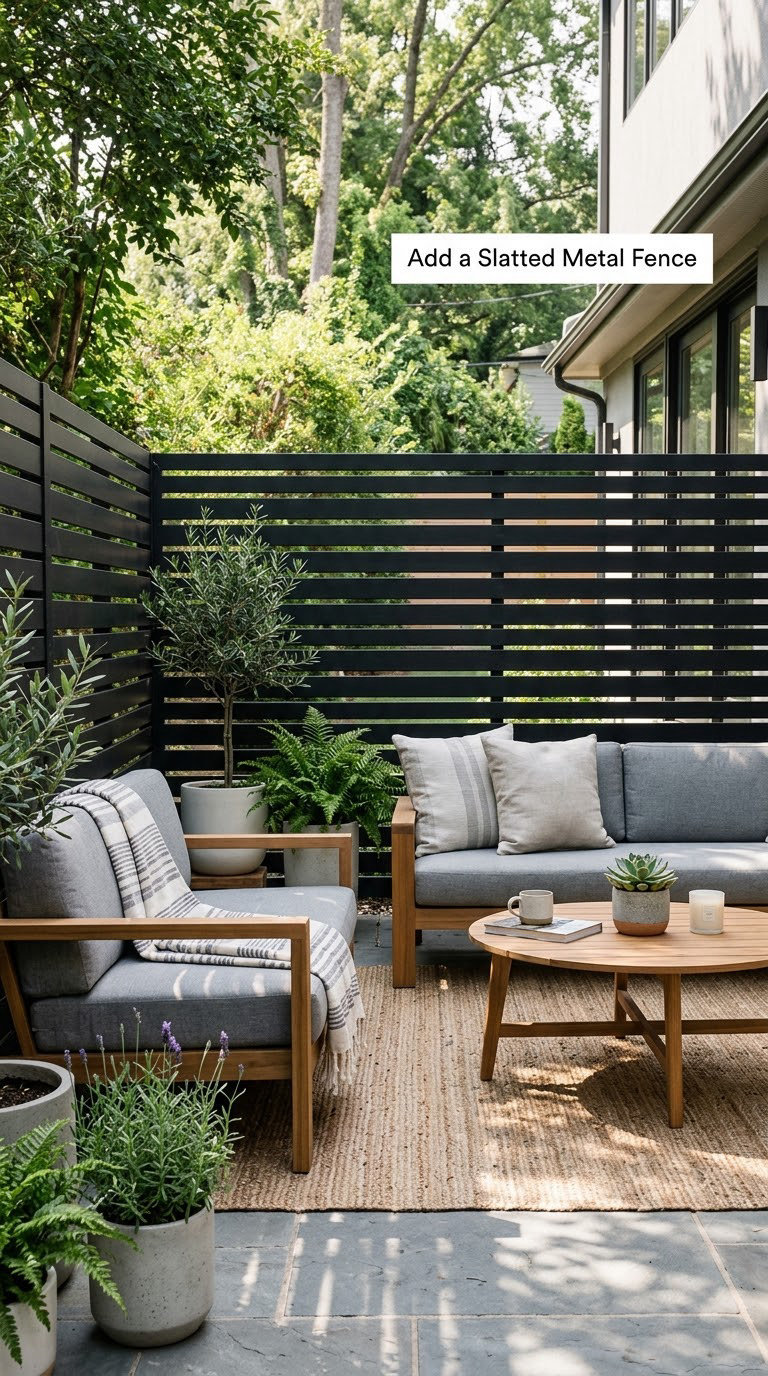
Slatted metal gives real, year-round privacy with an open profile, and it needs almost no maintenance. This is the durable answer if you plan to stay.
How to do it: Pick a panel system rated for your wind exposure, and check that it is powder-coated rather than just painted. Set posts no more than 6 feet apart in concrete footings dug below the frost line, usually 24 to 30 inches deep. Leave small gaps between panels for drainage and wind relief, and use galvanised or stainless fasteners throughout. A permit commonly applies, so check local rules before the first post goes in.
Cost: High. Difficulty: Hire a pro. Time: 1 to 2 weeks.
Good to know: Slats angled upward block a standing neighbour’s view while letting a low evening sun through. Wind passes through the gaps, which is why these fence better than solid panels.
16. Use Hanging Outdoor Panels
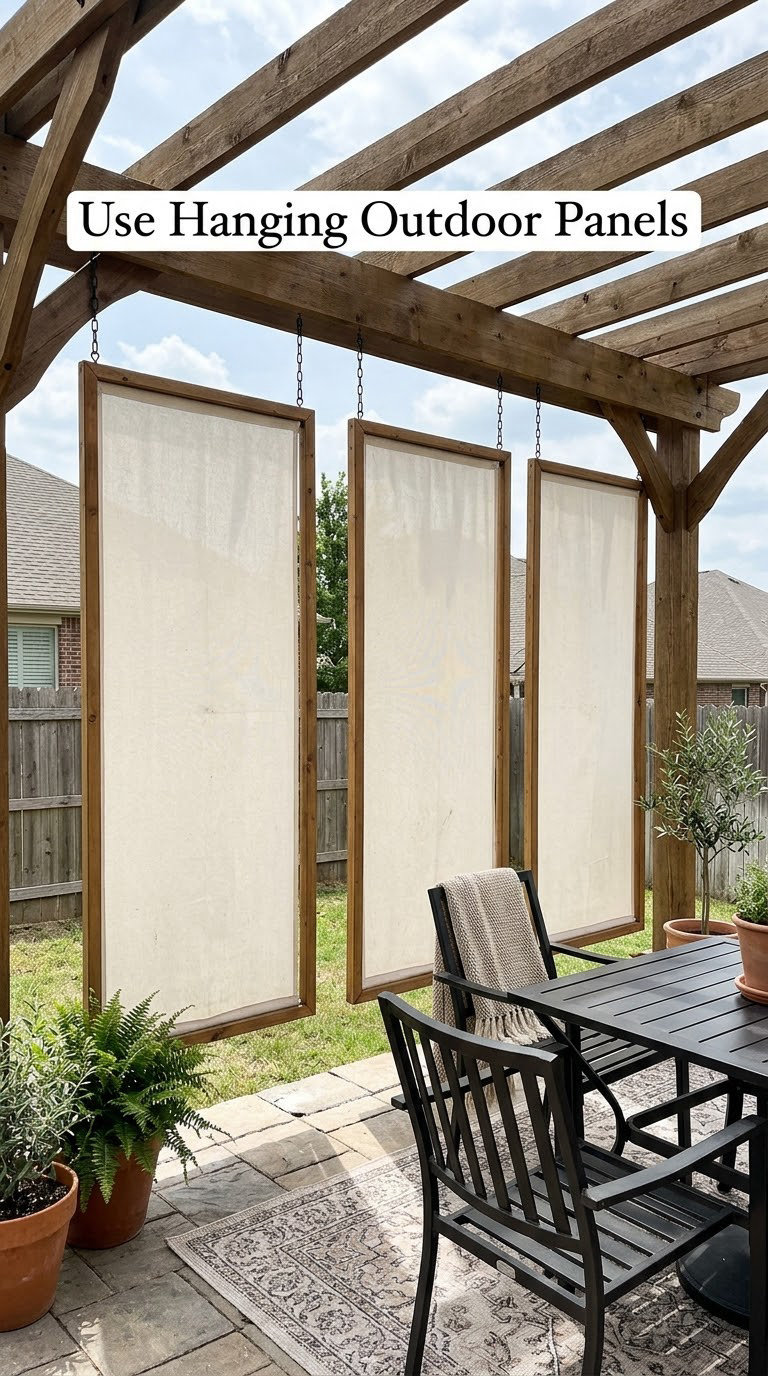
Suspended panels give you a screen that can come down after one busy season. They are also the easiest way to screen a patio you rent.
How to do it: Build a shallow frame from cedar strips, stretch UV-resistant canvas inside it, and staple the canvas every 4 inches. Hang the panels from a beam or wire with reinforced hanging points and stainless hooks rated for the weight. Space them at least 2 inches apart so air moves between panels, and that gap is also what keeps the wind load down. Take them down before storms rather than fighting a bent frame afterwards.
Cost: Low to moderate. Difficulty: Moderate DIY. Time: One weekend.
Good to know: One continuous sheet of fabric across the whole pergola behaves like a sail. Separate panels with gaps are the difference between a screen that lasts and one that does not.
17. Build a Reeded Glass Privacy Windbreak
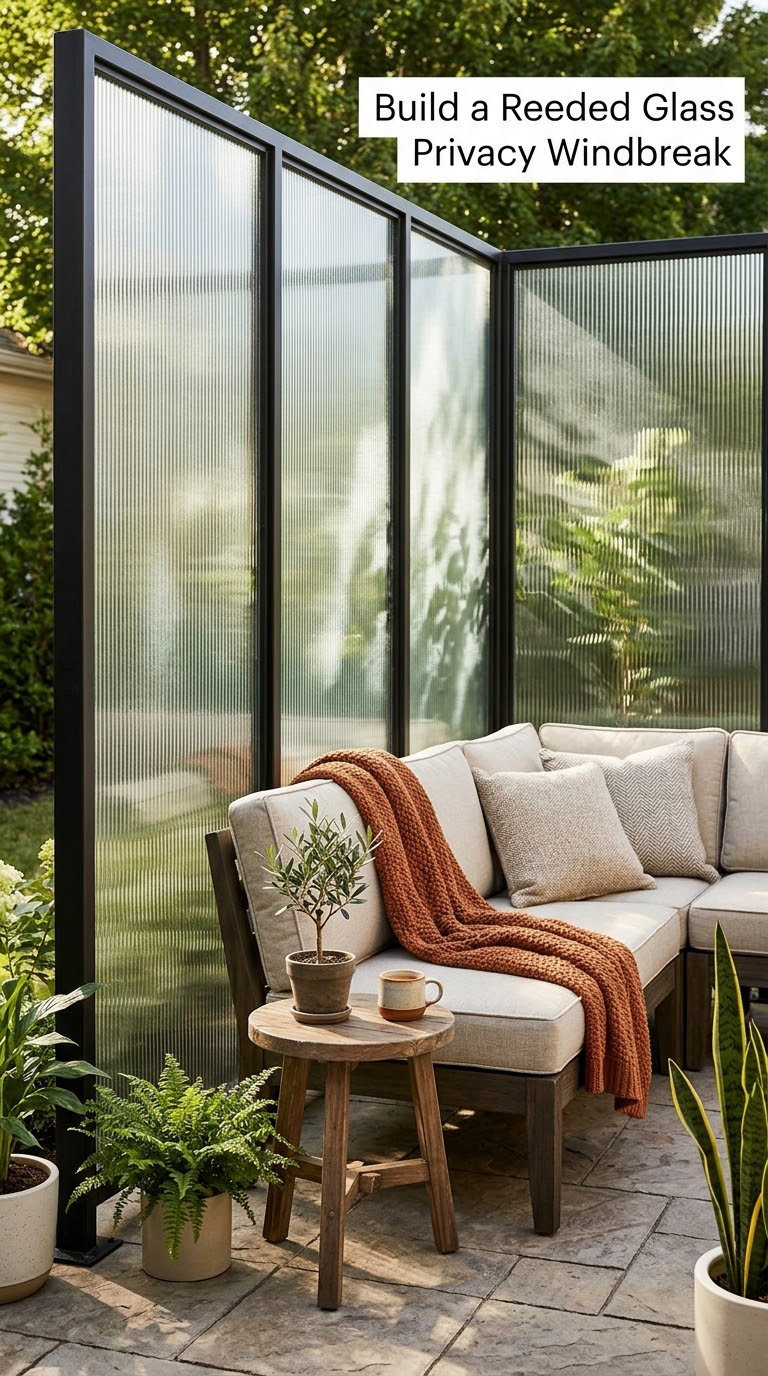
Reeded glass hides what is behind it by bending light rather than blocking it. You get privacy and daylight at the same time, which almost nothing else on this list does.
How to do it: Use tempered fluted or reeded glass, never annealed, in an aluminium or galvanised frame. Seat the frame in a base channel with a 1/2 inch drainage gap so water does not pool against the glass. Fix the frame to posts set in concrete, and have a glass shop or glazier handle the tempered panels, since they cannot be cut on site. Expect to need a permit for anything over 4 feet tall.
Cost: High. Difficulty: Hire a pro. Time: 1 to 2 weeks including glass templating.
Good to know: Reeded glass shows fingerprints and dust patterns quickly, and it is not fully private from someone standing right beside it. Wind exposure is the real constraint, so check the panel spec before you commit.
18. Add a Hedge-Style Outdoor Planter Divider
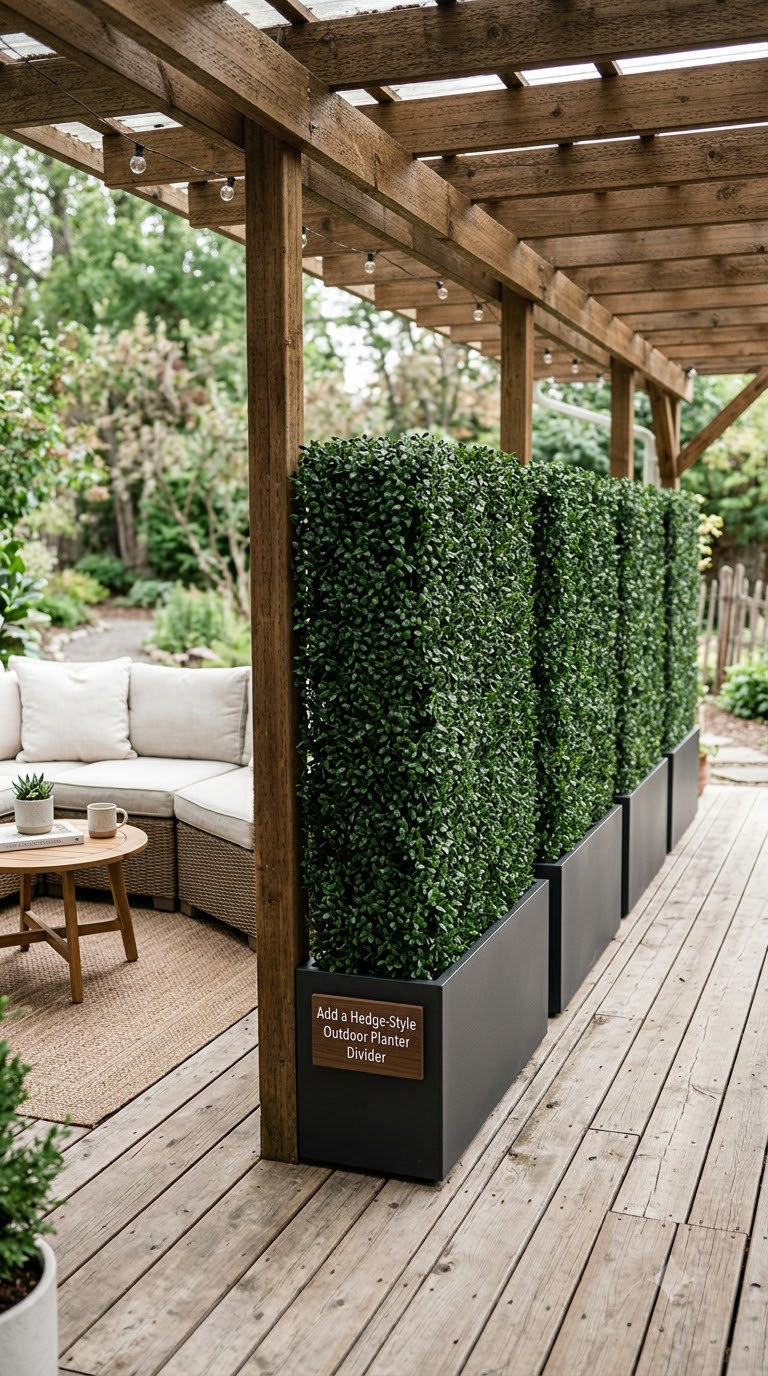
Artificial hedge panels deliver screening the day you buy them, which no living plant can do. In a shaded patio that gets little sun, that is often the only option.
How to do it: Choose panels rated for outdoor use with UV-stabilised foliage, and check that the base is wired rather than glued to foam. Drop each panel into a long planter with a few inches of ballast in the bottom for weight. Attach the panels to a built-in base or a rigid frame so wind cannot catch an edge. Mix in one or two live plants at the ends so the row does not read as artificial.
Cost: Low. Difficulty: Easy DIY. Time: An afternoon.
Good to know: Cheap polyester foliage fades within a single season in full sun. Skip it if the patio is south-facing, or accept a replacement every year or two.
19. Use Outdoor Acoustic Panels as a Privacy Screen
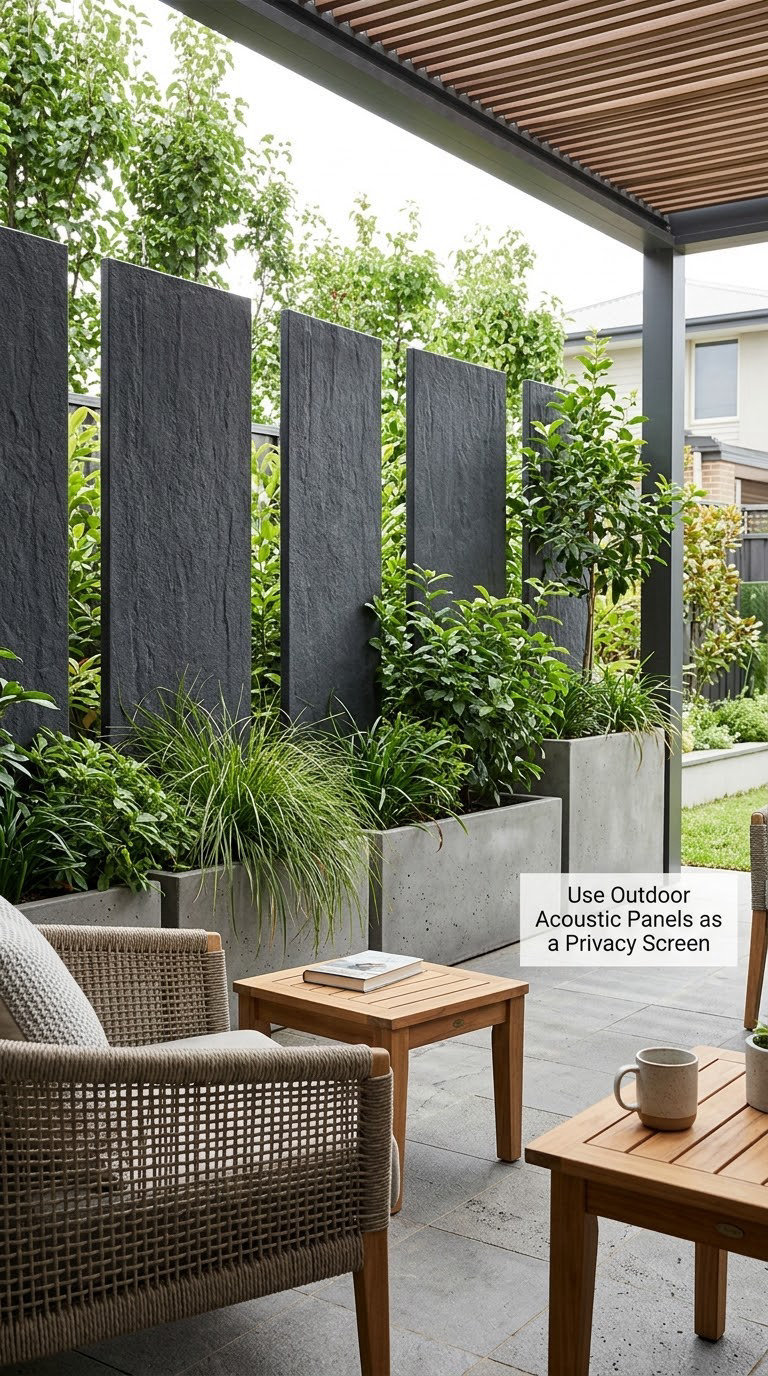
Acoustic panels handle sound as well as sightlines, which matters on a patio near a street, a play area, or a neighbour’s deck. Visual privacy is the bonus, not the main job.
How to do it: Buy panels rated for exterior use, since standard studio foam disintegrates in sun and rain. Mount them to a treated frame on the back of large planters so the frame carries the load rather than the panels. Leave a 2 inch gap behind for drainage and airflow, and slope the top so water runs off. Keep finishes fire-safe, and treat any wiring for lighting as electrical work for a licensed electrician.
Cost: Moderate to high. Difficulty: Moderate DIY, hire a pro for anything electrical. Time: One weekend.
Good to know: Panels tall enough to block sound are rarely tall enough to block a standing view, so pair them with a low screen. The same layered approach works for hiding a storage nook, whether outdoor or a food storage room indoors.
20. Create Privacy with a Covered Outdoor Room
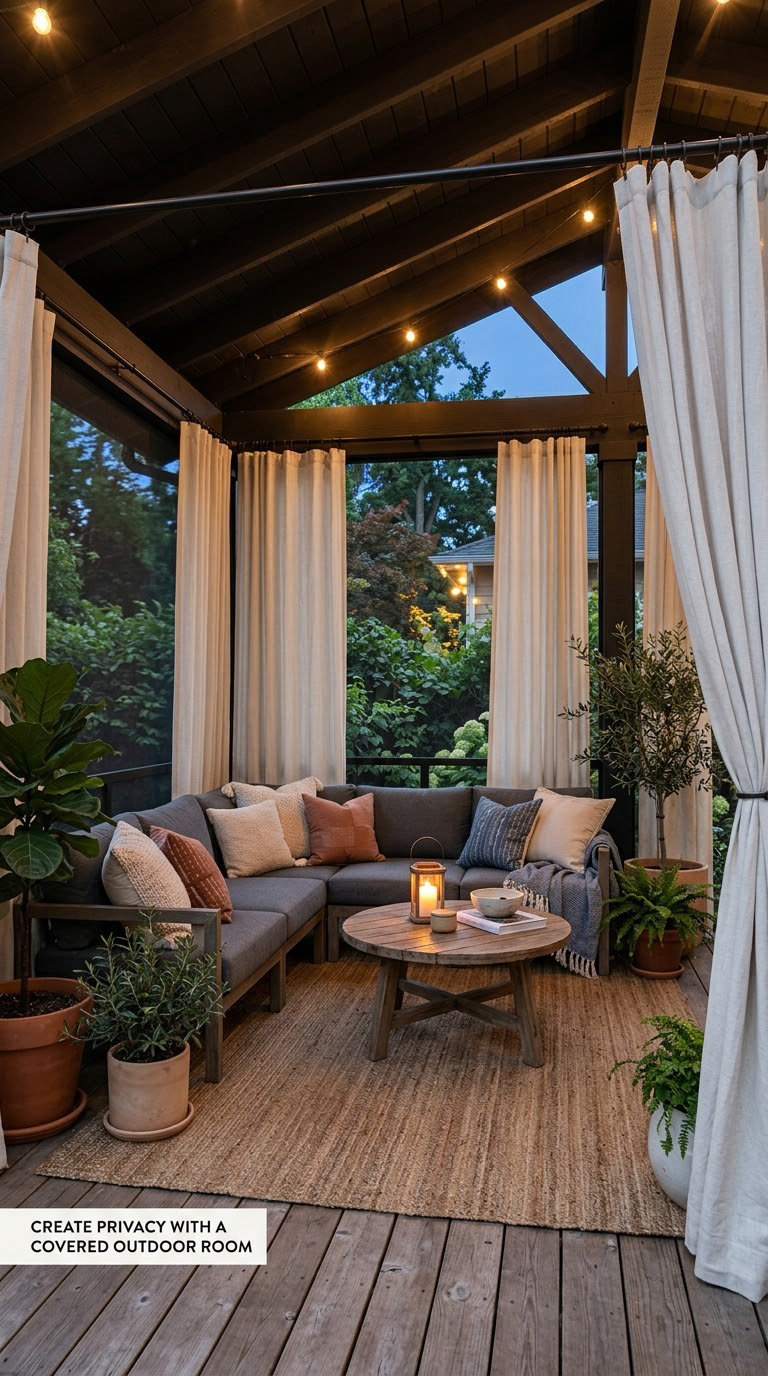
A covered outdoor room is the most complete answer on the list. Roof extension, side screens, and curtains together block horizontal views, overhead views, and weather in one structure.
How to do it: Plan the roof pitch and drainage first, since water needs a defined path away from the house. Specify a deep overhang, two side screens, and curtain track on the third side so the room can open up on good days. Confirm ventilation so the space does not become an oven in July, and get permits for the roof, any electrical, and the footings before construction starts. Use a licensed contractor for the structure and for any wiring.
Cost: Highest. Difficulty: Hire a pro. Time: 3 to 8 weeks depending on the size and the site.
Good to know: It is the only idea here that adds real value to a home, and also the only one that needs a permit in most places. Get the drawings approved before you spend money on materials.
Planning Tips
- Map the sightline first. Sit where the view comes from and note exactly where their eye level meets your patio. One 8 foot panel aimed correctly beats a fence run along the whole lot.
- Measure openings, not the patio. Screens only work at the gap they are covering, so add 6 inches of overlap per side. For a roller blind or Roman shade, measure the opening plus 2 inches each side for the same reason.
- Match the material to your wind and sun. Solid fabric and solid metal are the two wind-sensitive options. Fabric needs tiebacks and gaps between panels; metal needs a footing below the frost line and a wind rating.
- Keep air and water moving. Leave a 2 to 3 inch gap behind panels, keep drainage gaps at the base, and never seal a screen flush to the house. Trapped moisture is what kills wood screens in their second year.
- Check the rules before the first post. Backyard fences are commonly capped around 6 feet and front-yard ones around 4 feet in many US jurisdictions, and HOA covenants can be stricter. Freestanding screens and planters usually fall outside fence rules but still cannot block an egress path.
- Layer instead of overbuilding. A low fence with tall planters behind it, plus a curtain on the beam, screens more angles than one expensive solid run, and you can add the second layer a season later.
Frequently Asked Questions
What is the cheapest way to add privacy to a patio?
The cheapest fix is usually a freestanding panel rather than a fence run. A framed bamboo panel or a slatted screen made from leftover fence boards blocks one specific view for a fraction of a full fence run, and it needs no footings. If you already have a fence, rolled bamboo tacked over it is less work still.
Can renters create more patio privacy without permanent installation?
Yes, and most of the ideas in this list are renter-friendly if you use weighted planters instead of ground anchors. Freestanding screens, tall potted evergreens, layered curtains on a tension rod, artificial hedge panels in planters, and hanging canvas panels all come down or move with you. Check your lease for any rule against attaching to railings first.
Which outdoor privacy screens hold up best in wind?
Slatted metal and well-braced wood frames handle wind best, because air passes through the gaps. Solid panels and full-width fabric act like sails and need anchors, spacing, or tiebacks to survive a gust. Whatever you choose, anchor a freestanding screen or weight the base of every tall planter, since most screen failures are tip-overs rather than the panel breaking.
Do I need a permit to install a privacy fence or patio screen?
It depends on your lot and your local code. A privacy fence is usually treated as a structure, so anything over the local height limit, often 6 feet in backyards and 4 feet in front yards, needs a permit. Freestanding planters and curtains on your own patio generally do not, but a covered structure or any electrical work almost always does. Check with your building department before you dig.
How can I add privacy to a small patio without making it feel enclosed?
Screen one side instead of all of them, and keep the bottom 12 inches open so the space still reads as connected to the garden. Lattice panels, slatted screens, and a pergola with curtains block a view while letting light through. Reeded glass gives privacy and daylight at once, and a row of tall grasses softens any hard edge without closing the room in.
Conclusion
These twenty ideas fall into three price bands: planters and fabric at the low end, wood screens and trellises in the middle, and glass, metal, and covered structures at the top. Most patios need only one of them.
Start by finding the one sightline that bothers you, then measure that opening rather than the whole patio. Note the sun and wind on that edge, check what your local rules and lease allow, and start with the simplest option that covers the gap. A second layer can always go up next season.
